

This post is part of a Linux Security Blog Series. [View the full series here.]
Introduction
Before you start patching kernels or configuring firewalls, Linux hardening begins at the user level. Accounts, groups, logins, shells, passwords, and authentication policies are the foundation of system security. If attackers can slip in through weak credentials or forgotten accounts, it won’t matter how well you locked down file permissions or tuned PAM modules.
In this post, I walk through the core components of user environment security, based on my lab work in CentOS. I’ve worked directly with config files, observed system behavior, and tested account controls in my home lab to understand how they function in practice. This post assumes: you’re already beyond a beginner level with Linux and can do fundamental things like navigate around directories, use vi/nano to edit, filter your results with grep and generally use man pages to troubleshoot.
What You’ll Learn About:
- The structure and purpose of
/etc/passwd,/etc/group, and/etc/shadow - Strengthening default password policies
- Properly disabling or locking dormant user accounts
- Using UID and GID assignments to maintain role boundaries
- Applying resource limits with
ulimitand understanding why they matter - Implementing lockout measures after multiple failed login attempts
- Safely restricting root and SSH access
- Monitoring login activity and user sessions
- A walkthrough of the commands I used, with screenshots where relevant
User-level security is where integrity begins. It’s not just about creating accounts, it’s about managing them responsibly over time. If you’re preparing for RHCSA or just want a more secure Linux box, this post is packed with practical steps you can apply in your own environment.
Let’s get started.
Boots on the Ground
The best place to start this all off is in the /etc/passwd file that contains all of the user accounts in the system. The /etc/ directory holds nearly all the major configuration files for the Linux system: account details, authentication, system services, startup behavior and more. One could argue that this is the most important directory in the whole system from a security perspective. This is where it all goes right or all goes terribly wrong. With sudo privileges all of the system config files are editable and customizable to your liking (or a malicious actor’s if they have access).
Each one of the rows in the /etc/passwd file gives details for each account that look like this:
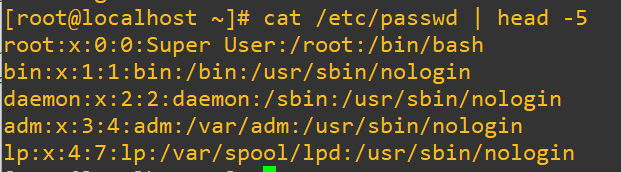
Each of the entries are organized as:
username : password : userid : groupid : user information : home directory : default shellThe password isn’t going to be available to see and appears as simply an ‘x’ (more about that later), and we can see in the list that some of the default shells aren’t actually bash. This is because several of the accounts cannot actually be logged into, you’ll know right away as their shell will be listed, as above, as /usr/sbin/nologin. If we have a look through the /etc/passwd file we’ll find that there are actually three more different shells.
We can filter the results with grep and also exclude the bash and nologin options using:
egrep -v "bash|nologin" /etc/passwd
The /bin/sync user is used to sync two or more machines together. The shutdown user is used to, yes, you guessed it, shut down the machine. As a little experiment you can actually log into the shutdown user. It spawns the shell at /sbin/shutdown and will kill the whole machine (be careful). The halt user will halt the machine. As a hypothetical scenario, perhaps you had an emergency where you couldn’t login in as root for some reason but needed to halt/shutdown the machine, then you could also log in as one of these users.
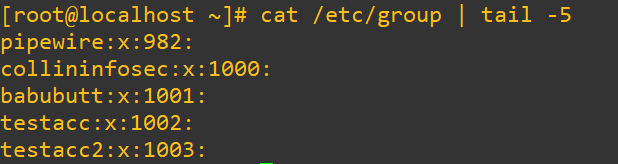
A few notes worth knowing about /etc/group:
- user accounts cannot be created without a group
- each user belongs to at least one group and multiple users can belong to one single group (a many-to-many relationship like in relational databases)
- passwords here also are listed as ‘x’ and are handled by
/etc/gshadow - in production, group names should reflect what that user actually can and should be doing on the system
- access to certain areas of the filesystem and binaries is much easier to organize with careful planning and implementation of groups
- the group file syntax per line looks like:
group_name : group_password : group_ID : user_listgroup_name-> The name of the group (e.g., wheel, developers, admins)group_password-> Usually x, meaning password info is stored separately in /etc/gshadowgroup_ID(GID) -> A numeric value that uniquely identifies the groupuser_list-> A comma-separated list of users who belong to this group (can be empty)
Password Quality and Storage
TL;DR: The /etc/shadow file stores user password hashes and policy details like min/max age, warnings, and expiration. Strong password storage starts with secure hashing (like Yescrypt) and well-defined aging rules. Use chage for per-user policy, /etc/login.defs for global expiration settings, /etc/pam.d/system-auth for authentication rules, and /etc/security/pwquality.conf for complexity requirements. Always back up configs before edits. Weak password controls are one of the fastest ways to turn a minor breach into a total compromise.
The /etc/shadow file is a crucial configuration file that includes hashed passwords, how they’re encrypted and details about password policies for each user. Here’s how a single user line looks if we cat /etc/shadow on the file:

At first this looks like a mess that is hard to focus on, but each section carries relevant information to securing your linux machine. Here’s how it breaks down between each colon separation:
username : encrypted_password : last_change : min_age : max_age : warn : inactive : expire : reservedusername-> Account name that must match an entry of/etc/passwdencrypted_password-> User’s password stored as a hash, will appear as ‘!’ if it’s disabled or not setlast_change-> How many days since January 1st, 1970 when the password was last changedmin_change-> Minimum days required between password changesmax_change-> Maximum days that the password stays valid before it must be changedwarn-> How many days before the password expiration that the user will get warned about needing to change their passwordinactive-> Number of days after password expiration before the account becomes disabledexpire-> The date since when the account is permanently disabled (since January 1st, 1970)reserved-> Not currently used, but is reserved for future extensions or compatibility
An important part to look at in the entries of /etc/shadow is the actual password-hashing algorithm that was used. On my CentOS box the default used is called Yescrypt. If you have a look at the above screenshot you’ll see $y$j9T$. What this means in plain English is, “Encrypt this password using the the Yescrypt algorithm and use the j, 9 and T parameters to make it harder to crack”. I’m not going to dig into the depths of password storage theory here, but it’s a very valuable concept to explore if you’re interested in cybersecurity. Here is a thoroughly in-depth link from OWASP on the topic of safe password storage.
When it comes to password safety, it should always be a security control of an organization to design and implement rules (and to abide by the legal regulations that demand compliance) about how long passwords can be used before changes, inactive days etc. Your mileage will vary, but this point cannot be stressed enough: mediocre password controls are one of the easiest ways to neglectfully take your production environment from an initial breach to potentially having severely damaged systems, damaged reputations and possibly even the entire business being destroyed.
Before we get into how to modify password policies, we’ll talk briefly about adding and removing users and groups. It’s a pretty straightforward process and including:
useraddanduserdel-> adding and deleting new usersgroupaddandgroupdel-> adding and deleting new groupspasswd-> changing password information for usersusermod-> changing userid, locking users, moving home directory, changing their shell
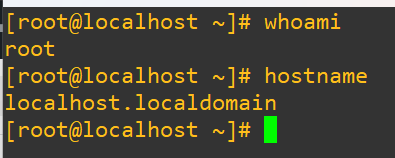
Before making any changes to users it’s a best practice to always issue a quick whoami and hostname to make damn sure you’re on the right machine and trying to do this with the right account in the first place.
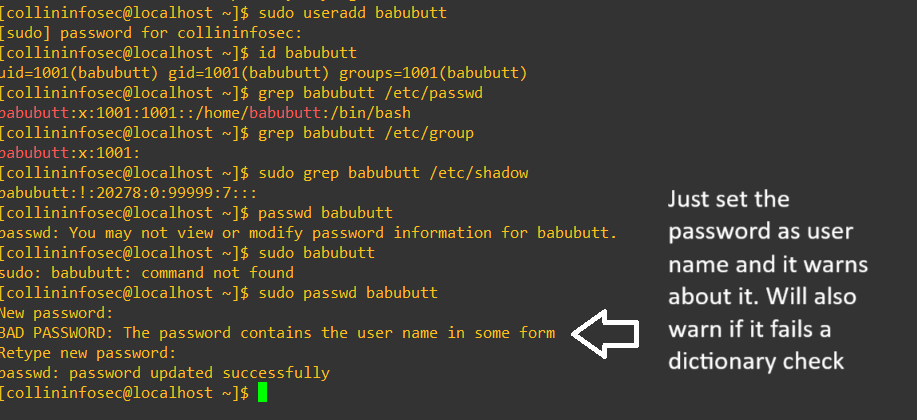
We’ll quickly add a new user to show what it looks like in the next screenshot. You’ll notice that once we run the id command it fires the new user into a group corresponding with the user’s name and and user id (1001). When it goes into the shadow file initially it doesn’t get assigned a password, indicated with the exclamation mark after we open up the shadow file. Just for the sake of ease I set the password as the username, and while this made it easy to play around in my lab bash also warns us that this is terrible, and it still allows us to do it.
After we set the password for the account with passwd we can see it set in the shadow file rather than the exclamation mark warning:

We’ve got an email ticket from our IT Manager, Jane:
From: Jane Morisson, IT Manager To: Collin, Security & Infrastructure Intern Subject: Temporary Password Policy for User babubutt

Hi Collin,

We’ve set up a temporary account for a legacy audit project. The user is babubutt, and it only needs access for a short period.

Please enforce the following password and account aging parameters:

Minimum password age: 5 days

Maximum password age: 90 days

Warning period before expiration: 10 days

Lock account 3 days after password expires

Permanently disable the account after 10 days

Let me know once this is applied and confirmed. We’re looking to keep temporary access airtight.

Thanks, Jane
Getting this done is pretty straightforward once the account is created. We’ll use the chage command to modify these values and then confirm the results again with a grep on the shadow file:
sudo chage -m 5 -M 90 -W 10 -I 3 -E 10 babubutt
sudo grep babubutt /etc/shadow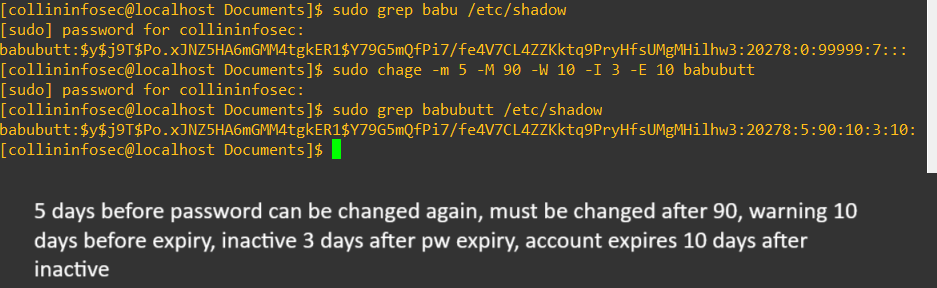
While chage is great for adjusting individual accounts, you wouldn’t want to repeat it manually for dozens of users. For consistent, large-scale enforcement, Linux provides several core configuration files that let you define global password aging, complexity rules, and login behavior.
Here are the three main files to know:
/etc/login.defs-> Controls global defaults for password expiration, warning period, UID/GID ranges, and more. It’s the primary place for settings likePASS_MAX_DAYS, PASS_MIN_DAYS,andPASS_WARN_AGE./etc/pam.d/system-auth-> This file governs PAM (Pluggable Authentication Module) behavior, including account lockout, authentication stacking, and integration with password hashing algorithms. It’s where you configure modules likepam_pwquality.soandpam_faillock.so./etc/security/pwquality.conf-> Handles password complexity rules. Think of it as the fine-tuning layer for requirements like minimum length, character diversity, and dictionary checks. These rules tie into PAM viapam_pwquality.
(!!!) Before making any changes to critical system configuration files always make a copy just in case we accidentally make potentially devastating changes to the system. The easy way to do this is to throw a copy into the temporary folder and name it something that makes it obvious that it’s the original file, such as appending .original onto the end. Consider also adding a date and/or time if you’re doing lots of edits and testing:

We’ll have a look at the /etc/login.defs file, but we’ll also use a little regex magic to only see lines that actually have commands, but looking at the entire file will give you details about what each line actually does explained within the comments:
egrep -v '^#|^$' /etc/login.defs^#excludes lines that start with a hash (comments)^$excludes empty lines-vtellsegrepto invert the match (hide lines matching the pattern)
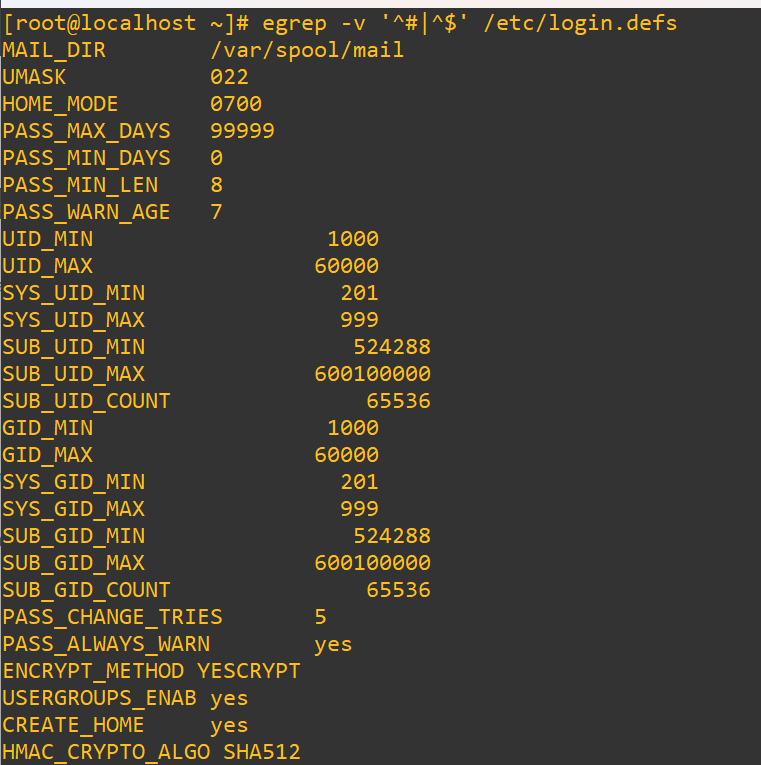
There’re a lot of settings you can modify, but these are three significant ones that are worth it to check on, especially if you’re doing an initial security audit of a system:
PASS_MIN_LEN-> sets the minimum number of characters required in a password. It helps block easily guessed or brute-forced passwords, and increasing it to 12 or 14 characters significantly strengthens defenses.PASS_MAX_DAYS-> controls how long a password remains valid. This setting enforces regular rotation, which limits the window of opportunity for stolen credentials to be used.PASS_WARN_AGE-> determines how many days before expiration a user is warned. This gives people time to update passwords before they expire and helps avoid accidental lockouts.
Next, we’ll update our minimum password length. You could certainly just open a root privileged nano or vi and edit it manually, or you could streamline it and issue a search and replace with the sed command in Linux:
sed -i 's/^PASS_MIN_LEN.*/PASS_MIN_LEN 14/' /etc/login.defs
Now, if you just wanted to see all the active password policy settings after the change we’ll use a similar command as earlier and then filter again with grep for only the password details that start with PASS_:
egrep -v '^#|^$' /etc/login.defs | grep PASS_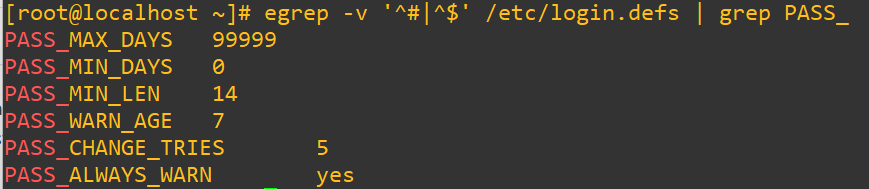
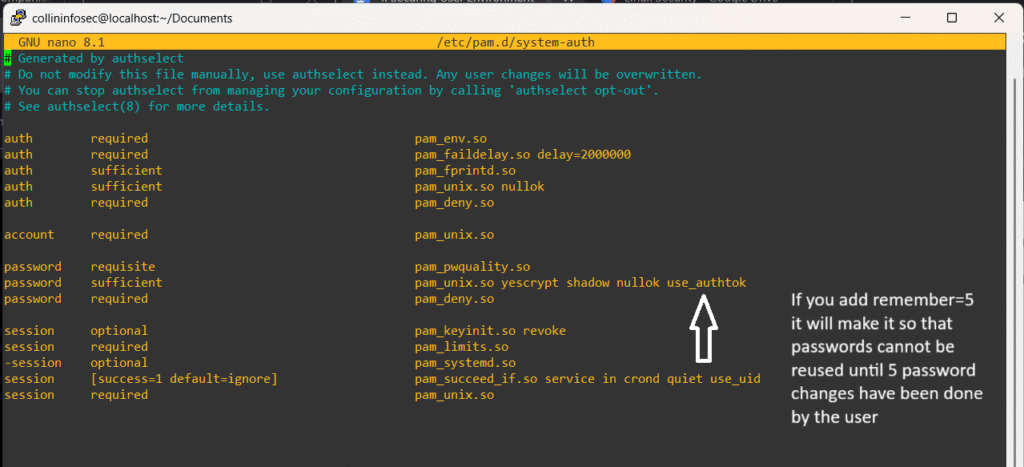
The /etc/pam.d/system-auth file controls how authentication works in Linux. It uses PAM (Pluggable Authentication Modules) to enforce password rules, lock accounts after failed attempts, and choose hashing methods like Yescrypt. You’ll see modules like:
pam_pwquality.so-> password complexitypam_faillock.so-> login attempt tracking
Most changes come from tools like authconfig or distro scripts, not manual edits. It’s a deep topic worth exploring that I will go into depth in a future blog post. Here’s how the file looks:
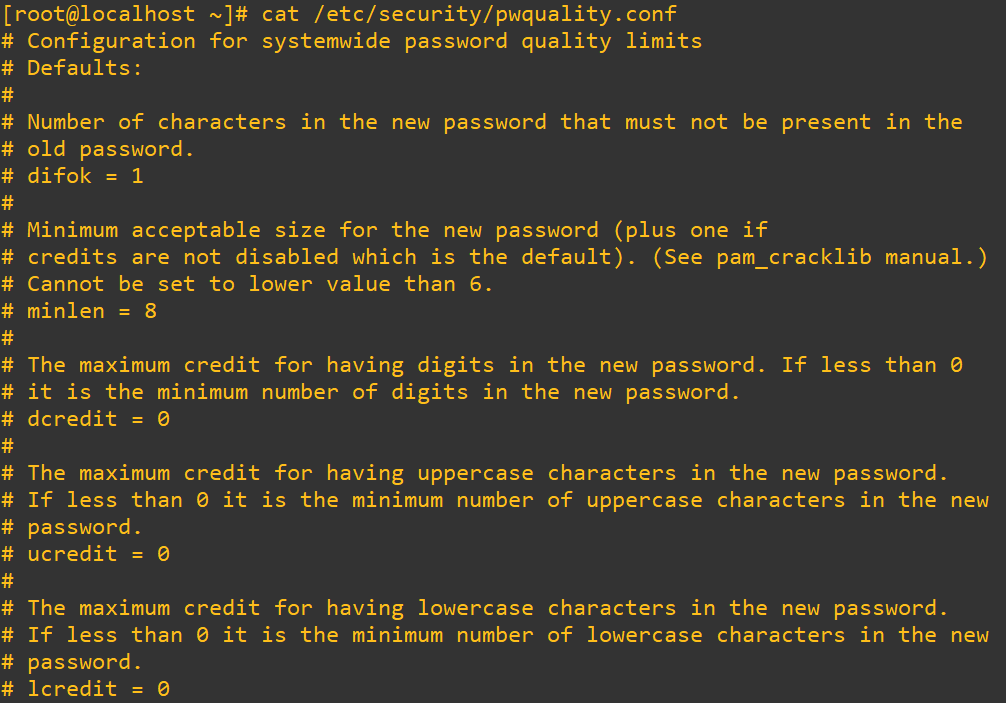
The /etc/security/pwquality.conf file sets the rules for how complex a password needs to be. It’s read by the pam_pwquality module, which enforces these requirements when users create or change their passwords.
Here are a few of the important parts to highlight:
minlen=14-> minimum number of characters in a passworddcredit=-1-> Requires at least one digitucredit=-1-> Requires at least one uppercase letterlcredit=-1-> Requires at least one lowercase letterocredit=-1-> Requires at least one special charactermaxrepeat=3-> Prevents more than three repeated characters in a rowmaxclassrepeat=4-> Limits repeating character types (like four digits in a row)
These settings make sure users can’t pick simple, dangerous passwords like password123 or qwerty! (which are broken in seconds by modern password cracking systems running on a decent computer), even if the system technically allows them elsewhere. You can tweak them to match internal policies or compliance standards.
This is what it looks like in the lab. By default on my CentOS 10, none of it is activated, it’s all commented out:
Locking Accounts and Automatic Inactivity Locks
TL;DR: Inactive accounts are a high-risk attack vector. Use /etc/default/useradd to set inactivity timeouts (e.g., 40 days) and lastlog to find dormant users. Lock accounts with usermod -L or disable shell access via /sbin/nologin for service accounts. The latter stops interactive logins but allows scheduled jobs to continue. Automating these checks and locks with scripts creates audit trails and prevents forgotten accounts from becoming entry points for attackers.
Locking and disabling accounts is an important component of security hygiene. Inactive accounts are a goldmine for malicious actors to establish an initial breach and/or maintain persistence on a system. Unused or inactive accounts often contain outdated permissions or weak credentials. This is like leaving a spare key under the doormat to your business.
The settings to modify this are found in /etc/default/useradd:
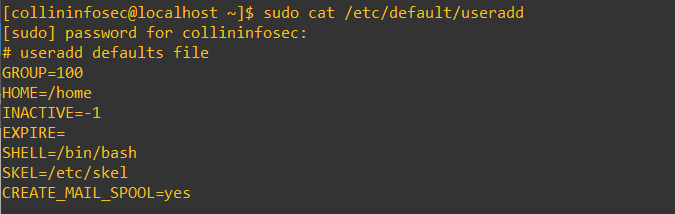
By default, my lab has this inactivity set to -1, meaning accounts never go inactive after password expiration. As a general security guideline, setting this to around 40 days helps ensure that dormant accounts aren’t quietly hanging around. It balances usability with security, especially for environments where user turnover or delayed password changes are common.
Hmm, it looks like we have another request from the manager. Time to make a coffee.
From: Jane Morrison, IT Manager To: Collin, Security & Infrastructure Intern Subject: Audit Inactive Accounts — 90-Day Window

Hi Collin,

As part of our quarterly security cleanup, I need you to identify all local user accounts that haven’t logged into the system in the past 90 days. We’ve had a few cases where dormant accounts slipped through and could have posed a risk if exploited.

Please locate those users and lock their accounts.

Thanks, Jane
First, we’ll find users who have logged in within the past 90 days and users who have never logged in at all using:
sudo lastlog -t 90
Because my lab environment isn’t that old, we’re going to do a workaround to create a user that will actually work for this demo and then simulate account inactivity (and also grab the user id after they’re made). Then, we’ll edit the /var/log/lastlog file to make this work. Be advised that this log file is actually a binary structure and not a plain text log. Be careful, if you misstep this could scramble login data across the system. Make a backup too:

If we open up that log file it looks like this, being pretty annoying to manually edit:

We’re going to do this with a python script for our sanity. First, we’ll build a directory for our admin scripts. Next, using your editor of choice input the script. Within the script we’ll:
- figure out how many seconds 91 days is and then subtract it from the current time
- then open up the log
- seek to where that correct position is
- write the fake time we need
Be sure you modify the uid to the correct user. In my case it’s 1004 as we obtained from earlier. Here is the full python script:
import struct, time

uid = 1004 # Our actual id of the workoutuser we created
fake_time = int(time.time()) - (91 * 86400) # 91 days ago, at 86400 sec per day
offset = uid * 292 # 292 because the records are 292 long bytes per user

with open("/var/log/lastlog", "r+b") as f: # Pop open the log file
    f.seek(offset) # Find the spot where the user's data sits
f.write(struct.pack("I", fake_time)) # Write our mock timestampAfter we enter the script from above, remember that it won’t have execute privileges, so change it over as well:
chmod +x lastloghack.py
chmod +x lastloghack.py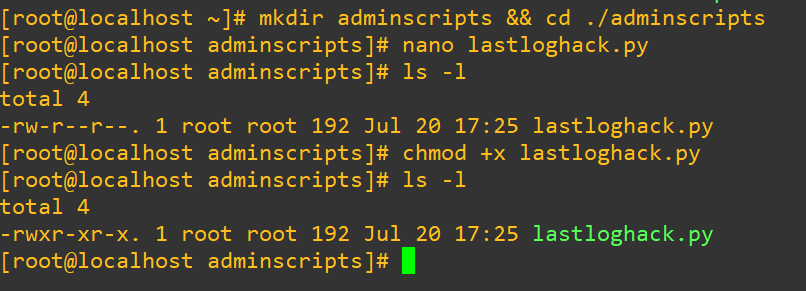
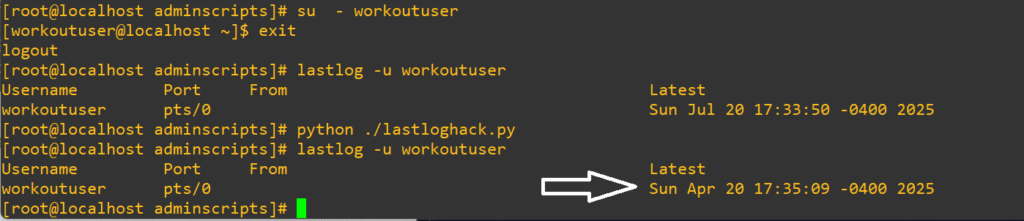
Now we’ll swap into that account to trigger a first login, run the script, then check to see if it’s actually pushed back as we expect:
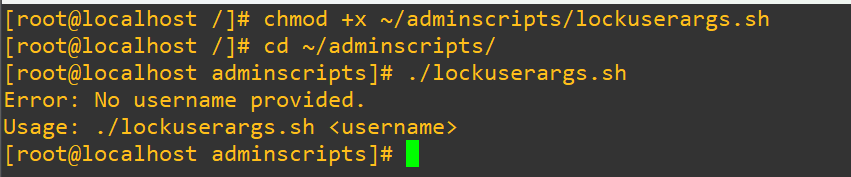
Great, now we can move forward. We’re going to use a bash script to do the locking and logging. The script will:
- do some error checking to ensure the user entered a value into the arguments
- grab the date
- attempt to lock the account
- report success or failure
- push that data into a logfile hardcoded as
~/inactive_accounts_report.log
As before, save and modify the script’s permissions as an executable script. Here is the bash script in its entirety:
#!/bin/bash

# Usage: ./lockuserargs.sh username

# Check for the username argument
if [ -z "$1" ]; then
    echo "Error: No username provided."
    echo "Usage: $0 <username>"
    exit 1
fi

user="$1"
timestamp=$(date + '%Y-%m-%d %H:%M:%S')
logfile=~/inactive_accounts_report.log

# Lock the account provided
if sudo usermod -L "$user"; then
    echo "Successfully locked account: $user"

    # Append entry to log file with timestamp
    echo "[$timestamp] Locked account: $user" >> "$logfile"
    echo "Log entry saved to: $logfile"
else
    echo "Failed to lock account: $user"
fiLet’s see if that error checking actually did anything when we provide no user at all:
First we’ll grep the shadow file to confirm it’s not locked (by the absence of an exclamation point at the start of the entry), pass the script our test user and then we’ll have a look at /etc/shadow/ to check if it’s actually locked:

Let’s see what the log looks like that it generated:

Remember earlier in the post how we saw the different shell options in /etc/passwd? Consider that it is possible to just change a user’s shell to /sbin/nologin. It’s a nuanced solution that takes into account that the user cannot start an interactive shell session, the system denies access if they log in via SSH or console and their account still exists (so, things like cronjobs or system services can still run under their account). It isn’t technically an actual lockout, just a stoppage of interactive login.
This kind of option is great for service accounts that shouldn’t have humans logging in anyways, such as an apache or nginx server or an account that runs automation. Sometimes, as a security precaution, you may desire to swap their shell for testing or staging environments or even creating layered security alongside other controls. Another niche use case is also that in some legacy environments using usermod -L may not behave predictably.
For a proof of concept, this is what it looks like in action:
- grab the shell information using
getent - unlock the user to undo our earlier script
- check that it’s unlocked from
/etc/shadow(looking for the absence of the exclamation point) - attempt a login
- swap the shell over to
/sbin/nologin - confirm that it worked again with
getentand attempt a shell login - reverse the changes made and attempt to login again
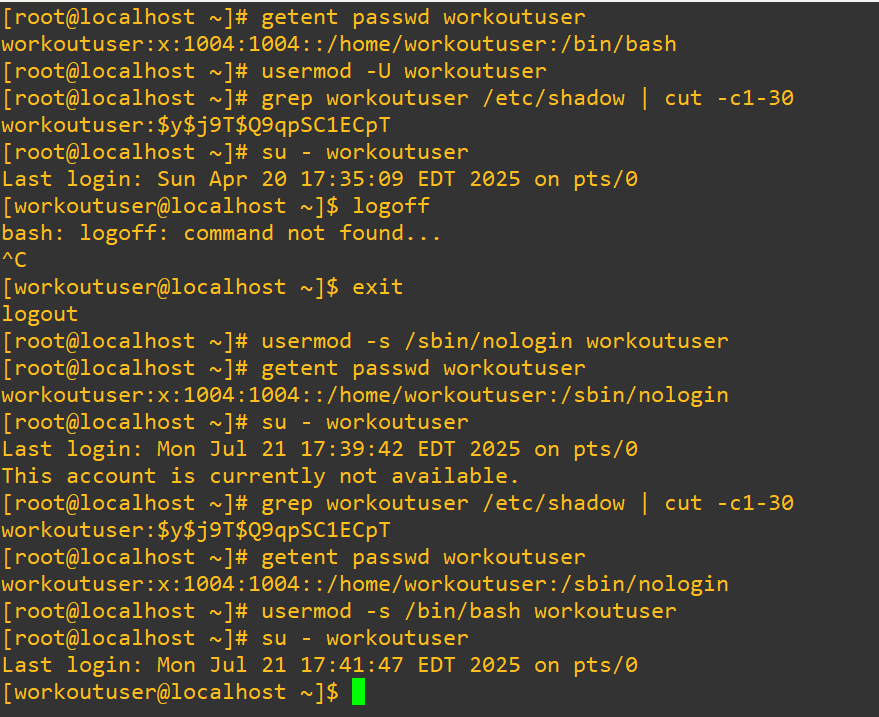
Notice that in the last call to /etc/shadow the account is not actually locked but we still cannot get in with a terminal. As a hypothetical security scenario, perhaps as an administrator doing an audit you notice repeated SSH logins to a service account like a database backup. You don’t want to disable the account and halt any cronjobs, instead you could also use this technique to issue surveillance on an account:
- Deny a user’s ability to log in from a shell
- Keep their services, scripts or whatever they typically run operating
- Obtain and audit a list of their attempts to get in
Controlling Failed Logins
TL;DR: Lock accounts for 15 minutes after 3 failed login attempts using pam_faillock.so to slow brute-force attacks and flag suspicious activity.
Security hardening doesn’t have to be dramatic. Here’s a subtle but powerful change that helps deter brute-force or casual misuse of user accounts. We’re going to configure account lockout using PAM (Pluggable Authentication Modules), so that accounts are temporarily frozen after three bad login attempts.
As always, before editing config files (especially PAM as it’s very touchy and one typo could lock everyone out of the system) make your backups and consider setting a snapshot in your VM as this is way easier than fixing a broken auth chain:

Have a look inside both of the files with your editor and insert the following lines before any pam_unix.so entries (I made this mistake in my screenshot below and it took quite a while to figure out where I went wrong):
auth      required        pam_faillock.so preauth silent deny=3 unlock_time=900
auth      [default=die]   pam_faillock.so authfail audit deny=3 unlock_time=900
account required pam_faillock.soThis will configure PAM to lock after 3 failed attempts and keep that account frozen for 15-minutes (900 seconds)

To check in on failed logins, simply pass their username to pam_faillock
pam_faillock --user usernameAnd to unlock the account or testing behavior, pass it the --reset flag
pam_faillock --user username --resetThis type of authentication control isn’t airtight, but adds a layer of defense and capacity to keep a close watch of accounts that may have a suspiciously high number of attempts that you could take further and investigate with a SIEM.
Root Access
TL;DR: Never allow direct root logins in production. Disable PermitRootLogin in sshd_config and use DenyUsers for targeted restrictions. Always operate through a sudo-enabled user to maintain audit trails and reduce risk.
Our next avenue is one of the most crucial areas of hardening a Linux system: restricting and controlling root access. Root can do everything and should always be closely monitored. Mistakes done as root have a huge blast radius, so to speak, and can accidentally cause catastrophic damage. Unrestricted root access is an unacceptable liability in production waiting to be exploited. The best practice is to restrict direct root access. You also need to have a clear paper trail of every privileged action that users take, enforcement of policies like sudo timeouts and command restrictions. In my lab, throughout this whole learning journey, I’m not going to do this to save myself writing sudo before every command, but in an enterprise deployment you absolutely don’t want to be logging in as root to do things. The risks do not outweigh the benefits.
Let’s try this out. Before we do anything else, make sure you have a regular account already that isn’t locked (confirm with checking /etc/shadow using steps previously shown in this post) and confirm it has sudo privileges. If you skip this step and proceed, you’ll get locked out of your system’s root access and will either have to roll back to an older VM snapshot or restart fresh. In a lot of distros the first user you make will automatically be added to the wheel or sudo group. Confirm this with:groups username
The user collininfosec was the first user I created and was put into wheel:

Make a backup of /etc/ssh/sshd_config. Change the field #PermitRootLogin from yes to no. Save the file and restart the ssh daemon using:
systemctl restart sshd 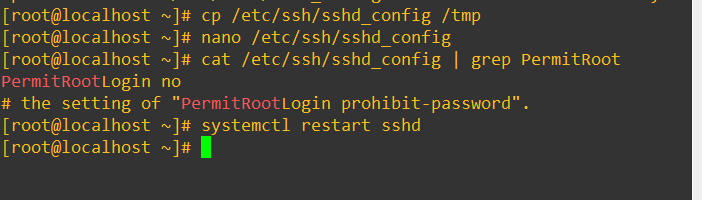

Now, we’ll fire open a new terminal session from PuTTY and attempt to get in as root:
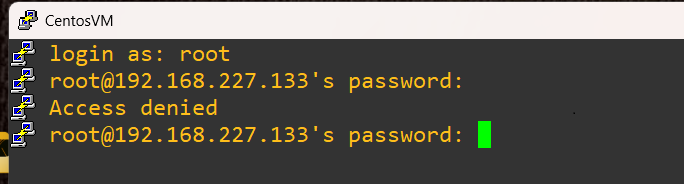
As a note, on my copy of CentOS 10 I had to also change an extra file made by the Anaconda installer that was in /etc/ssh/sshd_config.d/01-permitrootlogin to get this to work.
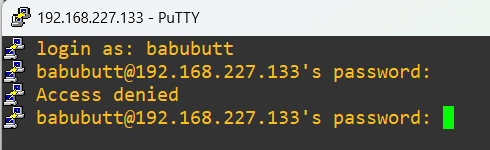
To expand on this idea of controlling authentication access, you may need or want to entirely disable SSH access for specific users. This is straightforward and done by editing /etc/ssh/sshd_config and modifying or adding DenyUsers username (it’s possible that this line won’t exist already, remember you can type /Deny in vi to quick search for this line) and then restart the ssh daemon again:
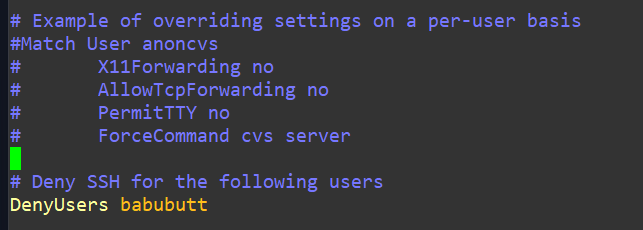
Logging in as that user will fail if all went well:
You may also have to modify the an extra file in the ssh_config.d directory, similar to how I mentioned it earlier:

Managing Resources
TL;DR: Use ulimit and /etc/security/limits.conf to cap user resources and prevent runaway processes from overwhelming your system. Test limits with controlled stress scripts and verify enforcement with process counts.
Picture this. Someone writes a bash script with a loop designed to process files or spin up tasks. Something goes sideways. Maybe they forgot to add a sleep timer, or the exit condition is missing entirely. Suddenly, the system is drowning in child processes. If it keeps going unchecked, it can take down the whole box. This is exactly where ulimit earns its stripes.
ulimit is a shell command that lets you define resource limits for a user session. These limits help contain runaway scripts, prevent brute-force behavior, and enforce system-wide discipline. They can be applied globally or tailored to individual users and groups. We’ve got two main types of limits we can set:
- Soft Limits -> These are the default settings for a user. They can be adjusted upward temporarily during a session using the
ulimitcommand. - Hard Limits -> These are the maximum caps set by the system. Regular users cannot exceed them. Only administrators can adjust them.
If you’re logged in as a root or sudo privileged user, you can do a soft switch to the user with
su testaccKeep in mind that you’re only taking on the user’s identity but not loading their full environment, you’ll know you did this right when you still see that sudo privileged user on the right like so:

If you issue a full:
su - testaccYou’ll end up loading that user’s full environment, starting a new PAM session, loading their .bash_profile and .profile. One way to think of the difference is that the former option is like borrowing another worker’s nametag and the latter is like sitting right down at their desk and using their work equipment. If you’re trying to troubleshoot or test what breaks when certain env variables or limits aren’t applied, su testacc gives you a stripped-down shell to play in. Consider also that starting a full login shell could invoke extra processes, dotfiles or load more variables (this may not matter, but you may also want it clean and lean.)
Here’s a quick look at the ulimit -a for my testacc:
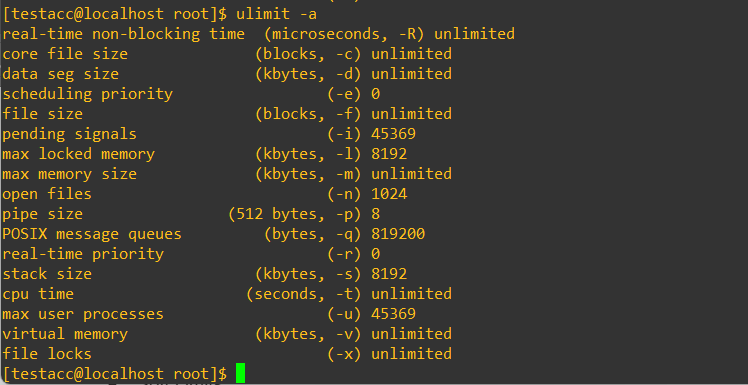
See the 45369 near the bottom? Yikes. That’s a lot of potential processes and could get out of hand very quickly. As the command output shows, we can change that easily with the -u flag:
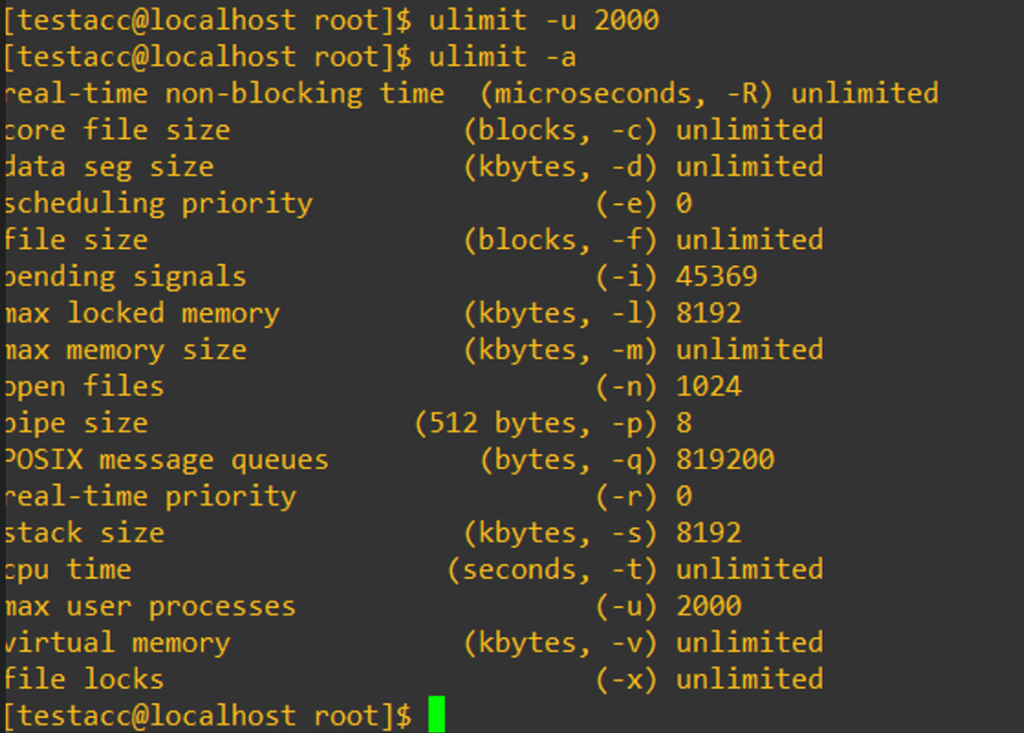
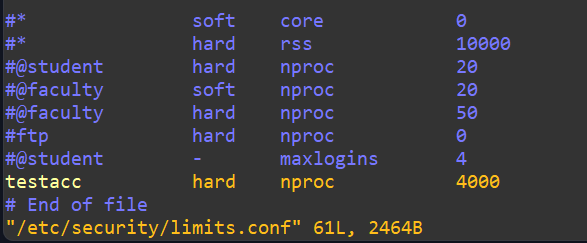
So, we’ve capped this user at 2000 processes, but it’s only active for this session and won’t be saved. You might find a use case to do it this for testing, but more typically you’d want to make permanent changes to ulimit found within /etc/security/limits.conf. Make a backup and edit it. Scroll past all of the comments to the bottom and add the following:
We’re on our way to locking down resources, but how do we actually know that this worked? Let’s try to break the control with a script similar to what I mentioned earlier about a faulty loop scenario. Here’s a breakdown of the goals:
- declare that we’ll be saving our logs of this test into
/tmp/nproc_stress_test.log - check if a username was actually entered as an argument
- check if that username provided actually is a username by calling the
idbinary on that username and then redirect any error messages into the abyss void of/dev/null - pull the
nprocsoft limit and hard limit for the user, push it to the console and also write it to the log file - next we start running our loop to see how many
sleep 1000commands we can issue to that user - the loop will automatically quit at 4500 process spawns and state that the limit is likely not enforced since it had intended to die at 4000
Here’s the script:
#!/bin/bash

# ----------------------------
# Script to test nproc limits
# ----------------------------

LOGFILE="/tmp/nproc_stress_test.log"

# Check for username argument
if [ -z "$1" ]; then
  echo "Error: No username provided."
  echo "Usage: $0 <username>"
  exit 1
fi

USERNAME="$1"

echo "Starting nproc limit test for user: $USERNAME"
echo "Log file: $LOGFILE"
echo "-----" > "$LOGFILE"

# Check if user exists
if ! id "$USERNAME" &>/dev/null; then
  echo "Error: User '$USERNAME' does not exist."
  exit 1
fi

# Get current soft and hard limits
SOFT_LIMIT=$(su - "$USERNAME" -c 'ulimit -Su')
HARD_LIMIT=$(su - "$USERNAME" -c 'ulimit -Hu')

echo "Soft limit: $SOFT_LIMIT" | tee -a "$LOGFILE"
echo "Hard limit: $HARD_LIMIT" | tee -a "$LOGFILE"

# Run stress test using su -
su - "$USERNAME" -c '
  echo "Starting process spawn test..."
  count=0
  while true; do
    sleep 1000 &
    count=$((count + 1))

    # Optional progress updates
    if (( count % 100 == 0 )); then
      echo "Spawned $count processes..."
    fi

    if (( count > 4500 )); then
      echo "Stopped after $count. Limit not enforced?"
      break
    fi
  done
  echo "Final background process count: $count"
' | tee -a "$LOGFILE"

echo "Test complete. Check results in $LOGFILE."Alright, let’s see this in action. Even though we have a “test complete” at the end, my expectation is that the subshell we’ve invoked will implode at the end:
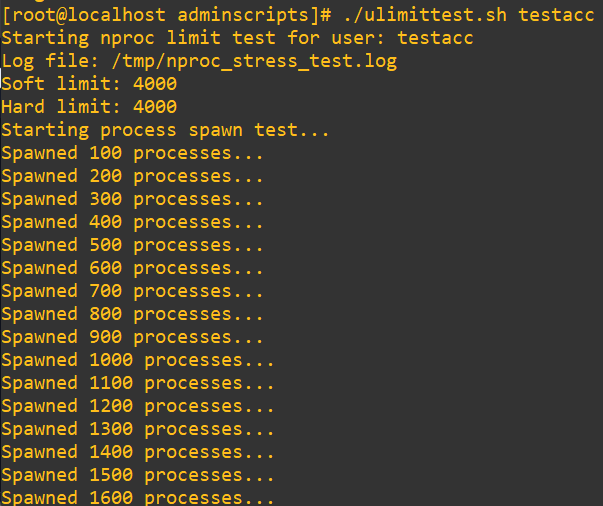
So far so good
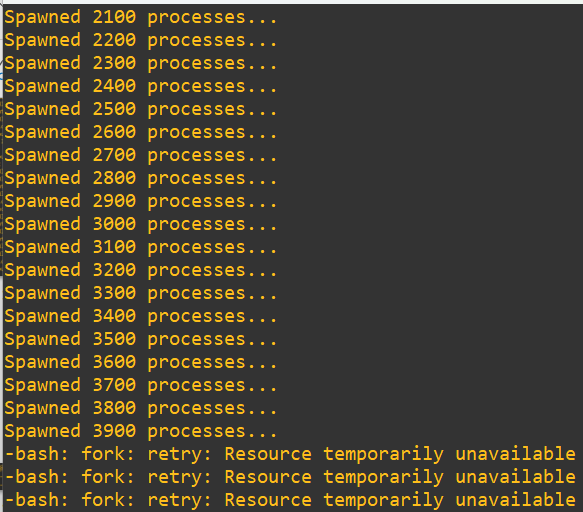
We reach the end and as expected bash starts telling us that we’ve run out of resources. This makes sense based on the progress counter, but let’s actually dig a little deeper and confirm. Open up a new terminal session and issue a process word count on this user while the test is going on using:
ps -u testacc | wc -l
In the time it took to open a new terminal, login and get the command in, it’s possible a few of processes shut down in the meantime. Either way, we’re right at the edge of 4000 as we wanted (and not over!). As a final step: halt the shell, clean up all those sleep calls with pkill and check out our process list count again with a wc call:
pkill -u testacc sleep
ps -u testacc | wc -l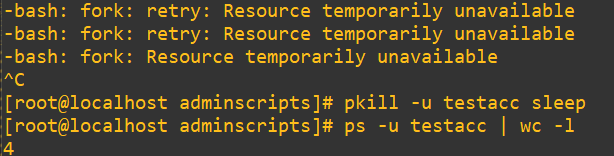
We’re back to somewhere normal at 4 processes.
User ID and Group ID Hygiene
TL;DR: Don’t rely on default sequential UID/GID assignments. Set custom ranges and group IDs early to improve security, simplify auditing, and avoid predictable account patterns. Standardize assignments across departments for cleaner identity management.
Managing UID and GID assignments is one of those foundational policies that often gets glossed over but becomes critical once your system scales. By default, Linux starts assigning UIDs from 1000 for regular users, while system accounts occupy the lower range between 0 and 99. That distinction helps separate human identities from system-level operations. If you’re deploying in a more structured environment, especially with logging, auditing, or directory integration, it’s smart to take control of those numbers early.
When adding new users, Linux by default will just increment the counter from the last user as so:
- Collininfosec has the userid of 1000 (which it should be since it’s the first user I added)
- Babubutt has the userid of 1001 as it was added as the second user
- Testacc has the userid of 1002 and so on
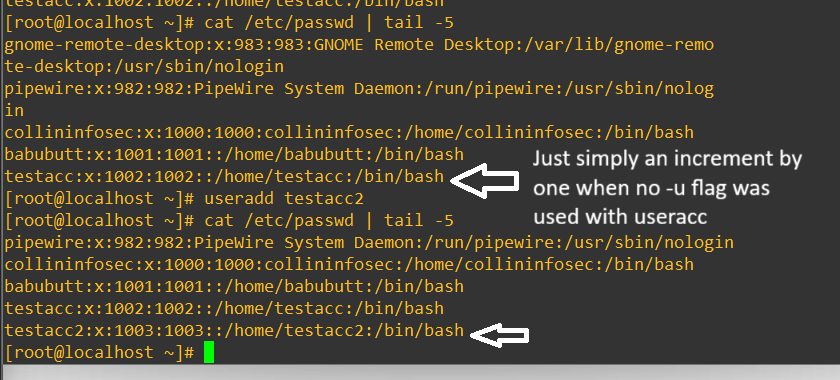
It’s considered a security best practice to not fire in your users in from 1000 and increment because we want to, as much as is possible, implement defense in depth and not make it easy for malicious actors by leaving the user accounts predictably incrementing after 1000. For the sake of argument we can manually just start adding users at 10000 and then subsequent users will increment from there.

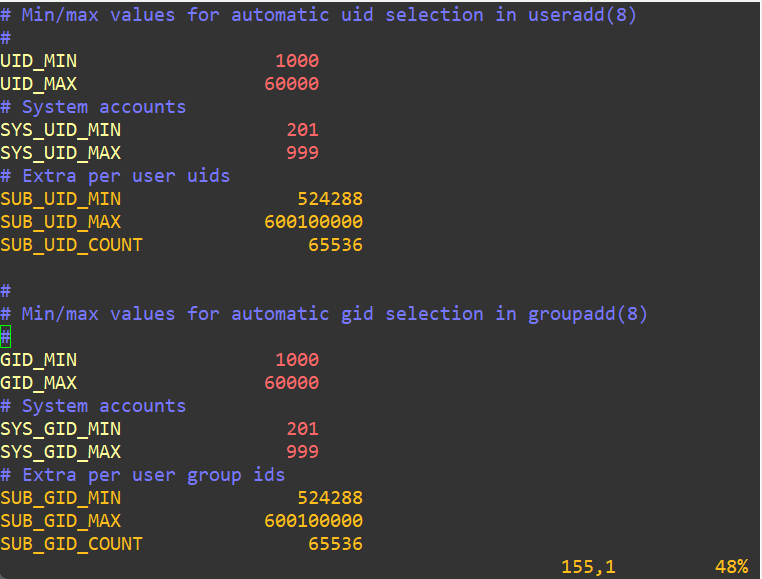
Over time, you might decide to block off UID ranges for different departments like DevOps, QA, BI, or System Admins. It brings order to identity management and makes parsing logs or securing resources much easier. To set custom default ranges system-wide you could make changes to /etc/login.defs:
We’ve got another ticket request from Jane:
From: Jane Morrison, IT Manager To: Collin, Security & Infrastructure Intern Subject: UID/GID Standardization Request for New Departmental AccountsAs part of our ongoing hardening initiative and identity management cleanup, I’d like to formalize how we assign UIDs and GIDs for all new departmental accounts moving forward.
Could you:
Create a new group called qa_team with a manually assigned GID of 3275Add two new users (alice.qa and dan.qa) with UIDs starting from 10000Ensure these users are added to the qa_team group and follow our secure provisioning guidelines
Let me know once the accounts are active so I can coordinate testing access with QA leads.
Based on what we know, this should be pretty easy. Add the group and confirm it exists with the right GID in /etc/group:

Add both new users with the 11000 and 11001 UIDs into the new group, give them a home directory with -m and set their shell with -s /bin/bash:

Now do a check with an extended regular expression version of grep for them in the /etc/passwd:

Centralized Authentication Service
As your environment scales, managing individual user accounts across multiple servers becomes inefficient. Repeating user creation for identical access needs is both tedious and risky. Instead, centralized authentication systems offer a way to manage user identities and access from a single source.
Directory services like OpenLDAP, Red Hat IDM, Winbind, and Microsoft Active Directory act as universal identity providers. These can store and control everything from usernames to access permissions, making it possible to enforce consistent login policies across Linux and Windows systems. With the right setup, even Microsoft AD accounts can authenticate to Linux hosts, creating smoother integration and stronger security.
It’s worth knowing that having a mixed operating system ecosystem is possible. I’m not going to dig into how to do it practically in this post, perhaps in a future blog post.
Sudo Access
TL;DR: Grant sudo sparingly and with precision. Use visudo for safe edits, restrict commands by exact path, and require passwords for accountability. Avoid blanket wheel group membership when targeted permissions will do, and monitor /var/log/secure or /var/log/auth.log to track usage.
Giving users sudo access is a necessity of running a useful linux system and thus careful consideration should be given to who, how and why they have access. Most of the time you’ll just give users access to some of the root commands. We use a special editor called visudo to do this as it has built in error checking so that you don’t accidentally brick your system when changing permissions. As always, make a backup and take a snapshot if you’re in your VM. An alternative option is to add users to the wheel group which effectively makes them a top-level administrator that can do anything root can do.
For this example we’ll use dmidecode which populates sensitive data about the hardware straight from the system’s firmware. It shows things like model, serial number, CPU specs, memory layout and more. Needless to say this is one of those areas you definitely want to be careful about revealing, but is useful if you have to troubleshoot, gather inventory audits or verify hardware before upgrades.
My testacc user we’ve been playing with has no privileges, but let’s experiment. First, we’ll add them to wheel with
usermod -aG wheel testacc
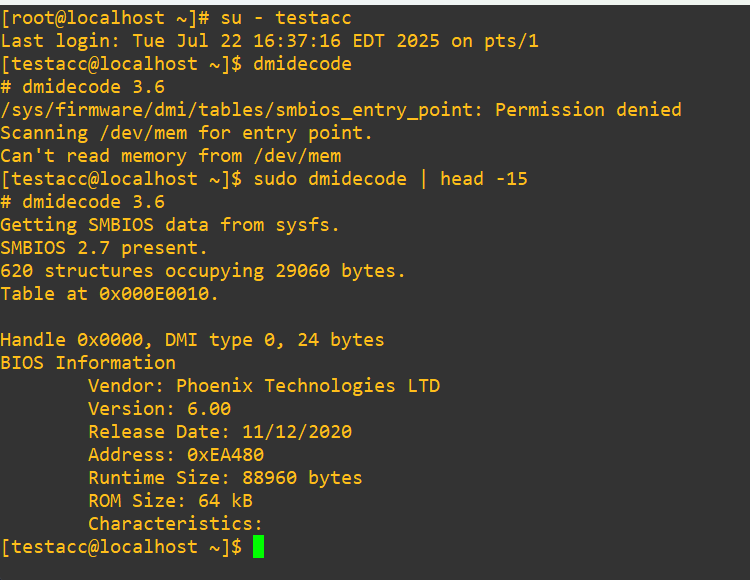
Time to test if it worked:
- hard swap into testacc
- attempt to run
dmidecodedirectly and it’ll tell us that it failed (expected) - try again, but with
sudograbbing just the first 15 lines (asdmidecodehas a massive output that we don’t need to see in its entirety)
Now, when we strip testacc from wheel, it will be impossible to do this test again using:
gpasswd -d testacc wheel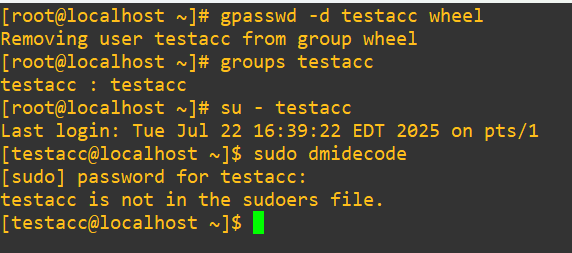
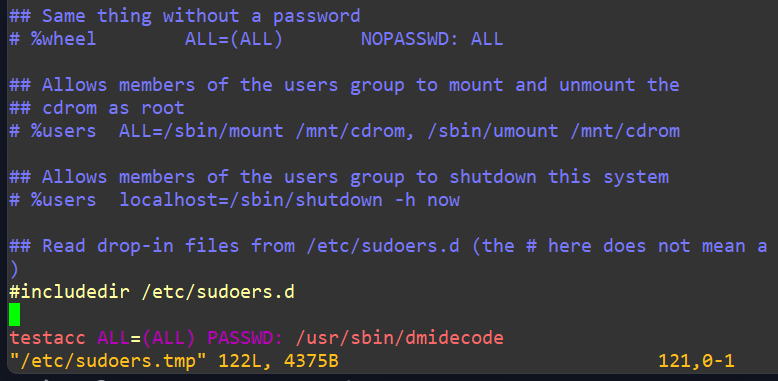
Next, we’ll assume we want this account to be able to run dmidecode but still not be a member of wheel. Open visudo. We have the option to not require a password by adding:
testacc ALL=(ALL) NOPASSWD: /usr/sbin/dmidecodeOr, give them a password requirement (safer since you need accountability in your system for sudo access) with:
testacc ALL=(ALL) PASSWD: /usr/sbin/dmidecodeNow we’ll track in our password required permission for testacc at the bottom:
Quit and write normally as you do with vi using :wq!. Test out that we can’t run other root commands, even with our sudo password since we’re not in wheel, such as adding a user:
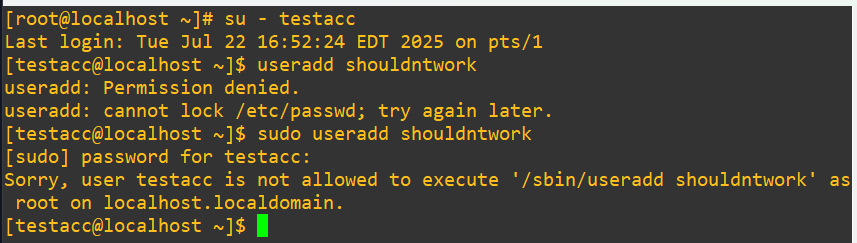
Can we run dmidecode as we intended?
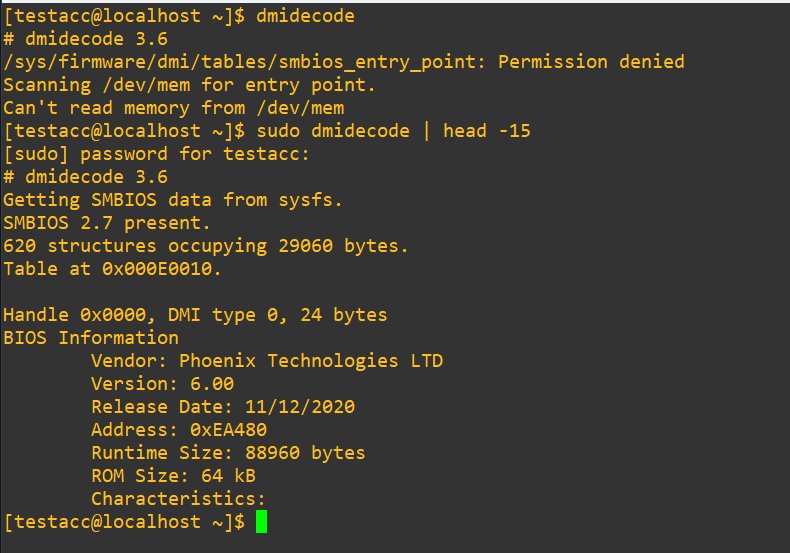
Good, it’s possible to run and also the shell prompts for the sudo password as requested. If hypothetically you wanted to keep an eye on this user and when or how they actually make this sudo call there are several tools. By default, sudo logs to /var/log/auth.log on Debian/Ubuntu and to /var/log/secure on RHEL/CentOS, so we’ll have a look in there:

The first four entries from testacc were while we had them in the wheel group earlier. We can determine this is due to how the binary was actually invoked at the end:
COMMAND=/sbin/dmidecodeTake note of the fifth entry at 16:52:39 where we see the “user NOT in sudoers” warning. When the account was within wheel, the shell would have likely picked up the location it needed from the user’s $PATH environment, but when we put it into visudo earlier we explicitly said that the user must run it from /usr/sbin/dmidecode, as we see at the end of the sixth line in the log file. This distinction matters because sudoers rules require exact path matches. A use case of this customization could be that if you had sensitive custom tools saved elsewhere on the system, you could set up the permissions with visudo to wherever that compiled binary exists. You can get extremely specific about who has access to what and then keep tabs on it closely. You could even write a custom compiled binary for individual users or groups that logs to a secret place if you felt inclined to do so.
Monitoring User Activity
TL;DR: Monitor users continuously with native Linux tools like last, who, w, /var/log/secure, and custom rsyslog configurations. Build baselines of normal activity, watch for anomalies in timing, location, and command usage, and secure logs against tampering. Use integrity checks, cronjobs, and stealth investigation techniques to catch threats early without tipping off the attacker. Documentation and policy adherence are as critical as the monitoring itself.
In production, it’s common to have multiple users logged into a Linux server at once. That makes monitoring user behavior a critical part of keeping a secure environment. You may want to know which IP addresses were used for login, the exact time users accessed the system, and what commands or processes they ran once inside.
There are two core approaches to effective monitoring:
- Log and record every user action
- Audit and validate those records regularly
Linux provides several built-in tools and logs to help with this:
/var/log/messages-> system-related events and messages/var/log/secure-> login attempts, authentication failures, and security-related eventslast-> displays login history, IP addresses, and session timeslast username-> filters login history for a specific user
lastb-> shows bad login attemptswhoorw-> lists currently logged-in users and their sessionstty-> direct console accesspts–> remote terminal sessions like PuTTY
/home/user/.bash_history-> tracks every command run by a usertcpdump-> captures network traffic; useful when piped togrepto filter by user activity/etc/rsyslog.conf-> configures log verbosity and destination; consider relocating logs to a custom directory for security or compliance (we’ll go over this later)ps -ef | grep username-> shows active processes launched by a specific user
Used together, these tools help you build a clear picture of user activity, detect unusual behavior, and support incident response. Capturing data is only half the job. True value comes from reviewing and validating data we grab, otherwise they’re just collecting disk space with a false sense of security. Reviewing logs can be tedious and boring, but if you’re serious about system integrity, audit trails are your best defense. Let’s have a look at /var/log/secure:
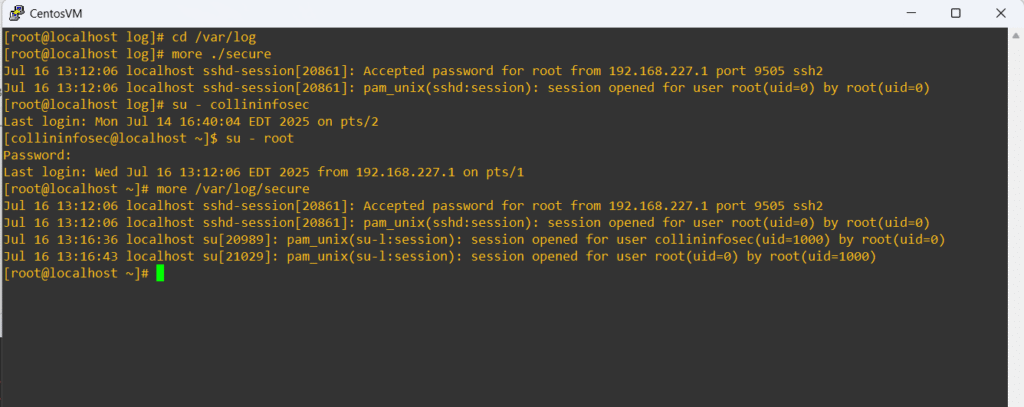
The logs provide detailed insight into how the system was accessed, with each entry tied to an SSH connection. At 13:12:06, there’s a clear indication of a remote login to the root account, including the local IP address and port over SSH. Later at 13:16:36, we see a user swap via the su command, performed by root as shown at the end with, “…by root(uid=0).” This tells us that root was already logged in and initiated a hard switch to testacc. That contrast between remote login and internal privilege escalation helps map out user behavior and access flow, which is crucial when auditing system activity or tracing the origin of a command or possibly security incident.
Privilege escalation is a major part of how malicious actors go from breaking in to actually wrecking havoc. Experienced intruders know that their tracks are visible, so a typical next step is to either cover their trail or blend in with routine user activity. A lot of threats actually start with simple recon of finding out what is normal on the system and then attempting to blend in as much as possible. Threat actors might just observe for months (or years) before they take action. That’s why early detection and log review are so important. By identifying unusual patterns, such as multiple su calls or rapid privilege jumps, admins can catch escalation attempts before they lead to something more destructive (or at least provide some context during and after a security incident has occurred). Consider that early detection might be the only chance defenders have to squash a breach before it becomes a legacy headline and cautionary tale.
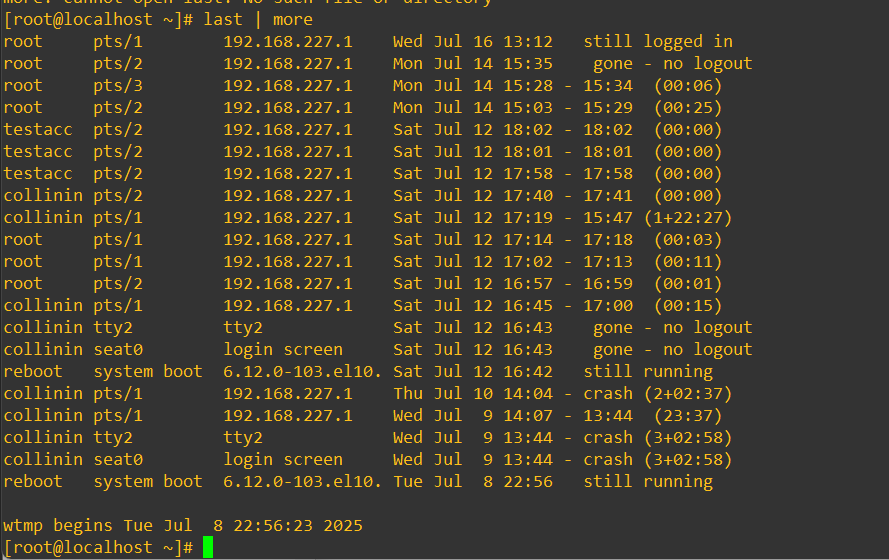
The last command comes in very handy when you need more data about how long users were logged in and if they used third-party software to get in. I almost always use PuTTY in my lab, thus nearly all the logins have the second column entry of pts. I logged in directly within the virtual machine on July 9th at 13:44 and had a crash, it was labelled with tty to differentiate how that session took place.
The last command also makes it streamlined to quickly see bad logins if we modify it as:
lastb 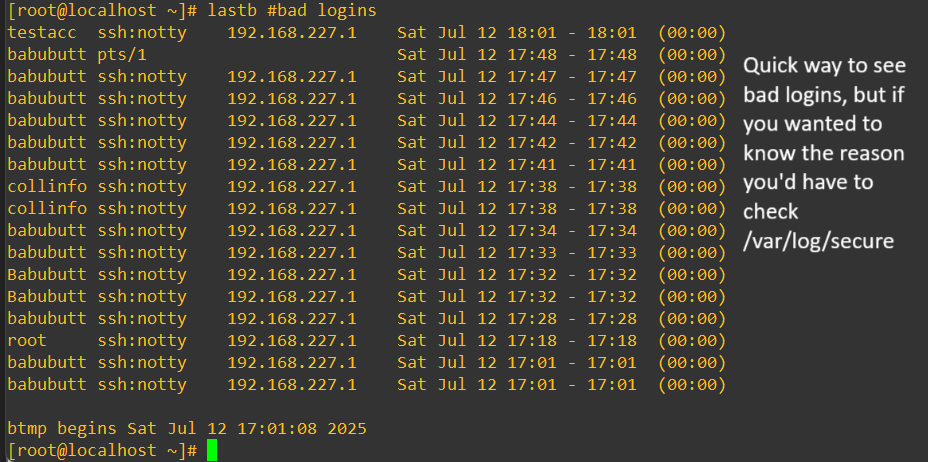
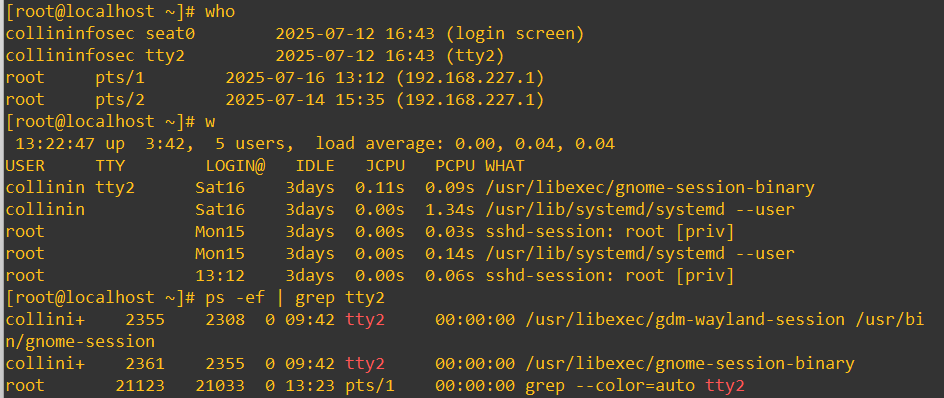
If you’re looking for real-time info, the who command will show you logged-in users, terminal type (pts/tty) and it reads from /var/tmp/utmp. The w command is similar but gives some more nuance of knowing how long they’ve been idle and what quantity of CPU usage they’re accessing and the current command/process they’re using at the time. There are two columns that are particularly interesting when it comes to building a story of what’s going on: JCPU and PCPU.
JCPU explains the total CPU time used by all processes tied to their session including background jobs. PCPU is the CPU consumption used by the task that falls under the WHAT column. It might seem innocuous at first glance, but if the user had a JCPU significantly higher than their PCPU that would mean they have a large amount of background tasks running that aren’t going to be immediately visible in the WHAT column. So, perhaps the user is running a top command to mask that they have something much heavier chewing up resources behind the scenes.
Keeping an eye on w establishes a base-line of what gets run by who and when. It’s worthwhile to also gradually compile a running personal log of what quiet times look like and busy times look like throughout your system lifecycle. This could be automated with a script and cronjob similar to what we’re going to explore in the next area where we look at log customization. Here’s how the two active monitoring commands look in action:
From a security perspective, w is super strong to start drawing conclusions and answers to questions that might pop up like:
- Why are there logins at 3am going on?
- I don’t recognize this username, has it even been active lately?
- How long has this session been open, did it dip into after hours?
- Hold on… why is this user running
nmap? That’s very unusual. Is someone gathering reconnaissance on our system? - Why does this user have multiple sessions from the same IP? Maybe some kind of port-forwarding or proxy use. Could be normal for some workflows… But first thing at 8am? Usually they’re checking emails still.
- Wow, this account is using a ton of unexpected CPU right now… did they maybe get hacked and there’s some malicious script running on their account?
Checking in on w often will seriously aid in developing a sense of intuition about what should be base-line for your systems. Developing that base-line of intuition is something you’ll only get over time but is absolutely golden for catching security incidents in the act or intercepting them from progressing from initial access to an actual exfiltration of data.
To expand on what I mentioned earlier about malicious actors covering their tracks, it’s 100% worth it to open up /etc/rsyslog.conf and change the default log paths:

One useful option would be to modify the authpriv.* line to additionally send logs to somewhere else like:
authpriv.* /var/log/secure
authpriv.* /opt/audit_logs/secure.logYou could take it a step deeper and also modify the permissions on that new log file to be impervious to modification (immutable) unless the permission is removed by someone with root permissions:
chattr +iIf you apply this concept, make sure that new log directory path exists, the log file exists and is writable by the rsyslog user. Here’s this whole process command by command:
- build the new secret directory for logs
- build our empty file for the
secure.log - swap the ownership to
rsysloguser (this assumes your system usesrsyslogas the user/group. Confirm this withps aux | grep rsyslog) - give read/write access to the owner and read access to the group
- log hardening against tampering
- restart the
rsyslogdaemon
sudo mkdir -p /opt/.audit_logs
sudo touch /opt/.audit_logs/secure.log
sudo chown rsyslog:rsyslog /opt/.audit_logs/secure.log
sudo chmod 640 /opt/.audit_logs/secure.log
sudo chattr +i /opt/.audit_logs/secure.log
sudo systemctl restart rsyslogWant to take it another step deeper? We’ll build out a script that compares the hashes between both log files and runs it as an automated cronjob as a round-the-clock routine audit to keep an eye on potential tampering or logging issues in general:
- declare our paths to the original log and new secret log
- we grab both hashes with
md5sumand filter the columns withawk - compare the hashes and report if they’re identical or not
Here’s the script:
#!/bin/bash

# log paths
primary_log="/var/log/secure"
secondary_log="/opt/.audit_logs/secure.log"

# pull md5 hashes
hash_primary=$(md5sum "$primary_log" | awk '{ print $1 }')
hash_secondary=$(md5sum "$secondary_log" | awk '{ print $1 }')

# compare hashes and report
if [ "$hash_primary" = "$hash_secondary" ]; then
    echo "Log files are identical"
else
    echo "(!!!) Log files differ. Possible tampering or logging failure"
    echo "Primary MD5: $hash_primary"
    echo "Secondary MD5: $hash_secondary"
fiOnce the script is saved and you made it executable we’ll open crontab and add a new entry that:
- executes the script twice an hour (every 30 minutes)
- appends results to a secure audit log
- captures any errors using the redirect
2>&1
This would be the entry assuming you called your script check_log_integrity.sh:
*/30 * * * * /opt/.audit_logs/check_log_integrity.sh >> /opt/.audit_logs/integrity_report.log 2>&1Verify that the cronjob is actually functional by checking out the journal or looking in /var/log/syslog (may not work on newer versions of CentOS):
journalctl -u cron.service
grep CRON /var/log/syslogIf you take the integrity script and wire it up with email alerts using an internal SMTP server, you’ve essentially created your own lightweight SIEM. You’ve got scheduled log verification, a report trail, and predictable notifications when discrepancies do arise. It’s contained, customized, and completely within your control. For small environments or tightly scoped deployments, this can be an elegant alternative to bulky, overbuilt monitoring solutions. I plan to expand on this in a future blog post about setting up and testing a lightweight SIEM like this.
A word of caution: All of these defensive techniques are great at the tip of the spear: multiple log paths, audits, integrity checks… but they’re worth nothing if basic safeguards aren’t already in place as discussed earlier. Any attacker (or even a careless admin) with unrestricted root or misconfigured sudo rules can tamper with logs, override cronjobs, alter file permissions, or even disable rsyslog entirely.
Let’s run with a hypothetical threat hunting scenario where you’re reviewing the system’s activity via who and notice a user named backupsvc (that’s meant purely for automated off-hours backup tasks) that has an active session from a remote IP at 10:03 AM, right when peak business hours are operating. This is already strange.
You check w and see this:
backupsvc pts/2 Mon10 0.00s 0.01s topWhy is an automated backup account running top interactively during work hours, and remotely? This account isn’t supposed to have shell access whatsoever. A further investigation reveals:
lastconfirms that the login was from a different subnet than usual/var/log/secureconfirms the user switched withsufrom another service account- there aren’t any backup processes scheduled for this time in your internal policies or memos
Now we should start asking:
- Did someone hijack that backup user’s credentials?
- Are they performing recon on system performance before launching a heavier script?
- Was this an attempt to blend in using a low risk command?
At first glance, top is harmless. But when it’s run by the wrong account, at the wrong time, from the wrong location it’s not a performance check anymore. It’s a breadcrumb. It could be nothing, but it could be an indicator of a threat and is worth noting and keeping an eye on. You might take the action of killing top right away by finding the process using:
ps -ef | grep username | grep top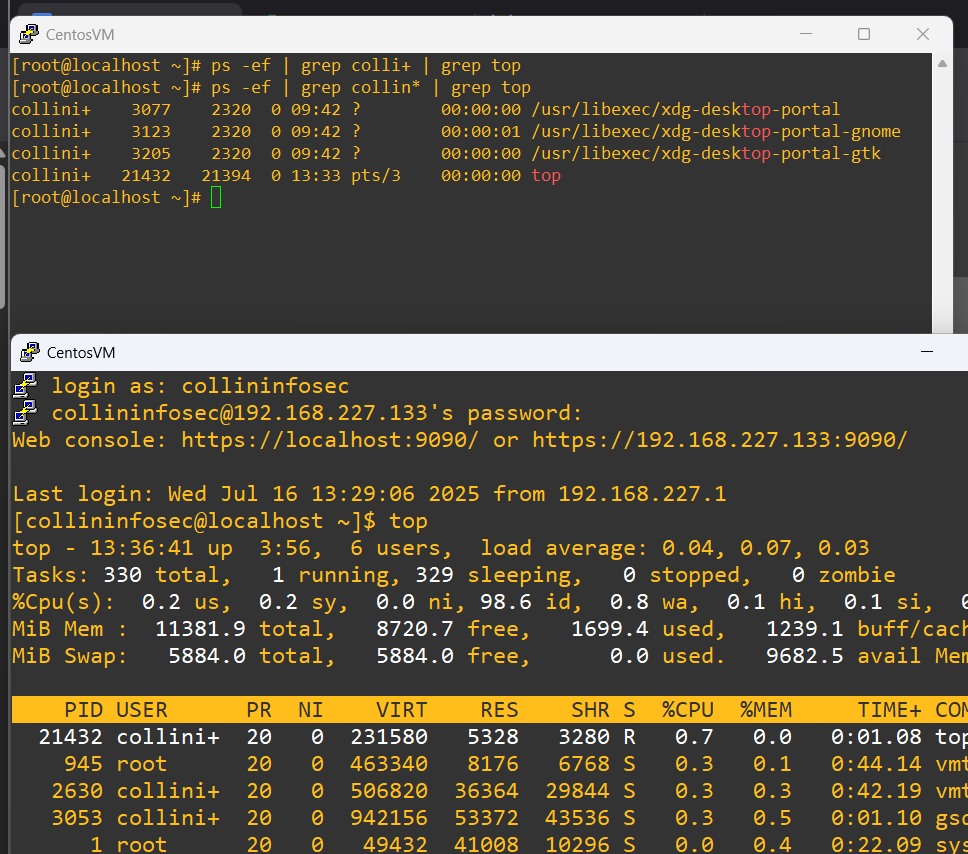
Now that we got the process id, in this case 21432, we can issue the kill command to stop it:
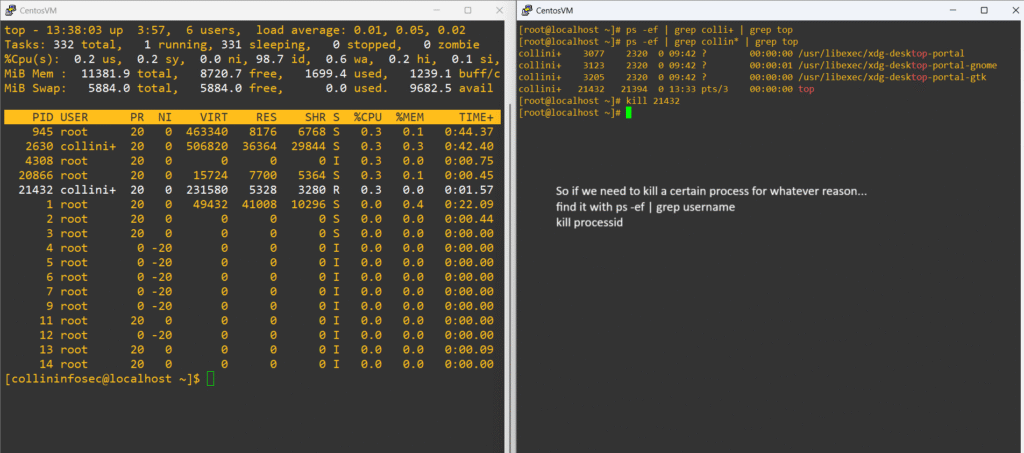
Let’s find the ssh session and kill it by instead using grep to filter for sshd this time:
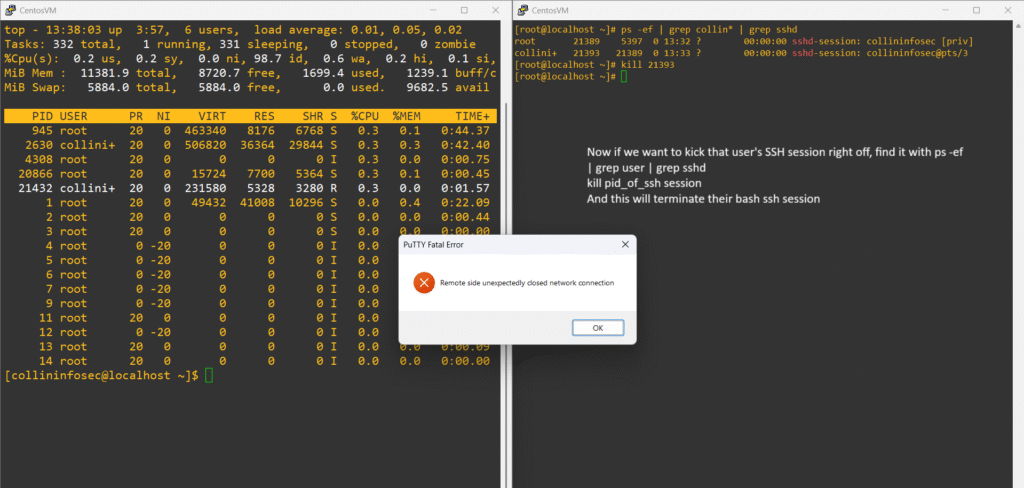
We’ve killed the process and kicked the user’s SSH session, but this might not actually have been the right action here in this scenario. We suspected some kind of recon but we now also completely alerted them that we saw it and reacted. This now could scare off the attacker before building a good heatmap of their method in and possible goals; this also may cause them to panic and escalate to an attack if they feel threatened. A better route may actually to be use some stealth and investigate further with counter-intelligence:
- use tools like
auditd,strace, orpsacctto record activity without alerting the attacker (capture files accessed, commands run or network behavior) - now might be a good time to consider setting up a deliberate honeypot of fake assets to see what happens and if they attempt to exfiltrate
- start keeping a very close eye on data leaving the system to find signs of data exfiltration including from your honeypot
- consider building a virtualized sandbox of your environment to analyze and possibly replicate how the system was compromised
- quietly build a containment strategy to restrict file system writes with access-control lists, rotate credentials around quietly (especially those with
sudoaccess), build out ideas of lateral movement paths before intervening
As a final note in this threat hunting scenario, always keep a clear journal of what you observed and why it raised suspicions. Detailed documentation gives weight to your decisions, whether you take action or choose to hold back. Just as importantly, ensure any stealth actions stay within legal and ethical boundaries. Know your organization’s policies, respect privacy regulations, and seek guidance from senior staff when in doubt. Don’t play cowboy when your organization’s assets are on the line.
Final Thoughts: Beyond the Tools
This began as a routine log review and account hygiene guide, but evolved into a comprehensive strategy for monitoring, detection, and response. Throughout the post, we’ve seen how simple tools like w, ps, top, and basic log configuration could be woven into a lightweight SIEM using nothing more than what Linux gives us out of the box. We extended this foundation with automation, integrity checks, stealth tactics, and investigative techniques that turn everyday commands into security instrumentation.
The goal isn’t just to lock down a system. It’s to gradually understand it over time and get comfortable building security intuition unique to your systems. The best piece of advice I can give you to summarize this whole post is to take lots of notes of what you saw and what you did. You never know when months or years down the road some little piece of an anomaly you observed, but didn’t understand at the time, could become a skeleton key to a much bigger puzzle of reevaluating security controls or thwarting an attack.
If you’re in the trenches working on Linux security, leading teams who are, or grinding in your home lab, I’d love to connect. Let me know what’s worked for you, what you’ve learned, or where you’ve hit walls.
You can reach me on Twitter or LinkedIn. The links are in the footer.