
This post is part of a Linux Security Blog Series. [View the full series here.]
Introduction
Welcome to the fortress gate of your Linux box: PAM. This framework silently guards every login, sudo attempt, SSH connection, and remote access handshake.
It is one of the most critical pieces of the Linux security stack. Usually, you never notice it until something breaks. When PAM breaks, it doesn’t warn you. It slams the gate and shrugs its shoulders.
This topic can be quite dry but we’ll investigate how PAM works, try out a few practical tests and will aim to break it in a safe way.
Here’s what we’ll cover:
- what PAM does and why it exists
- the layout of its configuration files
- the four module types: auth, account, password, session
- the logic of control flags and their impact
- real examples with sudo and SSH
- small scripts to automate testing
- reversible breakage to build confidence
- digital forensics analysis of logs
This post assumes: you’re already beyond a beginner level with Linux and can do fundamental things like navigate around directories, use vi/nano to edit, filter your results with grep and generally use man pages to troubleshoot. Check out the landing page of this series here for some guidance on how to get to this point first.
Boots on the Ground
PAM stands for Pluggable Authentication Modules, and it’s exactly what it sounds like. It’s a system that allows Linux applications to “plug into” authentication mechanisms without needing to be rewritten every time you change how users log in.
Before PAM, if you wanted to switch from password files to smart cards or biometrics, you had to rewrite the entire application. It was a royal, time-consuming pain that had to be addressed. Now authentication is handled in the middle, between services and the back-end that validates who can do what.
PAM is dynamic, modular and basically invisible (purposely to keep a critical security component hidden from prying eyes). PAM handles a lot of the most common services you’d use in your Linux system, including, but not limited to:
susudosshpasswdlogin
When you actually invoke these programs, they don’t care if you’re using services like Active Directory, LDAP or even a fingerprint scanner. They ask PAM what to do and PAM quietly decides with absolute authority. We can have a look at the PAM directory (on CentOS) with:
ls -l /etc/pam.dHere’s what a pull of the directory looks like:
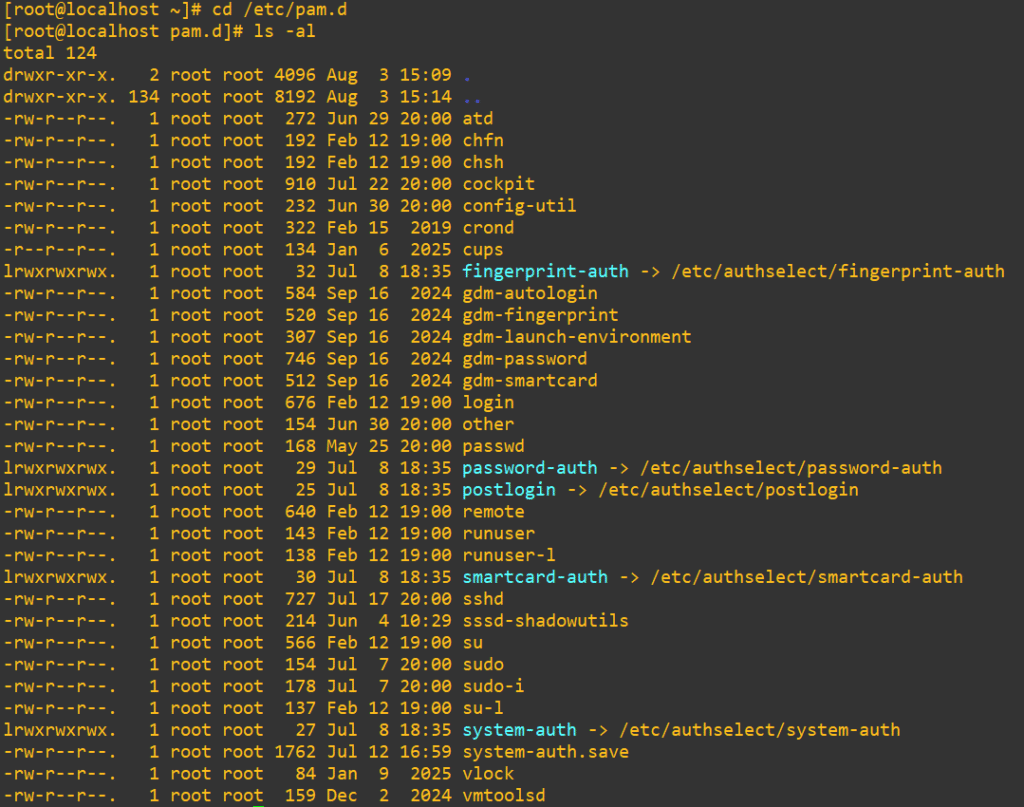
Consider that if a service doesn’t have a default configuration, PAM will automatically fall back to checking out /etc/pam.d/other instead. It’s also possible to define everything in /etc/pam.conf, but it’s honestly an ugly way to handle it in 2025, it was deprecated and gets ignored if the /etc/pam.d directory exists (which it almost always does by default).
The Four Management Pillars of PAM
TL;DR: PAM has four management pillars: auth verifies identity, account checks login permissions, password enforces password policy changes, and session sets up or tears down the environment. Modules like pam_nologin.so can block all non-root logins, making them useful for maintenance and dangerous if root login is disabled.
When a user tries to authenticate, PAM does not make a single decision. It walks through a stack of modules in a specific order. Each module type plays a different role in evaluating access and setting up the session.
Here’s the order and what each type handles:
Auth
This is the first gate. The auth modules handle verifying a user’s identity. Usually this means checking a password, but it could be a fingerprint, smart card or even a face scan if you’re being fancy.
The most common auth modules are:
pam_unix.so-> the default, checks against/etc/shadowpam_faillock.so-> handles brute-force lockoutpam_deny.so-> used to always fail authentication
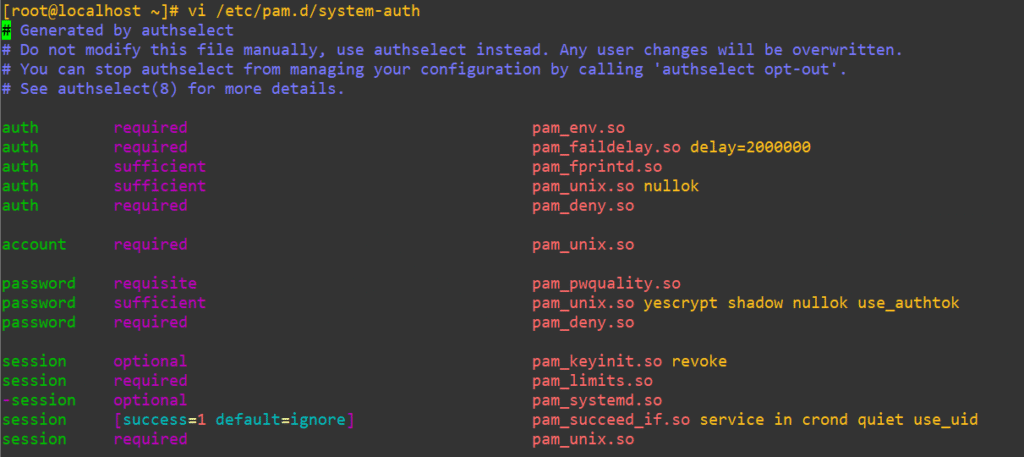
Here are the PAM settings for sshd:

Account
Once a user’s identity is verified with auth, the account module checks if that account is actually allowed to log in. PAM asks questions here like:
- is the account locked?
- has the account expired?
- is this login happening at a time we allow?
- is the user allowed to access this service?
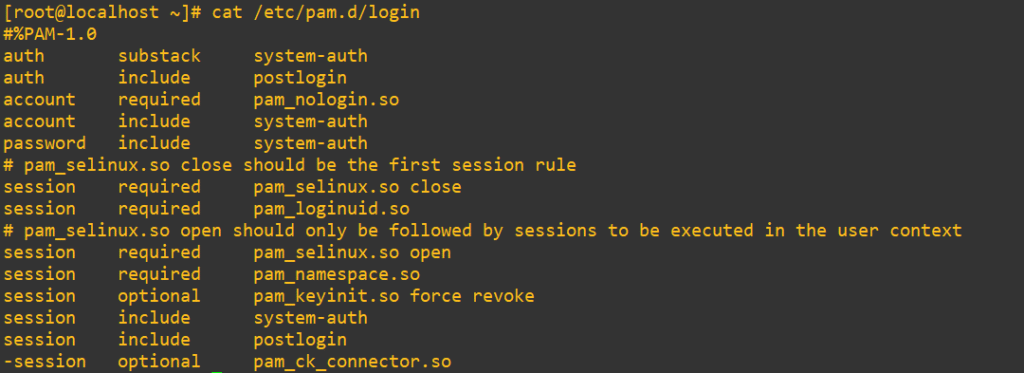
The important distinction is that this area is not verifying passwords, but rather deciding if the account is valid and permitted to go further. Here’s a look at the /etc/pam.d/login module:

Notice the line that says:
account required pam_nologin.soThis line checks for the presence of a file called /etc/nologin. If that file exists, PAM will deny login access to non-root users, usually with a message like “System is going down for maintenance.”
So in simple terms: If /etc/nologin exists, users get turned away at the door unless they’re root. This is useful when you’re rebooting a server or doing maintenance and you want to block new logins temporarily.
Below that line we have:
account include system-authThis line is saying: “Also apply all the account rules that are defined in the system-auth file.” You could think of system-auth as a shared config used by multiple PAM service files. Instead of rewriting the same rules in every service, PAM just references the centralized stack. This keeps things cleaner and easier to maintain.
Password
This module is only used when a user is actively changing their password, not during normal logins. Password modules enforce things like strength, minimum/maximum age, complexity rules. For a deeper look into these topics of password enforcement, check out my previous blog post’s section on the topic by clicking here.
The common password modules are:
- pam_unix.so
- pam_pwquality.so
Session
Now, once the user is authenticated and authorized (are you are who you claim to be and are you allowed to do what you want), session modules will run to prepare the environment. This will usually include:
- logging the login event
- mounting user directories
- setting environment variables
- cleaning up after logout
Most of the time these are invisible unless something actually goes wrong. The common session modules are:
pam_unix.sopam_mkhomedir.so(creates home directories if they don’t exist)pam_limits.so(sets resource limits… If you want a deep dive on resource limits, check out this part of my previous post here)
Every time you log in, switch users, or run sudo, PAM quietly walks through this full stack. Each line, in each module type, has to succeed before access is granted.
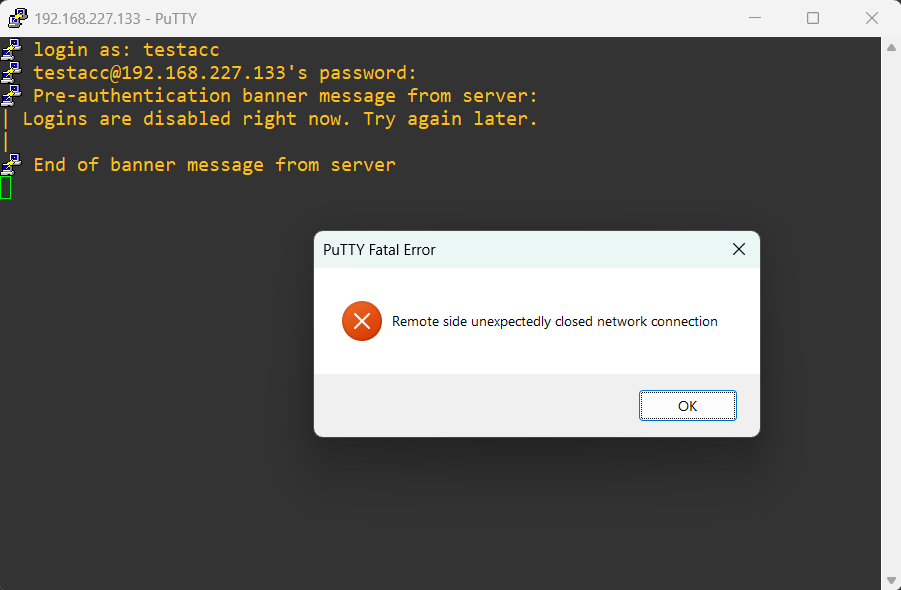
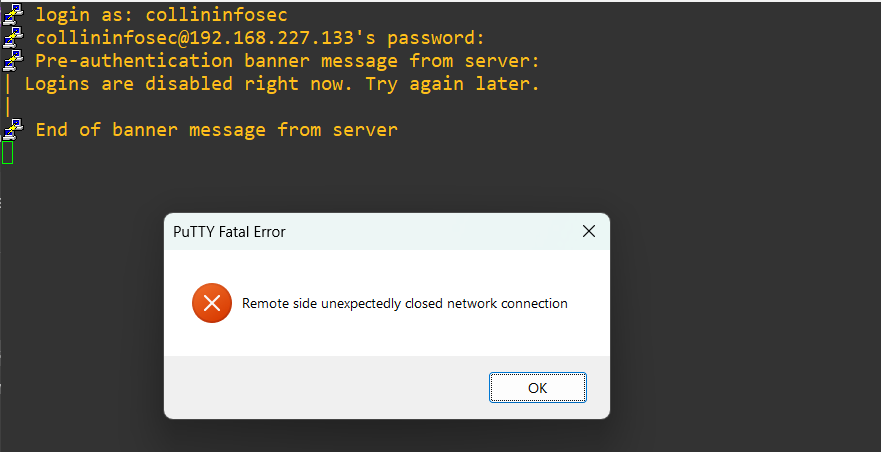
Let’s do a lab demo to explore pam_nologin.so that we saw earlier. It prevents non-root users from logging in and displays the file’s contents as a message. Root can still get in, which makes this a perfect maintenance mode tool. This module gets triggered when a file called /etc/nologin exists.
Right now, the file doesn’t exist:

As we saw earlier, the rule that enforces this can be seen in /etc/pam.d/login:

Now we’ll build a quick warning message and append it with tee to the new file we need:
echo "Logins are disabled right now. Try again later." | tee /etc/nologinThis file can say anything, it will push the contents of the file to the screen when users try to log in. I have a regular account called testacc that I’ll now try to log in with in a new PuTTY session:
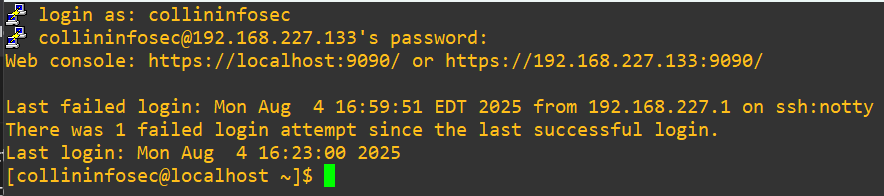
But, we should still be able to get in as root with no issues:
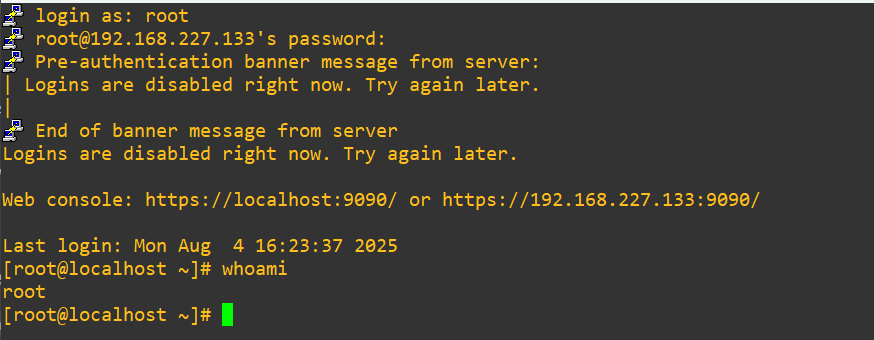
We still are warned that the login block is active, but we are in with root. It’s worth noting that even being within the wheel group (granted full sudo privileges like root), like my collininfosec user, still fails upon login:

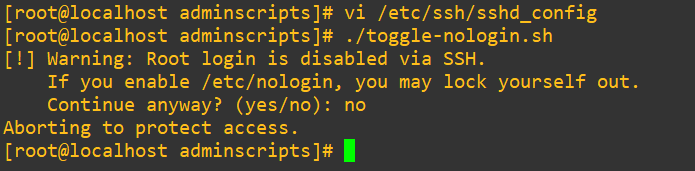
Be very careful about using this functionality if you are unsure about whether or not root access is allowed. This setting is modified in /etc/ssh/sshd_config, and I explore it in this part of my previous post in this series. If root access is disabled and you invoke this functionality you’ll be locked out of your machine remotely and will need console access. There are a few workarounds, but you don’t want to be in that situation ever in a production environment.
Let’s clean it up with:
rm /etc/nologinTest that we can get in again:
Let’s propose a hypothetical situation where you needed to do this on a regular basis. We’ll put together a bash script to automate it:
- check that this will only run as
root(remember thatroot'suser ID is always 0) - check to see if
PermitRootLoginis set to no, warn that this is the point of no return and proceed or abort - check if the file is already in place, if it is, offer to delete it
- prompt if the user wants to block non-root logins, build the file and continue with the lock
Here is the script in full:
#!/bin/bash
NOLOGIN_FILE="/etc/nologin"
SSHD_CONFIG="/etc/ssh/sshd_config"
# Check if root
if [[ $EUID -ne 0 ]]; then
echo "[!] This script must be run as root."
exit 1
fi
# Check if root login is disabled in sshd_config
if grep -q "^PermitRootLogin no" "$SSHD_CONFIG"; then
echo "[!] Warning: Root login is disabled via SSH."
echo " If you enable /etc/nologin, you may lock yourself out."
read -p " Continue anyway? (yes/no): " confirm
if [[ "$confirm" != "yes" ]]; then
echo "Aborting to protect access."
exit 1
fi
fi
# Show current state
if [[ -f "$NOLOGIN_FILE" ]]; then
echo "[*] /etc/nologin is currently present."
echo " Logins for non-root users are blocked."
read -p " Remove /etc/nologin and re-enable access? (yes/no): " confirm
if [[ "$confirm" == "yes" ]]; then
rm "$NOLOGIN_FILE"
echo "[+] Login lock removed."
else
echo "[*] No changes made."
fi
else
read -p " Create /etc/nologin to block non-root logins? (yes/no): " confirm
if [[ "$confirm" == "yes" ]]; then
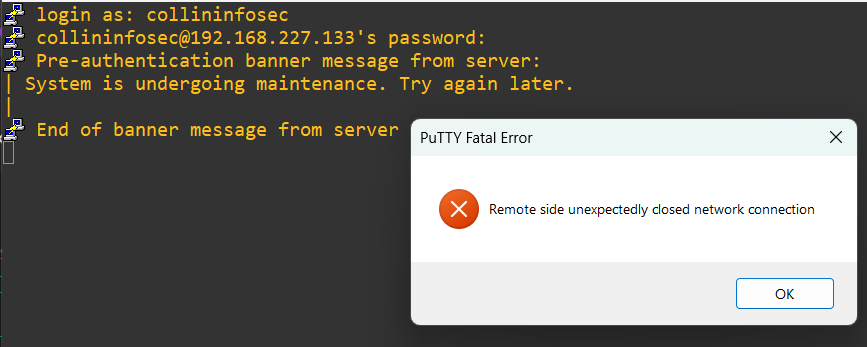
echo "System is undergoing maintenance. Try again later." > "$NOLOGIN_FILE"
echo "[+] /etc/nologin created. Logins now blocked for non-root users."
else
echo "[*] No changes made."
fi
fi
We’ll need to set the script’s execute permissions with:
chmod +x toggle-nologin.shLet’s see it in action. I’ll try running it on my collininfosec user that has wheel permissions:

So, it catches that even though we’re “in wheel“, we’d still have to issue sudo to fully elevate to EUID 0 and take on the persona of root.

Now after we open a new session and try to login, we’re shut out as expected:
Log back in as root and try the remove functionality:
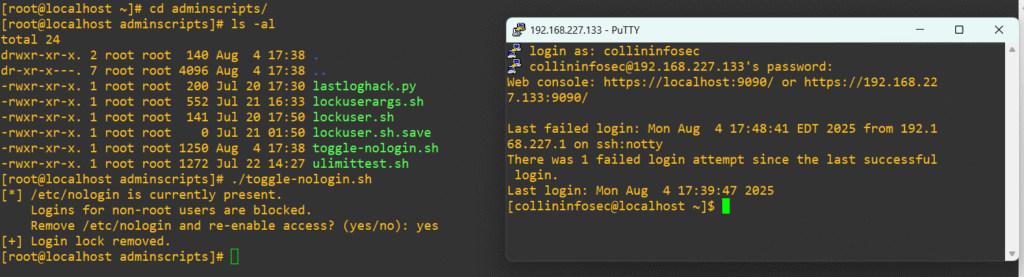
Perfect, now we can be sure the remove functionality works. As a final proof of concept, let’s see if it actually catches the PermitRootLogin trap. Again, make sure you have a user in wheel before you do this. Confirm members exist:
grep wheel /etc/groupAdd a user to wheel if you need to:
usermod -aG wheel usernameTo delete a user from wheel:
gpasswd -d username wheelOpen /etc/ssh/sshd_config and ensure this line exists (it may be commented out or not there entirely, quick search in vi with /Permit). Make it a habit to backup to all /etc/ files before you edit them to a place like /tmp/, too:
PermitRootLogin noWrite and quit. Rerun the script again and we’ll see if it gets caught:
Great, now we’ve got a functional quick-lock of all users other than root.
The Control Gates of PAM
TL;DR: PAM control flags decide how each module’s result affects authentication. required must succeed, requisite stops immediately on failure, sufficient can short-circuit success, and optional usually has no effect. Order matters, and a misplaced flag can lock out all access or bypass critical checks.
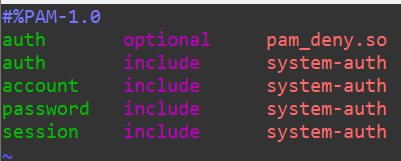
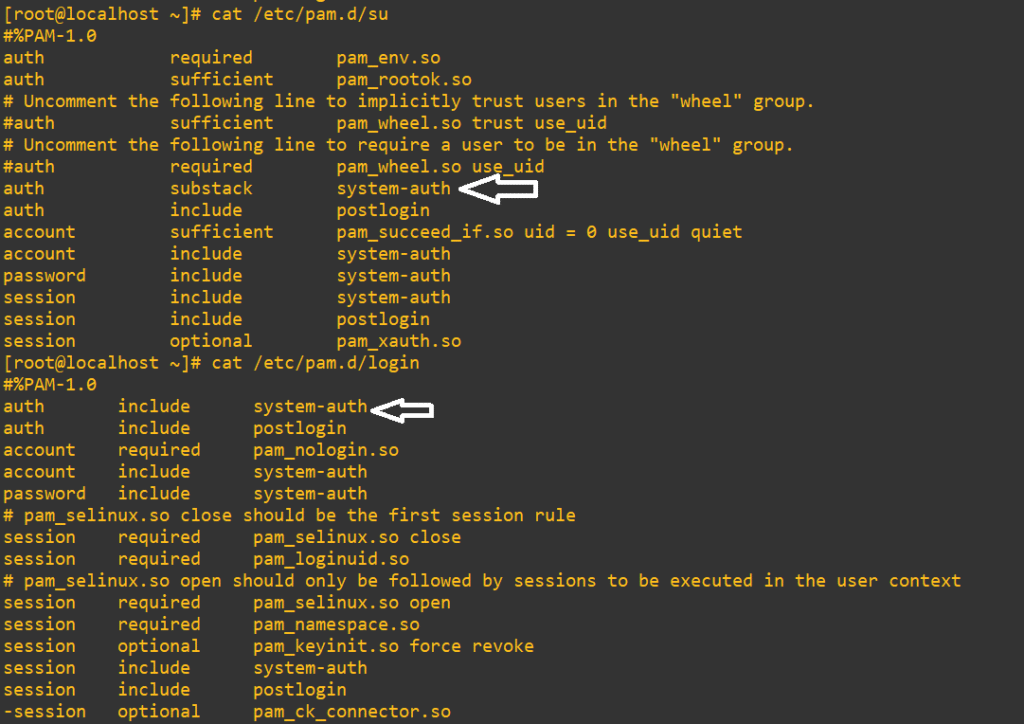
Each line in a PAM config file does not just tell the system what to do. It also tells it how to react if that module succeeds or fails. That’s where control flags (gates) come in. These gates are used to guide the overall decision-making logic of the PAM stack. They define how forgiving or strict PAM should be when evaluating that module’s result. Here’s a look at the PAM rules in /etc/pam.d/su; take note of the second column:
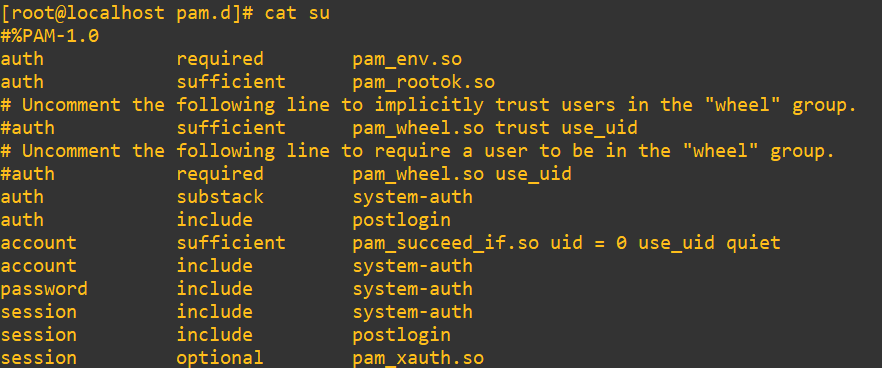
requisite
If this module fails, PAM stops right there immediately. The remainder of the stack might still be evaluated depending on how the calling app processes PAM. PAM says: “Nope. Get out.”
This one is useful when early rejection is desired, like when checking if the user is even valid before asking for a password.
required
This is the most common flag. It means the module must succeed. If it fails, PAM continues to check other modules, but the final result will still be a denial. PAM says: “We’ll keep going to do other stuff, but this must succeed eventually. No exceptions.”
sufficient
If this module succeeds, access is immediately granted and no other modules are consulted. But if it fails, PAM keeps going and the failure won’t hurt the overall result unless no other required module succeeds. PAM says: “If I pass, you’re in. If I fail, try someone else.”
Be careful with this one. A badly-placed sufficient can short-circuit important checks. We’ll see this demonstrated later.
optional
This is mostly ignored unless it’s the only module in that stack. It won’t impact the final result either way. PAM says: “I’m just here for logging. Don’t mind me.”
There are still two additional control keywords you’ll often see in PAM files (including in the su config we looked at above):
include
Instead of repeating a bunch of identical rules across files, you can use include to pull in a shared config. Here’s a common example:
auth include system-authThis tells PAM the desire is to abstract the rules away and check the account rules listed in /etc/pam.d/system-auth for your answer.
substack
Same idea as include, but it groups rules under a label that can be reused more flexibly. You’ll see this more in custom setups or with stacked logics. The substack control returns differently based on success or failure.
A key point about control flags is that the order they’re implemented matters. PAM is strict about this. For example, this would work fine:
auth required pam_unix.so
auth optional pam_deny.soThe actual authentication check is done with pam_unix.so. If it fails, login is denied. pam_deny.so runs after, but since it’s marked optional, it doesn’t override anything. Now, if we modified this to:
auth optional pam_deny.so
auth required pam_unix.soHere, pam_deny.so always fails. Even though it’s marked optional, it might still confuse module flow depending on other rules. Even worse, if you swapped the order and marked pam_deny.so as required, you’d deny every login attempt no matter what.
Now, we’ll do some lab experimentation with control flags. This is safe to experiment with if you leave a root session open. Again, make a back-up or snapshot:
Open up /etc/pam.d/sudo in vi:
We’ll add the pam_deny.so module to the top and give it the required control flag:
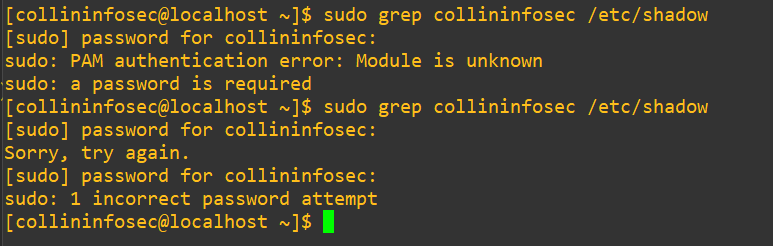
auth required pam_deny.so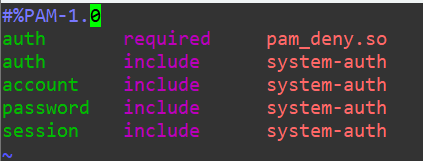
So, in essence we’ve changed the sudo binary to immediately require that the authorization is fed to the pam_deny.so module, which is designed to always fail authentication. Now, even running sudo should be impossible. I’ll log into my collininfosec user and attempt to pull my password into from /etc/shadow:
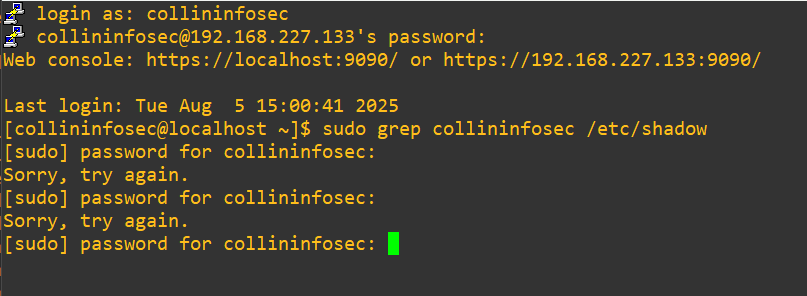
Ok, so we get denied with no details. The ambiguity is valuable here from a security hygiene perspective, we wouldn’t want attackers to gain any insight if we actually had to do this as an emergency precaution in production. An attacker might think their password is wrong or access was revoked, when in fact we brute-force killed sudo access across the whole system with PAM. We always should try to think in terms of defense-in-depth But, let’s try a different sudo elevated command just for a proof-of-concept that running grep on the shadow file wasn’t a one-off:
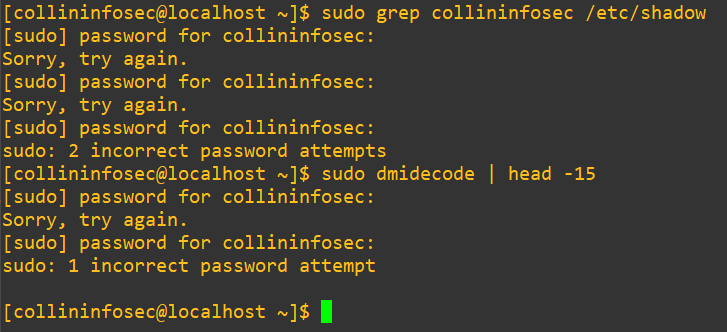
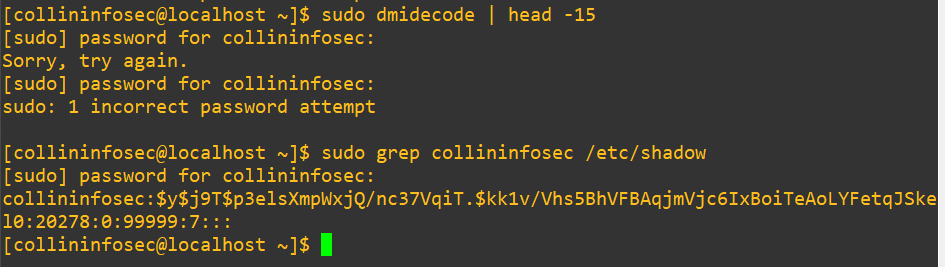
We’re definitely locked out from sudo. Let’s try swapping that required field into optional:
Now, after changing the control to optional we can pull our password info from the shadow file without issue on the wheel user:
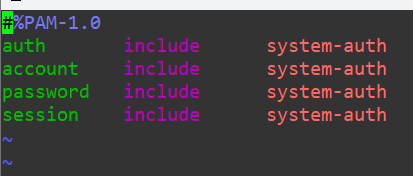
In CentOS/RHEL systems, you’ll often see modules abstracted away and handled by another module. In our case with sudo, we saw that each management pillar includes the system-auth module. If we dig into that actual module in /etc/pam.d/system-auth, we’ll see that there’s actually a lot more going on behind the scenes:
The sudo module, as we saw earlier, is basically saying: “For auth, account, password, and session … just go and look in system-auth instead”. The key to know is that system-auth provides authorization for a lot of different services in Linux. To get a better answer to what it actually handles, we can issue a grep that accounts for whitespace on the pam.d directory as:
grep -l 'include *system-auth' /etc/pam.d/*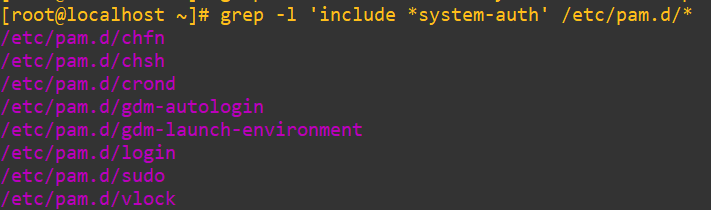
With this in mind, any changes to system-auth will cascade into all of these services. You’d want to map out the abstractions of PAM to get an idea of the blast radius of changes.
PAM Breaking: A Cautionary Failure
TL;DR: PAM configs on CentOS/RHEL 8+ are managed by authselect, so edits to system-auth can vanish or have no effect. Each service has its own PAM file, and login paths behave differently depending on method. Know the difference between include and substack, and always test with the correct service file.
On CentOS 8+ and RHEL 8+ distros (I’m running CentOS 10 in this lab), PAM configs like system-auth are managed by authselect. If you edit them directly, your changes will get wiped. You can either opt out completely or create a custom profile to keep your edits persistent. For lab environments, opting out is often easier. In production, use a custom profile.
We’ll experiment with a custom profile first to see how it works. Here’s how to set it up. First, we’ll find out what our default profile is called:
authselect current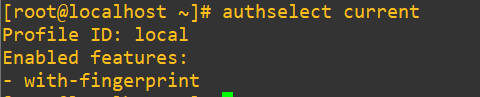
We know that the profile is just called local and it’s sitting in the 3rd column. We can extract that out with awk and store it in a PROFILE variable using:
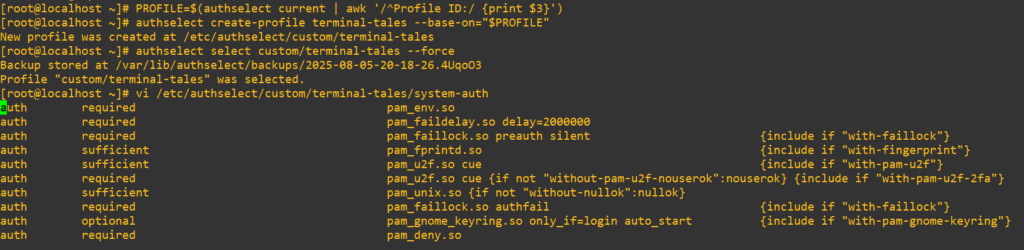
PROFILE=$(authselect current | awk '/^Profile ID:/ {print $3}')Construct our copy profile based on what was extracted in the last command; I’m going to call mine terminal-tales:
authselect create-profile terminal-tales --base-on="$PROFILE"Force authselect to swap over to the new profile:
authselect select custom/terminal-tales --forceWe can now modify our new custom system-auth file safely. We should now be able to open up our new system-auth in vi. Here are all the commands in sequence:
Add in our pam_deny.so line just like we did earlier to /etc/pam.d/sudo directly:

Make sure you’ve got a root session open and a second user if you don’t already and apply the changes with:
authselect apply-changesAs we saw earlier in the grep, this module handles both login and sudo. Let’s try out sudo first on the wheel user:

Now PAM is really broken. It’s saying: “I couldn’t even load or process one of the modules you told me to use.” If you didn’t catch it earlier, I actually misspelled it as pan_deny.so. PAM doesn’t always make noise when something breaks. If it can’t load a module, it won’t give you a friendly error. It just says “authentication error.”
After I fixed the typo:
Ok, we’re getting the normal deny message this time. Let’s also try to log in with a new terminal session as we saw system-auth handles login as well in the earlier grep:

This doesn’t make sense. We should be locked out, but we got in. Let’s have a look at /etc/pam.d/login again from the root user:
It turns out after all that the login service’s auth management actually uses the substack control for system-auth and not include. Because it’s in a substack, failures might not block login unless they’re explicitly critical. We’ll change that substack over to an include and we should be locked out:

We got in. What? Let’s go back to our custom system-auth file:

Here’s where it gets sticky and frustrating with PAM. We added that first required line earlier but we’ve also go a big stack of other auth management rules. Including
auth sufficient pam_unix.so ...At the end we also have:
auth required pam_deny.soWhen multiple required lines exist, PAM will evaluate all of them, and then return failure if any one of them fails. But if a sufficient module succeeds before any required failures, and there are no previous required failures, PAM may short-circuit the stack and grant access.
That’s a brain twister, right?
The first pam_deny.so fails, but it doesn’t fail fatally unless PAM immediately exits. We also have the sufficient pam_unix.so, and if it succeeds and no required modules above it failed, PAM just goes “we’re golden” and logs in the user.
Here’s where we get a chance to use the requisite control. We’ll force PAM to immediately exit with failure and skip evaluating the rest of the stack because we’ll comment it out. This is the nuclear option. We’ll swap that first line we added earlier over to:
auth requisite pam_deny.so
Make sure to push the changes again:
authselect apply-changesTried a login again:

This was the point where I started to get pretty frustrated with myself.
Mistake #1: Editing system-auth and expecting results
My first move was to jam pam_deny.so into /etc/pam.d/system-auth and expect it to work. Spoiler: it didn’t. I restarted SSH, opened a new terminal, entered my password, and got in like nothing had changed. But the problem wasn’t PAM. The problem was my approach.
Turns out, SSHD doesn’t even use system-auth on CentOS the way I thought. It uses password-auth. So my dramatic changes were just… sitting there.
Mistake #2: Mixing up include and substack
Once I figured out I was editing the wrong file, I dropped my deny line into password-auth, but nothing changed. That’s when I learned about the weird sibling rivalry between include and substack. I had assumed they were synonyms when they’re definitely not.
Depending on where and how they’re used, substack can act more like a scoped function call, where failures don’t bubble up the way they do with include. That difference bit me. This explained why even with the “right” file, PAM still wasn’t locking me out.
Mistake #3: Not realizing SSH was the variable
Here’s the real twist: I was testing everything through PuTTY. My login path wasn’t going through login or even password-auth the way a local console would. It was hitting /etc/pam.d/sshd directly. Once I dropped my requisite pam_deny.so line at the top of that file, I had the lockout. Finally. I was aiming in the wrong direction despite having the bullet loaded all along.
What I Learned
- don’t assume PAM stacks are universal (each service has its own file and Editing one doesn’t necessarily touch another)
- logins behave differently depending on how you enter (through a direct console, hard swapping users and SSH terminals are all handled seperately)
- test your headaches by keeping an eye on
/var/log/secure. (PAM doesn’t tell you much at the surface level… we’ll get into this later in the post)
In the end, getting PAM to deny me taught me more than when it let me in. The mess was the valuable lesson for me.
Brute Force Protection with pam_faillock.so
TL;DR: pam_faillock.so can lock accounts after repeated failed logins, making brute force attacks harder. It tracks failed attempts, enforces cooldown periods, and can be reset by admins, with all activity visible in the logs.
Now we’ll shift gears into a clear practical use case of PAM. We’ll lock out a user after several failed login attempts, check on who is actually locked, manually reset that lock and examine the logs that tell the full story in depth.
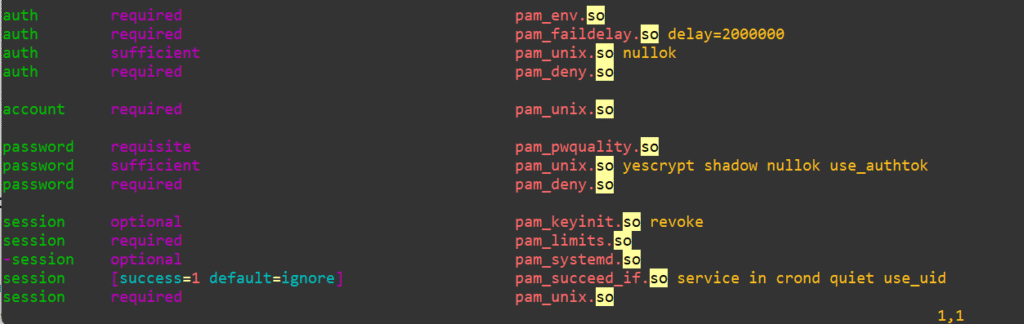
I’m going to demonstrate only a local user swap here. Have a look at /etc/pam.d/su and /etc/pam.d/login files. Switching a user with su and logging directly to a console session uses system-auth for their auth management:
For SSH sessions, we can have a look at /etc/pam.d/sshd and see that we’d need to actually change password-auth:
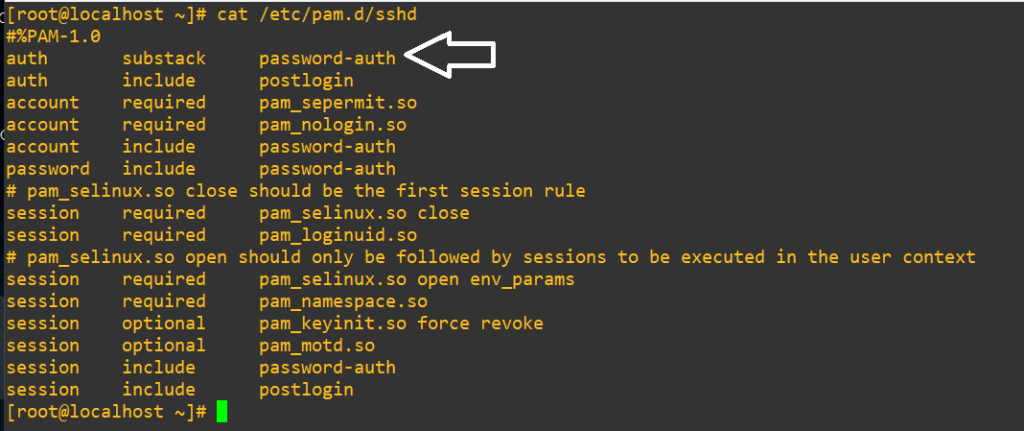
If you want to test this yourself for SSH, the process is the same as below, except that you must modify the password-auth file instead of the system-auth.
We’ll start with a standard backup:
cp /etc/pam.d/system-auth /tmp/system-auth.origCheck that you’re on your standard authselect profile (mine was just called “local”). Use the following to see the list of available profiles for authselect:
authselect current
authselect listSwap your profile back if you desire to (or stay on your custom profile, your call) with:
authselect select local --force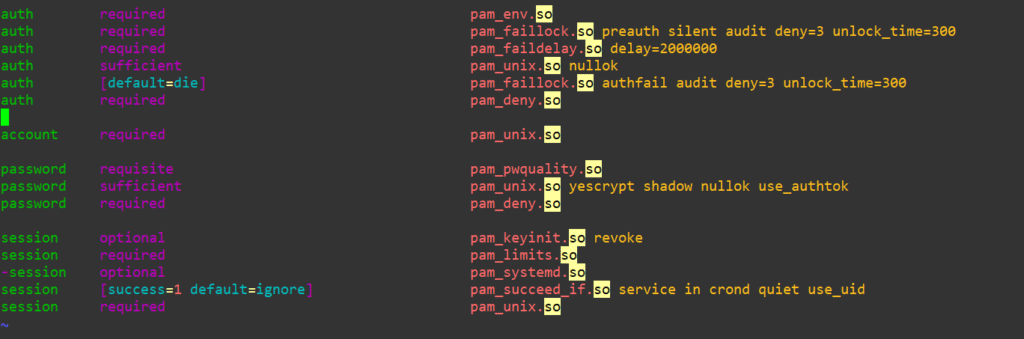
authselect apply-changesOpen up /etc/pam.d/system-auth and add the following line below pam_env.so (you can swap around the deny=3 to whatever count you want for allowed failed attempts or the unlock_time for longer delays):
auth required pam_faillock.so preauth silent audit deny=3 unlock_time=300Then add the following line at the end of the auth section above any pam_deny.so:
auth [default=die] pam_faillock.so authfail audit deny=3 unlock_time=300Here’s what the file looks like before we mess with it:
Here’s how it will look after the changes:
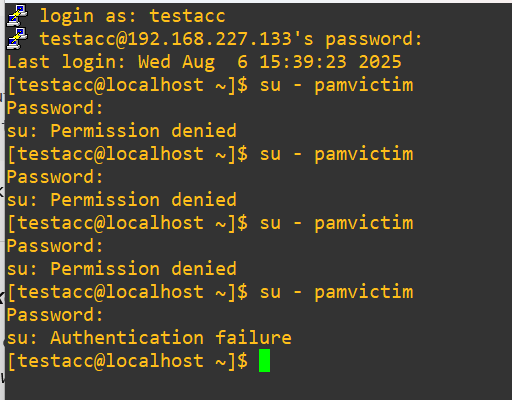
We’ll create a victim user named pamvictim and give them a password “badpass”:
useradd pamvictim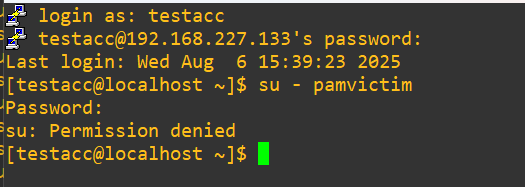
passwd pamvictimTo test out su, you’ll need to hard swap into a standard user and then hard swap over for the test. The root account doesn’t need a password to transfer into another account, making the test impossible. We’ll try out our three attempts now:
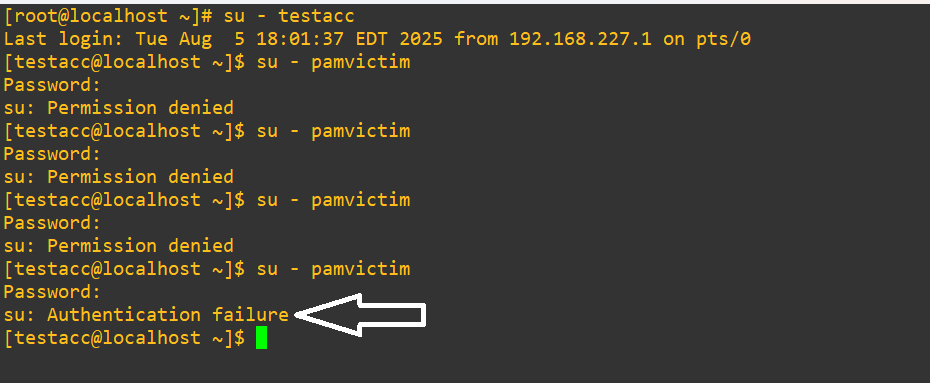
We went from “Permission denied” for the first three attempts and then straight into “Authentication failure” once we tried the fourth time.
Let’s have a look at faillock for our user to examine what was caught:
faillock --user pamvictim
We tried to get in four times, so why are there only three entries?. I discovered faillock shows only the failed attempts, but once the account is denied from a lock, it doesn’t track it here. Let’s have a look at the security logs for a deeper dig:
grep pam_* /var/log/secure
We see our first three login attempts fail the password check and produce an authentication failure at 15:39:32, 15:39:42 and 15:39:49. After the third failed attempt we can see:
Aug 6 15:39:49 localhost su[77223]: pam_faillock(su-l:auth): Consecutive login failures for user pamvictim account temporarily lockedNow, I waited about fifteen minutes and tried to test the security control again:
And here we see that the timeout we set of 300 seconds actually worked, since we didn’t actually receive an authentication failure. Let’s pressure it further to see what happens:
Alright, so the functionality looks like it is cycling correctly. Let’s double check the security logs in succession from the earlier four attempts:
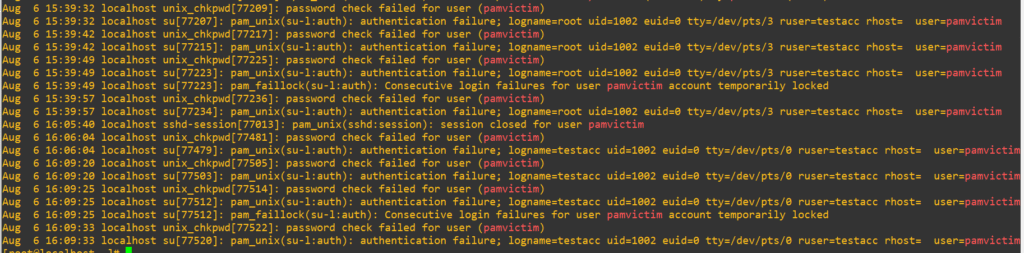
These four new attempts are identical, so we can trust things are operating under the hood like we expected.
We saw the full pam_faillock.so lifecycle in action:
- failed logins
- lockout trigger
- cooldown delay
- reset and retrigger
- final confirmation in logs
Let’s pose a hypothetical where a user locks themself out and you needed to unlock them immediately. This is easily done with:
faillock --user pamvictim --resetTrigger the authentication lock one more time, issue the reset command from above and then try to get in normally with the correct password:
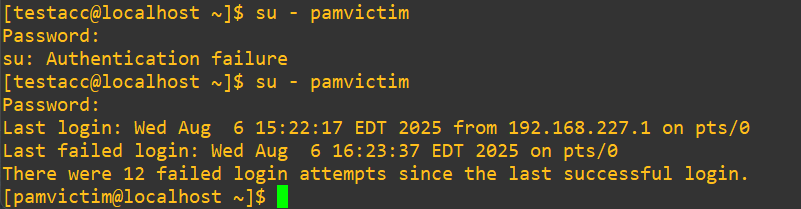
We went through the lock-out cycle three times with four total attempts each, so we can see that the logging is working accurately, telling us about the twelve failures. Perfect.
Having this security control in place should be a cornerstone of any Linux hardening strategy. It’s low effort to implement and makes spray-and-pray brute forcing from malicious actors much more challenging, giving defenders (and/or SIEMs and intrusion detection systems) more time to identify, contain and remediate possible incident attempts.
The Power (and Risk) of pam_rootok.so
TL;DR: pam_rootok.so lets root skip all authentication checks. If misconfigured in sudo, anyone who becomes root even briefly can run sudo freely without MFA, password prompts, or proper logging.
Our last avenue in this post that we’ll go down is about pam_rootok.so. Plain and simple: it checks if the current user is root (UID 0). If the user is root, authentication automatically succeeds. If not, that authentication fails. This does not ask for a password or do any further verification. It’s a pure yes or no check if your User ID is 0.
This PAM module is common in services where root should be able to bypass the usual authentication mechanisms. This is essentially a superuser bypass hack. This PAM module is responsible for why I mentioned earlier that we couldn’t test our su changes without swapping out of root first.
When you see this module in files it typically looks like:
auth sufficient pam_rootok.soA few of the common places you’ll find it are:
/etc/pam.d/su
/etc/pam.d/runuser
/etc/pam.d/crond (sometimes)Usually you’ll see it paired with the pam_unix.so module. This is done so that if you are not root, the stack will fall back to pam_unix.so to require you to authenticate properly. It will often appear as:
auth     sufficient   pam_rootok.so
auth required pam_unix.soThis feature is very powerful and very potentially dangerous to mess around with. The key problem is that misusing pam_rootok.so opens holes in your security posture to grant possible future privilege escalation (and stealthy abuse, which we’re exploring next) from malicious actors.
Let’s run through a quick lab demo to see this in action. But, let me be absolutely clear: this very risky to do in a production environment.
We’re going to intentionally introduce a free privilege escalation to our system by misconfiguring the sudo PAM file. Open up /etc/pam.d/sudo and add the following line at the top:
auth sufficient pam_rootok.so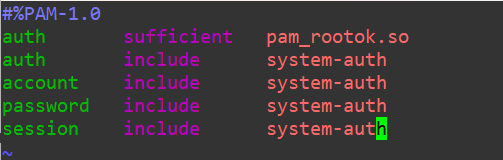
What have we actually done now?
- if you’re already
root,sudonow skips all further checks (this is fine) - if a malicious actor finds any way to escalate to UID 0, even momentarily, they now can run
sudofreely without password prompts or proper logging - this bypasses multi-factor authentication, password policies, auditing, logging hooks or any other security controls lower in the stack
As a quick refresher from the control section earlier:
required-> must pass, but doesn’t stop the stackrequisite-> must pass, and stops immediately on failuresufficient-> if it passes, skip the rest of the stackoptional-> doesn’t impact the result unless it’s the only module
Throwing the sufficient control into the configuration guarantees:
- no password is requested due to the logic of
pam_rootok.sopurely just confirming UID 0 being true or false - no audit logs from
pam_unix.so - no MFA challenges from
pam_google_authenticator.so - no login accounting from
pam_tally2.soor others
We’re going to also set up PAM logging to see authentication logging it in action. Add the debug flag after the pam_rootok.so entry.
auth sufficient pam_rootok.so debugAlso, modify the pam_unix.so module of auth within /etc/pam.d/system-auth to:
auth sufficient pam_unix.so nullok debugThe debug flag will now force PAM to push authentication logs to /var/log/auth.log on Debian/Ubuntu or /var/log/secure on RHEL/CentOS.
There’s a another option for PAM auditing (possibly dangerous in production) that we can use to see some debugging. Install audit:
yum install audit #CentOS(!!!) Running broad auditctl watches or PAM debug in production can flood logs, expose sensitive data, slow authentication, and even break services, so keep it in a controlled lab environment only.
Using a tool like auditctl to watch PAM config files or binaries like /etc/pam.d/sudo or /usr/bin/sudo can flood your system with audit events, especially on busy servers. If the watch rules are too broad (for example, tracking rwxa permissions on multiple files, like we’re going to do here), you risk:
- overwhelming the logs
- filling the audit buffer to the point of failure
- even triggering a system panic if
auditdis set to halt on disk-full conditions
Enabling debug on PAM modules (like pam_unix.so or pam_google_authenticator.so) can also cause sensitive information like passwords, usernames, even tokens to appear in plaintext in /var/log/secure, /var/log/messages, or journalctl.
If these logs aren’t tightly protected, rotated, and pruned, they become a goldmine for attackers.
In some cases, aggressive audit or debug settings have caused:
- errors when using
sudobecause modules behave differently under debug conditions - noticeable delays in authentication
- broken SSH or login manager sessions
With that caution out of the way, we’ll add a rule to force auditing to deliberately catch PAM sudo interactions and we’ll tag it with pam_sudo_mod. It will log any read, write, execute or attribute changes (rwxa):
auditctl -w /etc/pam.d/sudo -p rwxa -k pam_sudo_modOn my box I issued a simple trigger while logged in with root:
sudo whoamiNow to check it out in the log and see our wall-of-text, but in-depth output, we’ll use:
ausearch -k pam_sudo_mod
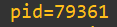
We’ve now got a forensic breadcrumb trail with answers to:
What was run-> sudo whoami

When -> 2025-08-07 16:55:28

Who -> uid=root
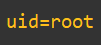
Where (from) -> /usr/bin/sudo

How -> pid=79361
Logging is set-up and we verified it works as intended. For demonstration purposes, I added a standard account to visudo and gave them permission to run dmidecode with no password. If you’d like a deeper breakdown of sudo and visudo, have a look here at my previous blog post. Here’s how it looks:

Next, I’ll explore a very sneaky, but powerful technique that involves pam_rootok.so which experienced malicious actors use to stay under the radar after they’ve successfully obtained privilege escalation in a system.
Real-World Attacker Tactics: When Root Uses Sudo to Hide
TL;DR: pam_rootok.so lets root run sudo commands without authentication and leaves minimal traces, making it useful for admins but risky if abused. This area digs into digital forensics techniques.
Imagine this:
A skilled malicious actor has compromised a Linux server belonging to a hosting provider. After some lateral movement and privilege escalation, they’ve obtained root access on one of the production boxes running CentOS 7. But instead of living noisily as root, the attacker wants to stay quiet.
They discover that the system uses pam_rootok.so in /etc/pam.d/sudo right at the top of the PAM stack and they realize something important:
If they invoke commands as sudo while logged in as root, they’ll bypass all authentication logging.
Now, they craft a persistent implant or drop a trojan binary and schedule it with a root-owned crontab like:
* * * * * sudo /usr/local/bin/.hidden_payload.shWhy use sudo here? Because it:
- avoids logging sensitive actions to
/var/log/secure
(since nopam_unix(auth)entries are written for UID 0) - exploits trust-based authentication
(pam_rootok.soreturns success silently for UID 0) - lets them blend in with legitimate scheduled jobs or admin commands
(especially on systems where ops teams usesudoheavily)
They can now:
- run recon tools, network scans, or exfil jobs using
sudo-prefixed scripts - avoid password prompts (which might trigger MFA or alerts in some PAM stacks)
- leave no obvious forensic breadcrumb in auth logs
- just
pam_unix(sudo:session)entries, which look innocuous and identical to normal admin activity
- just
Now, I’m going to now demonstrate an entire root trust loop where we’ll see clearly:
- if
rootis callingsudo, itis not challenged - It still touches the PAM file (which audit catches)
- But skips all password mechanisms
This is the entirety of how to push the process:
- hard swap into the non-
wheeluser testacc and rundmidecodepasswordless - hard swap into a user that’s within
wheeland has perimssion to run sudo commands, but with a password, and runsudo whoami - hard swap into root and run
sudo whoami
The scenario in a flow-chart will look like this:

This is what it looks like in action:
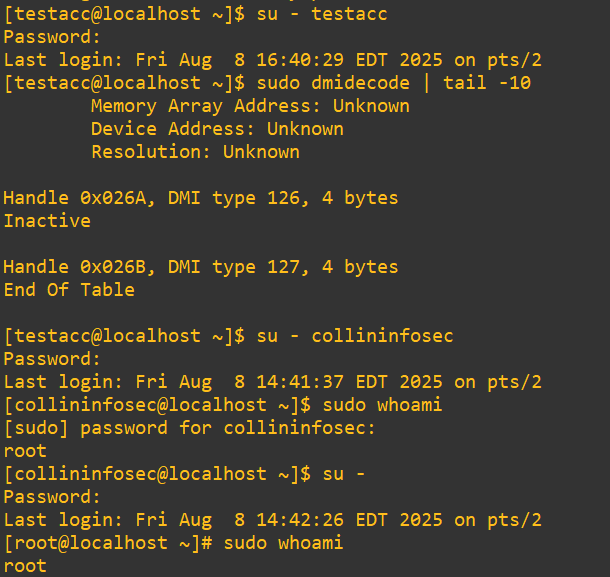
Now, when we examine the PAM logs as demonstrated above we can see all three entries with their distinct UID’s and process calls:
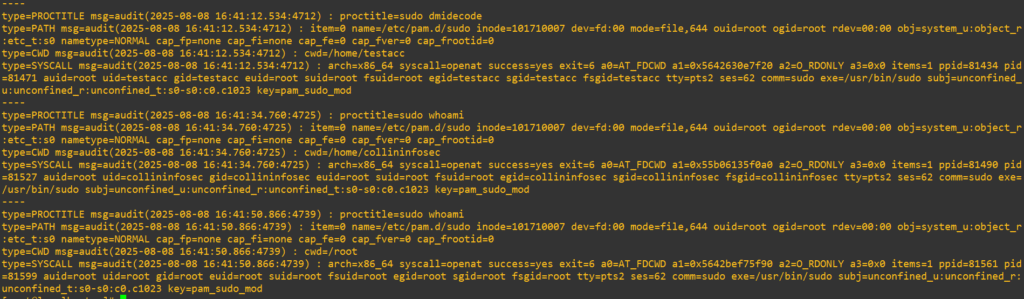
While this shows us what PAM was doing, we still don’t actually see evidence of the missing authentication issue. Further examining the /var/log/secure logs demonstrates exactly what we’re looking for:
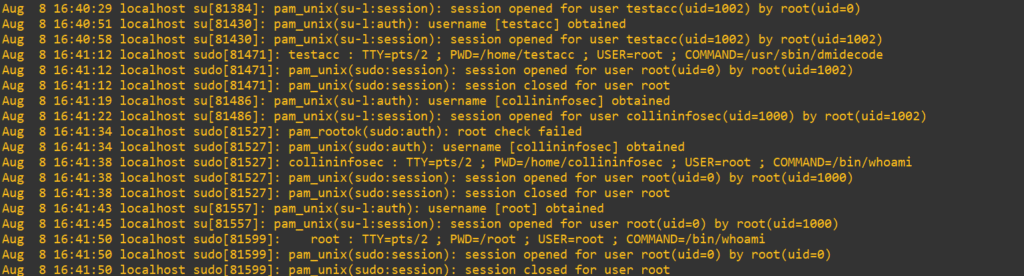
Final breakdown:
1. testacc using sudo dmidecode (NOPASSWD)
Aug  8 16:41:12 localhost sudo[81471]: testacc : TTY=pts/2 ; PWD=/home/testacc ; USER=root ; COMMAND=/usr/sbin/dmidecode
Aug  8 16:41:12 localhost sudo[81471]: pam_unix(sudo:session): session opened for user root(uid=0) by root(uid=1002)
Aug  8 16:41:12 localhost sudo[81471]: pam_unix(sudo:session): session closed for user root
sudoersgranted this command withNOPASSWD- authentication was not prompted
- session opened/closed
- no
pam_unix(sudo:auth)present, this is normal forNOPASSWD
2. collininfosec (UID 1000) running sudo whoami
Aug  8 16:41:34 localhost sudo[81527]: pam_rootok(sudo:auth): root check failed
Aug  8 16:41:34 localhost sudo[81527]: pam_unix(sudo:auth): username [collininfosec] obtained
Aug  8 16:41:38 localhost sudo[81527]: collininfosec : TTY=pts/2 ; PWD=/home/collininfosec ; USER=root ; COMMAND=/bin/whoami
Aug  8 16:41:38 localhost sudo[81527]: pam_unix(sudo:session): session opened for user root(uid=0) by root(uid=1000)
Aug  8 16:41:38 localhost sudo[81527]: pam_unix(sudo:session): session closed for user root
pam_rootok.sowas invoked and failed because UID != 0- PAM fell through to
pam_unix.soto authenticate pam_unix(sudo:auth)shows username acquisition- authentication clearly occurred
- password prompt was triggered
- this is textbook PAM flow when
pam_rootok.sois bypassed
3. root (UID 0) using sudo whoami
Aug  8 16:41:50 localhost sudo[81599]:    root : TTY=pts/2 ; PWD=/root ; USER=root ; COMMAND=/bin/whoami
Aug  8 16:41:50 localhost sudo[81599]: pam_unix(sudo:session): session opened for user root(uid=0) by root(uid=0)
Aug  8 16:41:50 localhost sudo[81599]: pam_unix(sudo:session): session closed for user root
- no
pam_rootok(sudo:auth): authentication passed - no
pam_unix(sudo:auth):… at all - no password prompt
- no password success log
- yet sudo worked and session opened
Wrapping Up: From PAM to Practical Forensics
This post started as a look into PAM but became something bigger. We explored how Linux handles authentication, how modules interact, and how attackers can abuse trust-based mechanisms like pam_rootok.so to move quietly through a system.
Along the way, we:
- broke down how PAM stacks work
- analyzed key modules like
pam_unix.soandpam_deny.so - used
auditdand/var/log/secureto track authentication paths - discovered how root can use
sudowithout leaving forensic clues - learned how to think like both an attacker and a forensic analyst
PAM isn’t just about getting access. It’s about understanding who was trusted, who bypassed checks, and what trails they left behind. If this walkthrough helped you see that more clearly, then it did its job.
Thanks for reading. See you in /etc/pam.d.