

Introduction
Keeping track of passwords is frustrating. You know you shouldn’t reuse the same one for every account, but creating and remembering a dozen unique passwords feels impossible. This is where password managers come in. They store all your logins securely and require you to remember only one strong passphrase.
But what actually does strong mean? Once we’re set up in the cloud, we’ll take a brief nerdy detour into the world of password security to understand why this question matters. Imagine password protection as a castle wall. A short and predictable password, like your phone number or birthday, is the equivalent of a flimsy wooden door. A long and random passphrase is reinforced steel like a bank vault that would take attackers millions of years to break through. We’ll go over password entropy and how it measures the unpredictability of a password. We’ll explore how even a simple four-word passphrase makes brute-force attacks nearly impossible. Adding unpredictable symbols makes it exponentially harder for cracking tools to break.
The downside is that many password managers come with a price tag. If you are storing sensitive credentials for personal or business use, trusting a third-party service with your data might not feel right. What if you could host your own password manager in the cloud, giving you full control over security and avoiding subscription fees?
In this guide, I will walk you through setting up Passbolt, an open-source password manager, on an AWS cloud instance. You will learn everything from deployment to security configurations. I will also cover cost-saving strategies that automate instance shutdown so you only pay for what you use instead of letting cloud fees pile up when the service sits idle.
By the end, you will have a secure, cost-effective, and fully private password manager running in the cloud.
Preparation
Before setting up our own cloud-based password manager, it is helpful to have a foundational understanding of a few key technologies. You’ll need a Linux VM set up and foundational Linux skills will be useful for managing your AWS instance, including navigating directories, adjusting file permissions, and establishing SSH connections. I’ll walk you through the basic AWS knowledge that is also important, particularly how EC2 instances work. It looks intimidating at first but the screenshots will make it easy to see where you need to go. Additionally, a base understanding of SSH authentication will allow you to securely connect to your cloud server using RSA key pairs rather than password-based logins.
Purchasing a domain (it can be a cheap random named domain for a few dollars a year, you don’t necessarily need a full-fledged quality web solution) will allow you to establish transmission security for your password manager and host it simplified from a web browser. The total financial cost to get a domain and deploy your instance EC2 (maybe for a few days, depending on how long it takes you) should only cost you a few dollars USD. An understanding of the basics of DNS and using an public-key certificate to secure HTTPS traffic will be needed, too. If you choose to skip this part, your password manager is completely unsafe to use beyond a learning exercise. You must configure SSL so that it operates with encryption, don’t consider this optional if you’re going to use it practically. Finally, security awareness is essential, as handling passwords requires strong security practices such as using long and unpredictable passphrases, minimizing cloud exposure, and limiting unnecessary access. With these concepts in mind, you will be well-prepared to begin setting up your password manager in the cloud. Let’s get started!
Deploying Your Password Vault
To start with, we’ll head over to Amazon’s AWS website to register a new AWS account, if you don’t already have one.

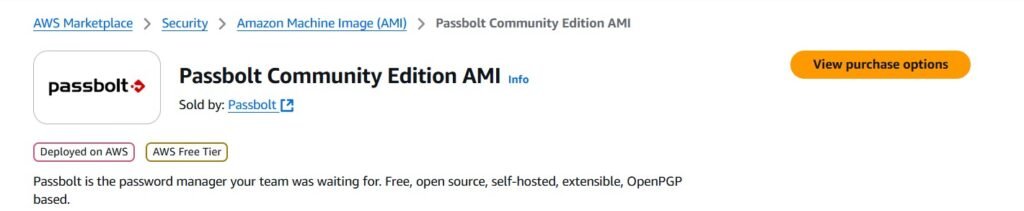
Follow the on-screen registration, it’s very straightforward without technical depth. Next, we’ll navigate to Passbolt’s website to start setting it up. Select “Install on-prem” and choose the option for deployment on AWS.

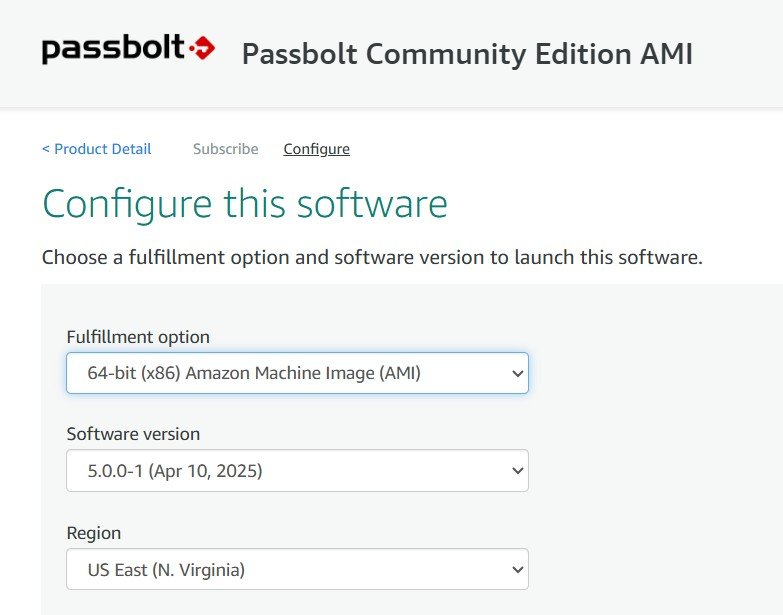
You’ll then be redirected to the AWS marketplace landing page for Passbolt. Subscribe to the software, and head to configuration. Be aware that running this in the cloud will cost approximately $0.05 per hour. At approximately 720 hours per month it will cost around $30 a month if you were to let it run 24/7. Don’t accidentally leave it running if you’re not actually going to use it or practice with it.

The default settings are fine, change the Region to an area near you if it isn’t already.
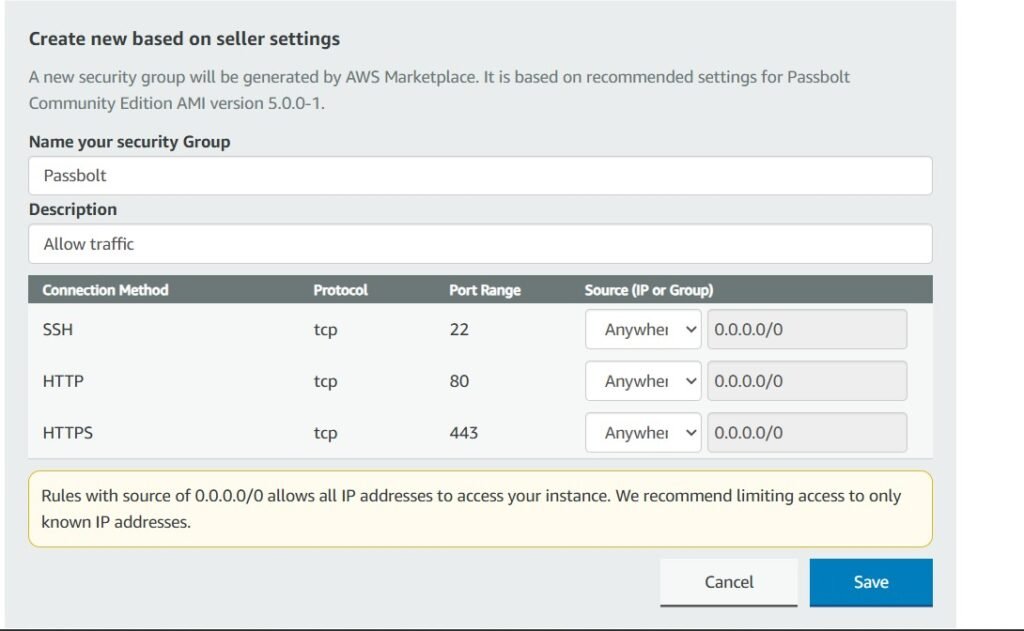
Leave the launch settings as default other than security group settings, click “create new based on seller settings”.

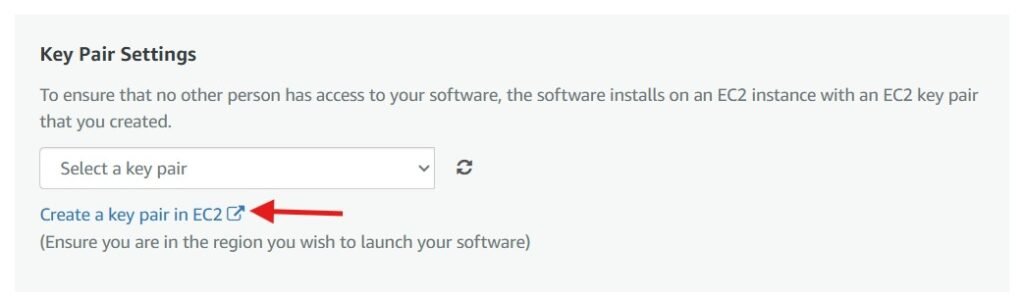
We want to be able to access and manage it via SSH, so we’ll have to ensure port 22 is open for traffic.
Scroll down a bit and click on “generate key pair”. We’ll want this to have secure transmission with our EC2 instance hosting our server. Click on Actions -> Import Key Pair.

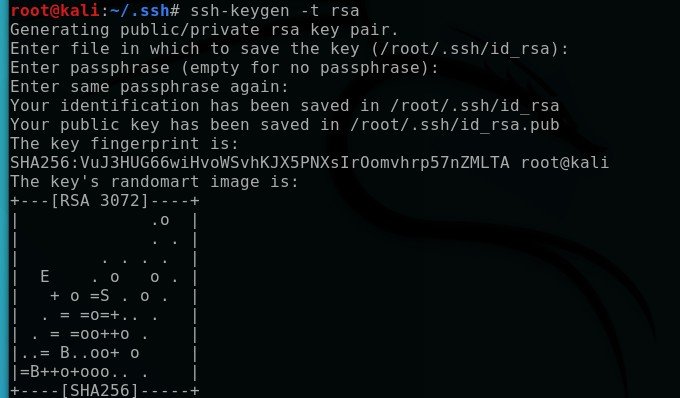
Open up your Linux VM (I’m using Kali, but any distribution will work) and generate a new SSH key pair using the RSA algorithm. Open a bash terminal and enter:
ssh-keygen -t rsaIf you are not deploying this for practical use, you can skip setting a passphrase. However, for a production environment, adding a passphrase provides an extra layer of security. While an RSA key without a passphrase is still secure, using one significantly improves protection against unauthorized access if the private key is compromised. The whole point of key-based protection is that it’s highly secure so long as no unauthorized access comes to your systems. We’d all like to hope that this won’t happen, but it’s extra insurance for your peace of mind as a security-minded professional. It’s considered best practice to take all the security measures you can that don’t impede practical efficiency too greatly and having a passphrase on your security keys is trivial to add.
For maximum encryption strength, you can modify the command to:
ssh-keygen -t rsa -b 4096This generates a 4096-bit RSA key, which is widely considered the best balance between maximal security and broad compatibility at the time of writing.
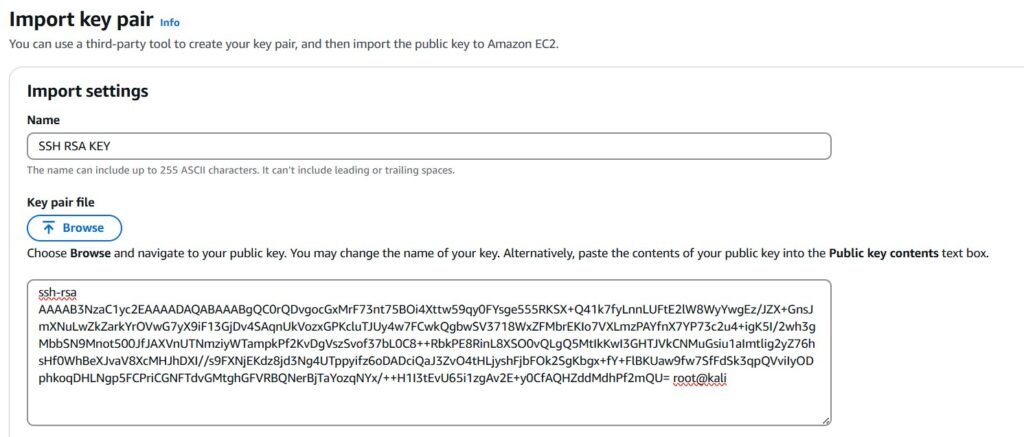
Now open the public key that was created in the hidden .ssh folder within root. The directory was shown when you created the key above. Copy this public key back into your AWS set-up for Passbolt. While I’m showing my public key here, you never want to show the private key. If you look at your private key, it will be similar in appearance. In practice, you never want to show or disclose this online or to anyone who is unauthorized to see it in your organization as it is the metaphorical key to the castle, which could have devastating implications to production and public trust. Share the public key, hide the private key.

The configuration panel should confirm that the import was successful. You can also assign it a name if you’d like. If the import fails, double-check that you generated an RSA key pair or whichever asymmetric algorithm you prefer when running ssh-keygen. There are several encryption algorithms available, and using an incompatible one could cause the issue.
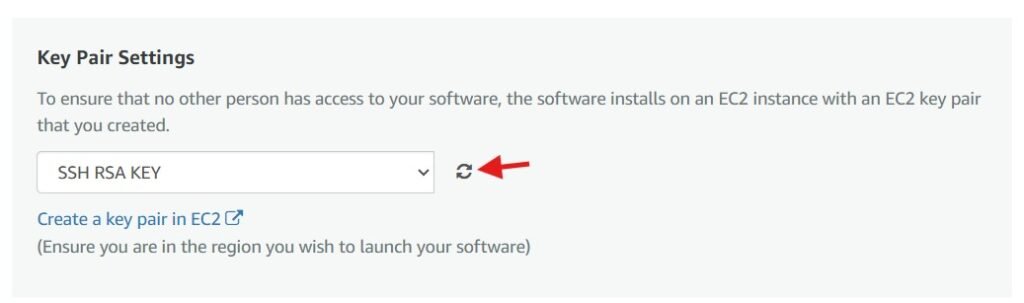
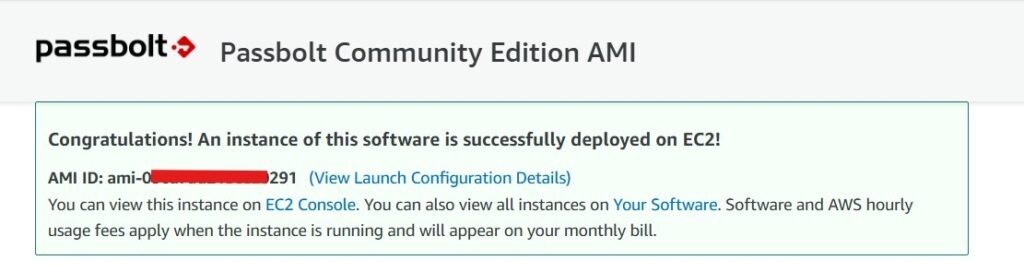
When you refresh the key-pair settings your created key should now be selected. Click on launch in the instance dashboard, if everything worked you should now see your instance of EC2 deployed.


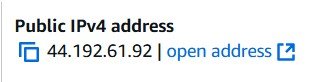
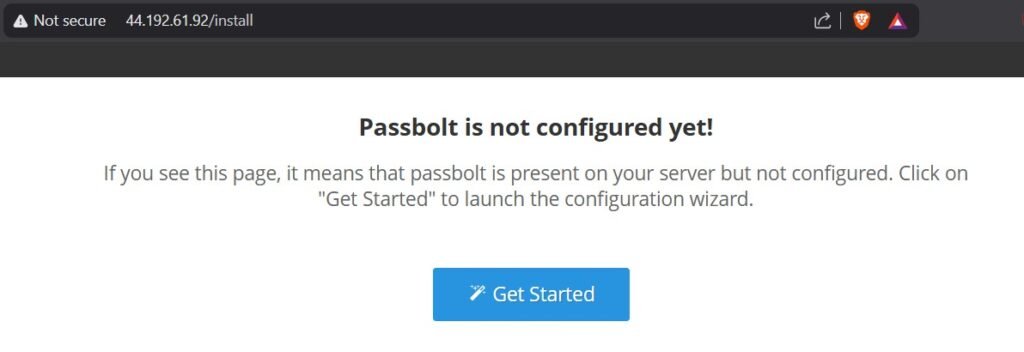
Now that our EC2 instance is in the running state, navigate into the instance and have a look at your public IP address. If we drop that into a browser, we’ll see that Passbolt still needs to be set up and have confirmation that we can indeed access our cloud server.
Your browser will should attempt to connect via HTTPs by default and it will fail since we haven’t configured any of our online encryption yet.
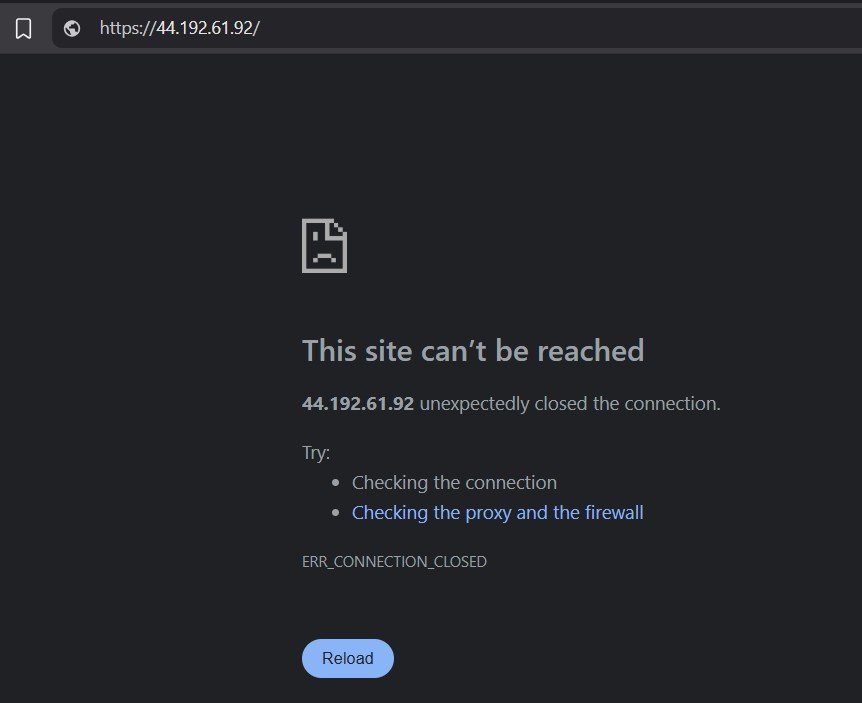
Change it to http://your-instance-ipv4-address/ and it will take you to the landing page for Passbolt, confirming we can access the server from a browser. We’re about half way done now!
As mentioned in the introduction, if you are setting this up purely for the experience and do not plan to use it practically, or if you prefer not to pay for a domain, you can skip the next few steps. However, if you intend to deploy this for business or personal use, it is critically important to configure a proper SSL/TLS certificate. Without encryption, your passwords will be transmitted in plaintext, leaving your system vulnerable to interception.
I have access to a hosting service by Hostinger (which is great, by the way!) and created a subdomain on my main website to get a new unique security certificate. If you need help with the following few steps, shoot your web provider a message and I’m sure they’ll be happy to lend a hand.
You’ll need to to access the administration area of your web portal which will have a defined area called “DNS Zone” or “DNS management” or something similar. In my case, with my provider, in my DNS records I added an “A” Record for my passbolt subdomain that points to the IPv4 address of my EC2 instance. Some tweaking may be required to get this to work properly.

Head back to your Linux box and open a bash terminal. Our next goal is to configure the server software within our instance. We’re going to access our box via SSH. Enter the following:
ssh admin@yourinstanceipv4addressOnce we’re in, the server should prompt you about your Passbolt installation with some straightforward instructions.
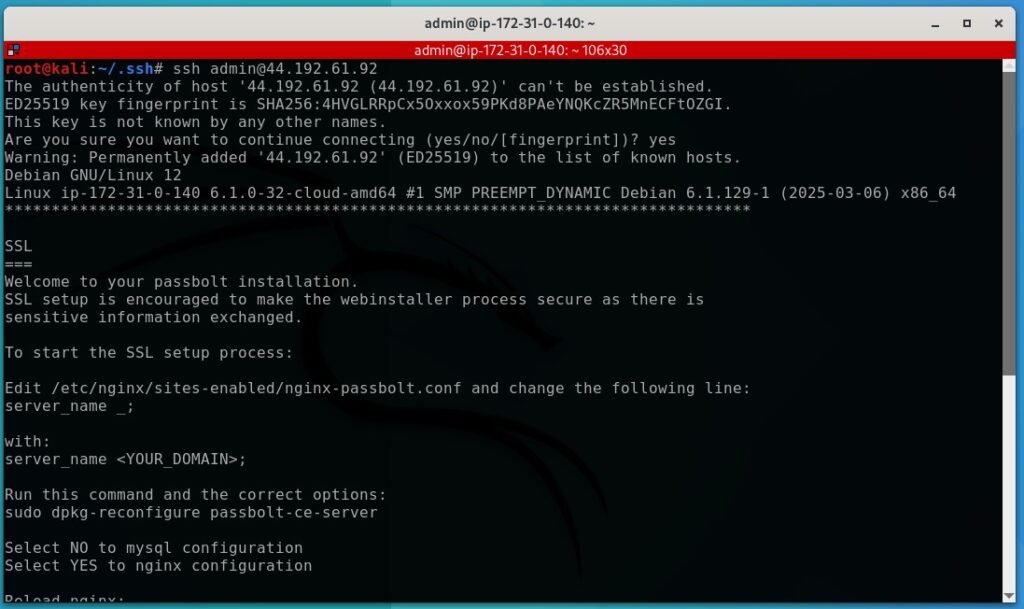
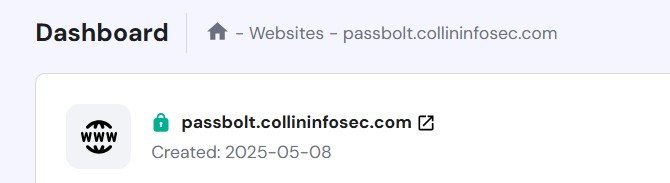
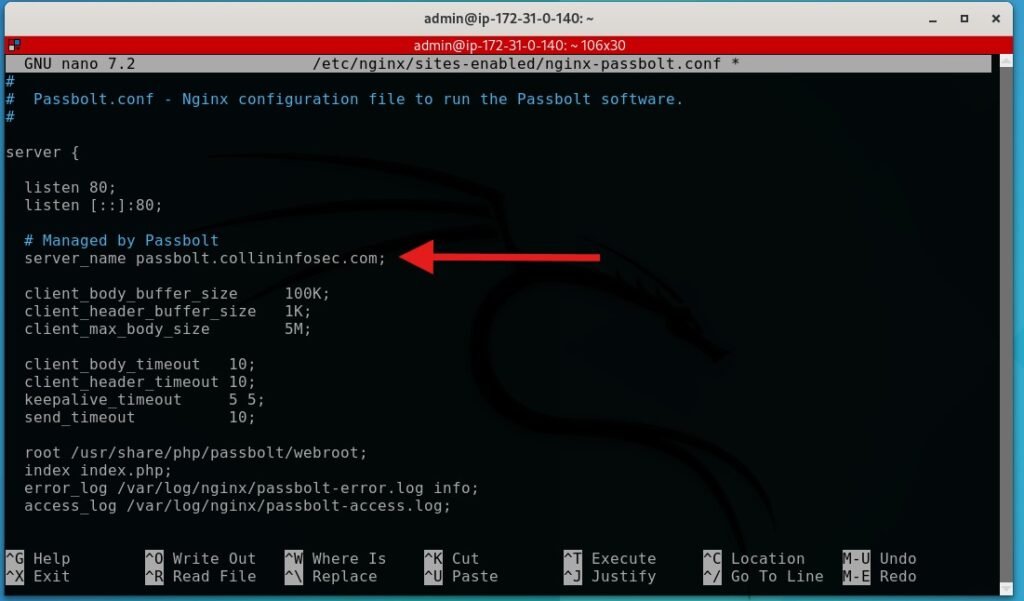
We’ll have to modify the nginx configuration file. Enter the following bash command and modify the server name to whatever you called your domain. In my case it’s just passbolt.collininfosec.com
sudo nano /etc/nginx/sites-enabled/nginx-passbolt.conf
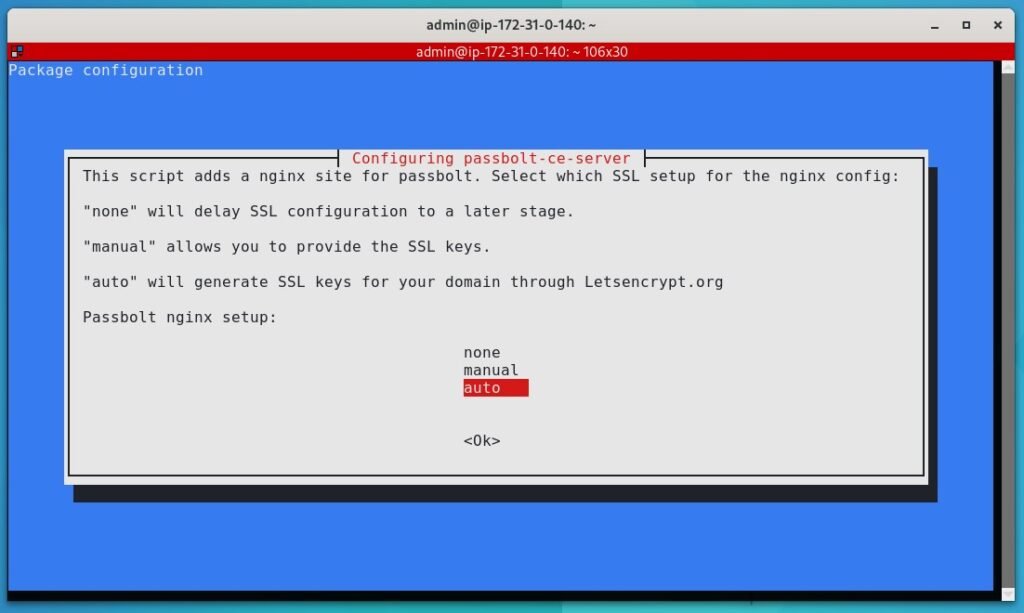
Next, run following command to start the nginx server setup. Select no for MySQL database and yes for nginx server when prompted.
sudo dpkg-reconfigure passbolt-ce-serverThe installer will ask how you want to configure SSL keys. Select auto and allow it to handle this for you. Doing it manually is a good learning experience, but I’m not going to go over it here.
Before we can proceed, let’s make sure our DNS records from earlier are ready. The standard advice is that DNS “A” records can take up to 24 hours to propagate, though in many cases, the process completes within minutes. However, the delay can vary depending on multiple factors.
When you update an A record, the change must be processed by multiple DNS servers across the internet. Each server caches DNS data to reduce load and speed up lookups, but this caching means changes may not be recognized immediately. The TTL (Time-to-Live) setting on your record determines how long other servers will hold onto the old data before refreshing with the latest updates. If the previous TTL value was high, propagation can take longer.
Propagation speed is also influenced by the DNS provider, the geographic distribution of DNS resolvers, and how frequently internet service providers refresh their cached records. Some ISPs update DNS data rapidly, while others may hold onto outdated records for extended periods. Even if your own system reflects the change quickly, someone accessing the site from a different location might still see the previous record for several more hours. This is why DNS updates can sometimes appear inconsistent depending on where you are connecting from.
If your record has not updated immediately, be patient and check back later. In the meantime, you can try clearing your local DNS cache on Windows or Linux using the following commands respectively:
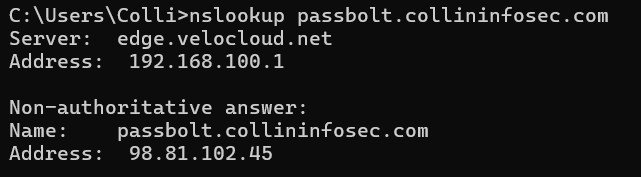
ip config /flushdnssudo systemctl restart systemd-resolvedAn easy option is also to use an external DNS lookup tool to verify whether the change has started propagating across different regions. I checked with a quick windows DNS lookup as shown below and once it returned the ip address of my EC2 instance, I was ready to continue. Note: this IPv4 address is different than what you saw previously in this blog post because when I went through this I restarted my EC2 instance and didn’t set up a static address with Amazon, so I was issued a new one. If you left your EC2 instance running it should still be the same as it was before. You can confirm this back in your instance console as demonstrated.
Return to your nginx installation within the SSH session and proceed with the installation. Give it the domain name and set the admin email account as whatever you want to use. The installer will now check with the certificate authority services (probably LetsEncrypt.org) about the SSL certificate your website uses.
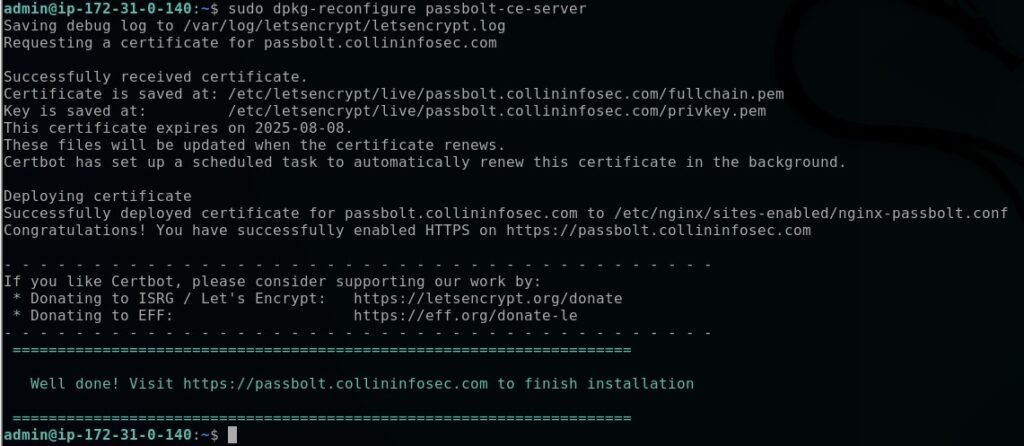
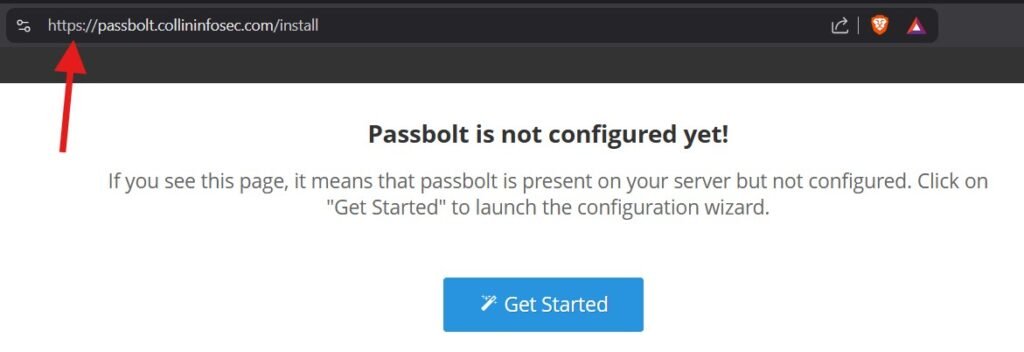
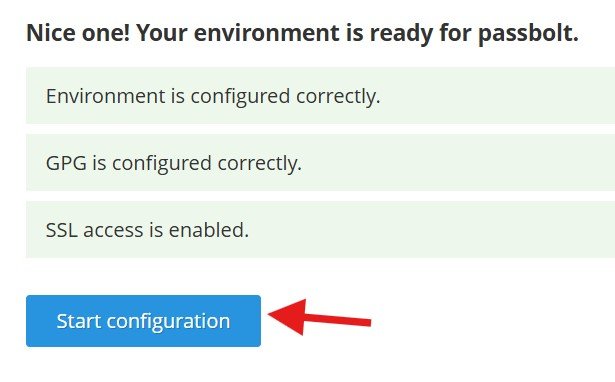
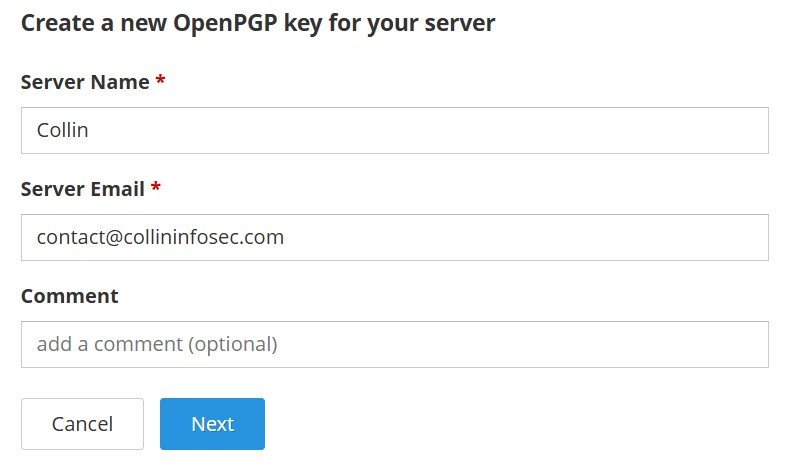
Refresh your browser domain page and you’ll see it load correctly with HTTPs, indicating your SSL cert was synced correctly on the machine. You may not be able to access it immediately as it takes some time for the DNS servers to register it; give it some time. From here the setup is pretty straightforward. Click “Get Started”. You can leave the database configuration as it is for this demo, also in PGP keys I set it up to just a personal email address.
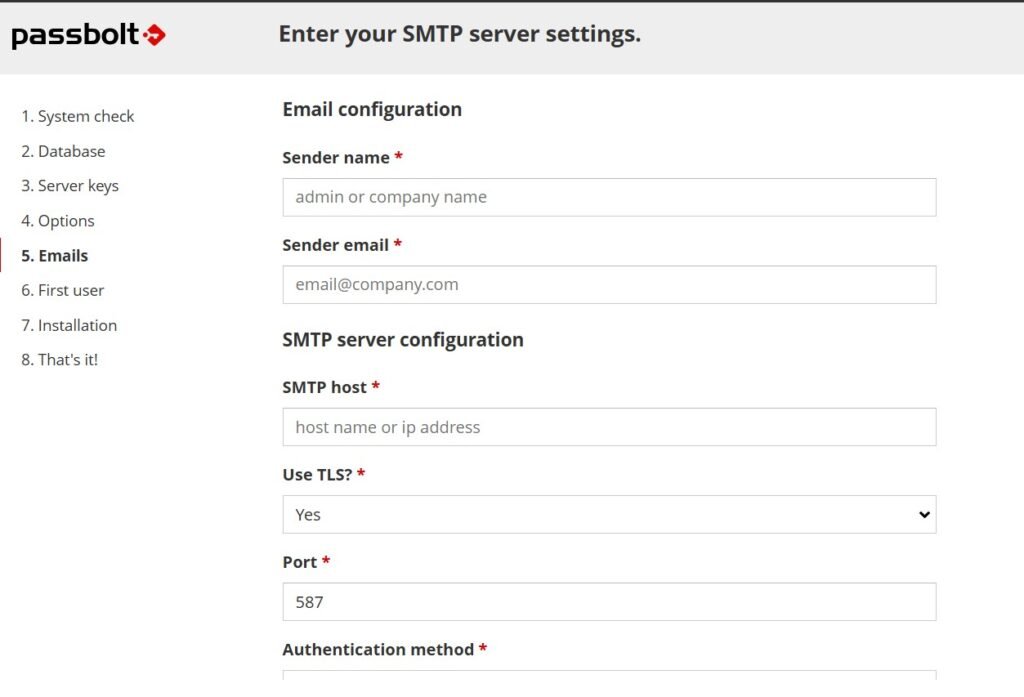
I’m not going to use SMTP for this as I don’t intend to actually use this as my password manager daily-driver. If you want to use this service for your passwords you’d want to have an SMTP server set up so that Passbolt can send you emails about account creation etc. For this setup you can just enter whatever personal email address you want as the host.
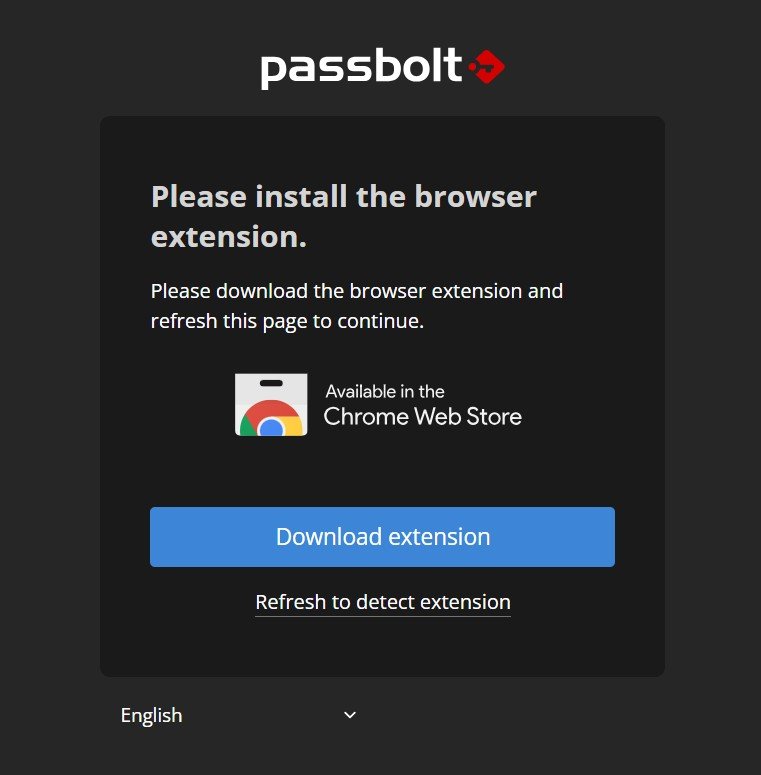
Once you’re done the setup, Passbolt will prompt you to install their browser extension and refresh.
Passbolt will now request you to set your passphrase. Don’t actually use this password shown in the screenshot and no, I don’t use it for anything. It’s just four words chosen at random with a few symbols tossed in.
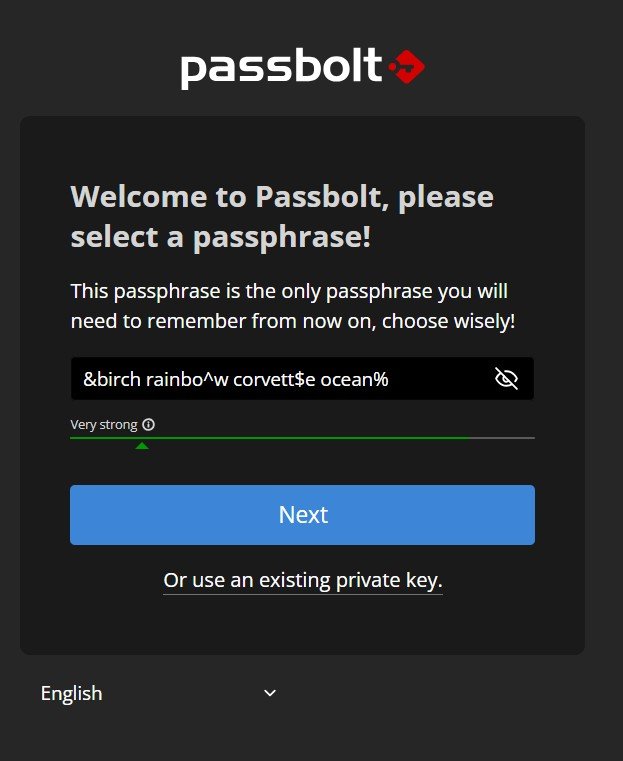
At this point, Passbolt will prompt you to create a master password. If you are not already using a password manager (why not?), it is crucial to understand that this single password protects everything stored within Passbolt. If it is compromised, all your saved passwords could be at risk. However, the major advantage is that you only need to remember one strong password, making password management much safer and more convenient. The benefits far outweigh the risks of reusing passwords or slightly modifying them for different services. Modern password-cracking systems are designed to recognize these patterns and can break them quickly.
When choosing a master password, my recommendation is to create a four-word nonsense sentence using completely random English words that have no connection to you, your family, your life, or each other. This method provides strong security because length and randomness make it incredibly difficult to crack. If you take it a step further by adding a few random symbols in unpredictable places, you significantly increase its strength. At that point, the computing power required to crack it would be beyond imagination. The Canadian government has provided some further information and guidance on this topic.
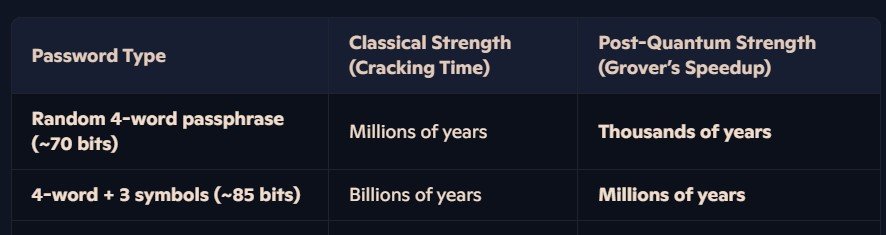
To dig a little deeper into password theory, here’s a few snippets from AI where we discuss and show the strength of a 4 English word password based on the assumption of approximately 200’000 words in English. Brace yourself, this is going to get math-y. Password strength is heavily influenced by entropy, the concept of determining the randomness of something.
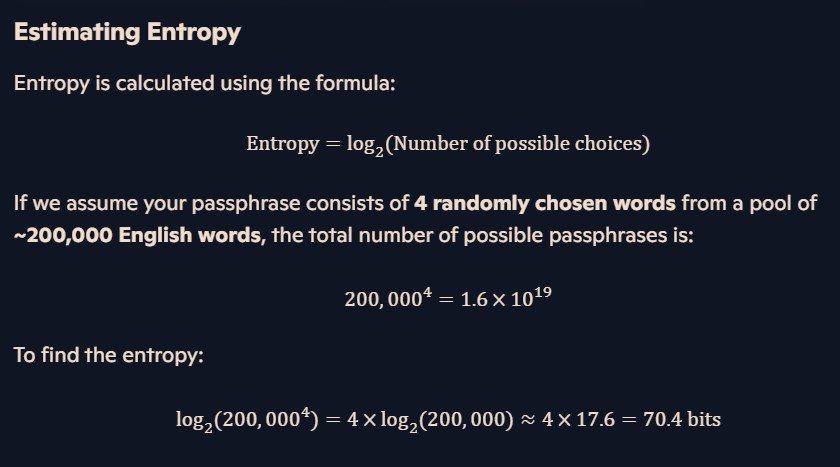
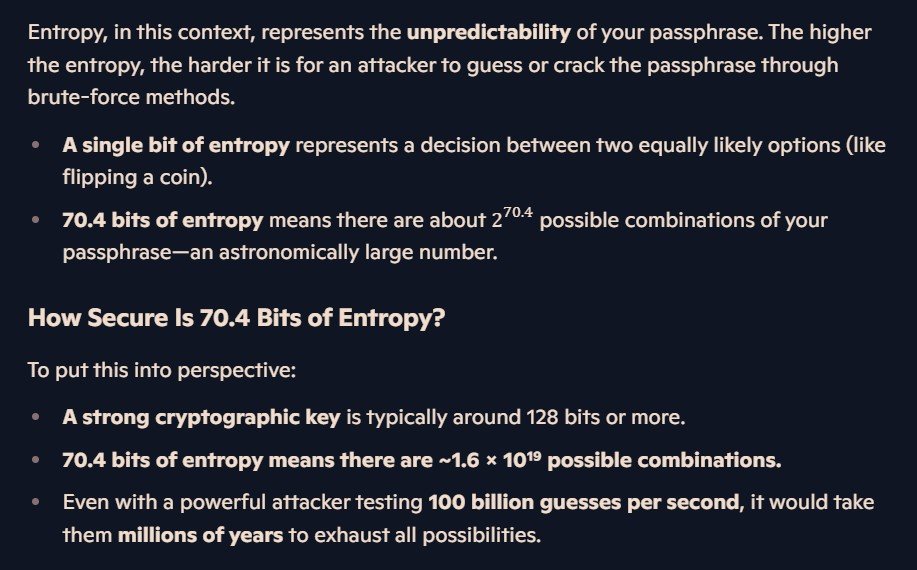
To put this into perspective, the calculation showing 70 bits of entropy means that, in practical terms, even an attacker using an advanced system capable of 100 billion guesses per second would take millions of years to crack the password. At this level of security, the password becomes effectively unbreakable under current computational capabilities.
Once our password reaches this large length of characters, each additional character added increases the difficult to break it logarithmically. So we’ll take our base example of four words and inject 3 random symbols into it, jumping our computation time from millions of years to billions.
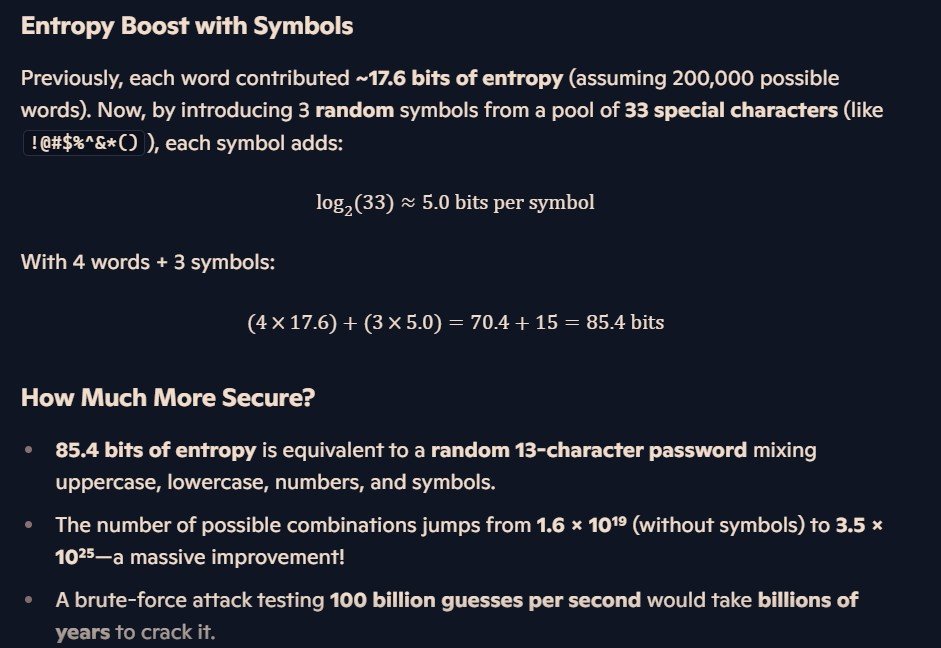
Four random words with 3 symbols scattered throughout will provide you with a similar level of security as a random 13-character password. Let’s be honest, trying to recall thirteen random characters like, for example, g9D$&nl!s$U9r is far more annoying than the a passphrase. This type of problem often encourages employees of businesses to write it down and stick it on a piece of paper by their desk. This type of behavior might seem innocuous until you consider that malicious actors can and will attempt to infiltrate businesses specifically with the knowledge of this type of lax security control being unfortunately common.
At this point, you might be thinking: Who cares? What’s the difference between millions of years and billions of years? Right now, in 2025, it’s not really a big issue to your day-to-day life right now, but you should be aware that once we reach wide-scale quantum computing: weak 8-character passwords with one symbol and one uppercase letter will no longer be acceptable. It already is very bad but is also alarmingly common as the “minimum standard” for most account passwords online. When quantum computing goes live these passwords will be trivially easy to break and could potentially put your safety at serious risk.
Quantum computing poses a major threat to traditional password security. At present, a long passphrase, such as four random words, acts as a highly secure vault protecting your digital identity. Current computing power is not capable of breaking it through brute force because it would require millions of years to test every possible combination. However, quantum computers could completely change the security landscape. Imagine a lock-picking machine that suddenly becomes exponentially faster at breaking locks. That is exactly what quantum algorithms such as Grover’s Algorithm could do to today’s passwords. What currently takes millions of years to crack may take only thousands, significantly weakening even strong passwords almost overnight. All speculation about quantum computing’s ability to crack passwords is theoretical, and it remains to be seen how much faster or slower it will be in practice.
It is fair to say that the drop from billions of years to millions may seem insignificant. However, this theoretical comparison is based on highly secure password design. The reality is that many people still use weak passwords, relying on predictable choices like their child’s name, their birthday, and a single symbol. A common example might be Samantha$1995, which is alarmingly easy to guess and highly vulnerable to password-cracking techniques.

I would hypothesize that in the future, password technology will undergo a complete transformation to address this inevitable challenge. Encryption and hashing algorithms that were once considered the industry standard, such as MD5, were later proven to be insecure. This same pattern will likely happen with current password authentication methods as computing technology evolves. Instead of relying entirely on traditional passwords, security may shift toward multi-factor authentication, biometrics, and passkeys as the primary means of protecting digital identities. Some researchers suggest that quantum-resistant cryptographic algorithms will become the new standard, ensuring authentication remains secure against advanced computing threats.
Beyond cryptographic improvements, behavioral-based security could also play a role in future authentication. Systems may analyze typing patterns, location history, or device usage habits to determine whether a login attempt is legitimate. Passwords as we know them may eventually become obsolete, replaced by methods that are more intuitive, resistant to brute-force attacks, and less dependent on user-generated text-based credentials. While predicting the exact direction of authentication technology is difficult, it is clear that security practices cannot remain static. The shift toward post-quantum security is not just theoretical. It is coming and we also can’t predict when it will.
If you’d like to dig into this more, check out these resources about quantum security here and here.
Let’s head back to Passbolt and finish this up. As an additional level of security, many password managers including Passbolt give you phishing protection by letting you choose the appearance of your security token. You can choose 3 characters and a color that is unique to you.
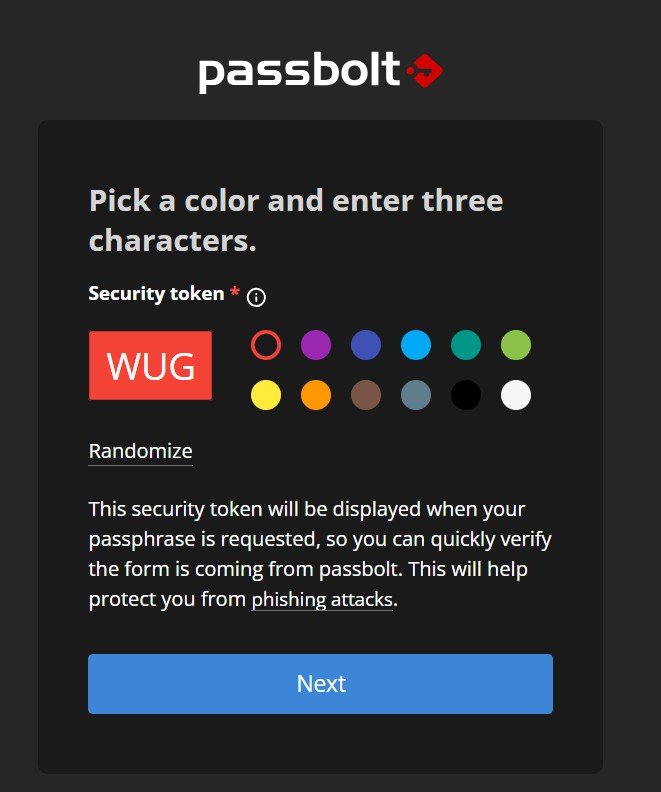
If some malicious actor tries to hit you with a phishing attack you’ll immediately recognize if your token was compromised. In practical terms, this means that the attacker has a roughly 1 in 3’000’000 chance of guessing correctly, which is basically impossible. You’ll know right away if you receive an email claiming to be your password manager and whether it’s fraudulent or legitimate. Again, follow the security principle of not making this relatable in anyway to your life details. Just randomize it.

Passbolt is ready to use.

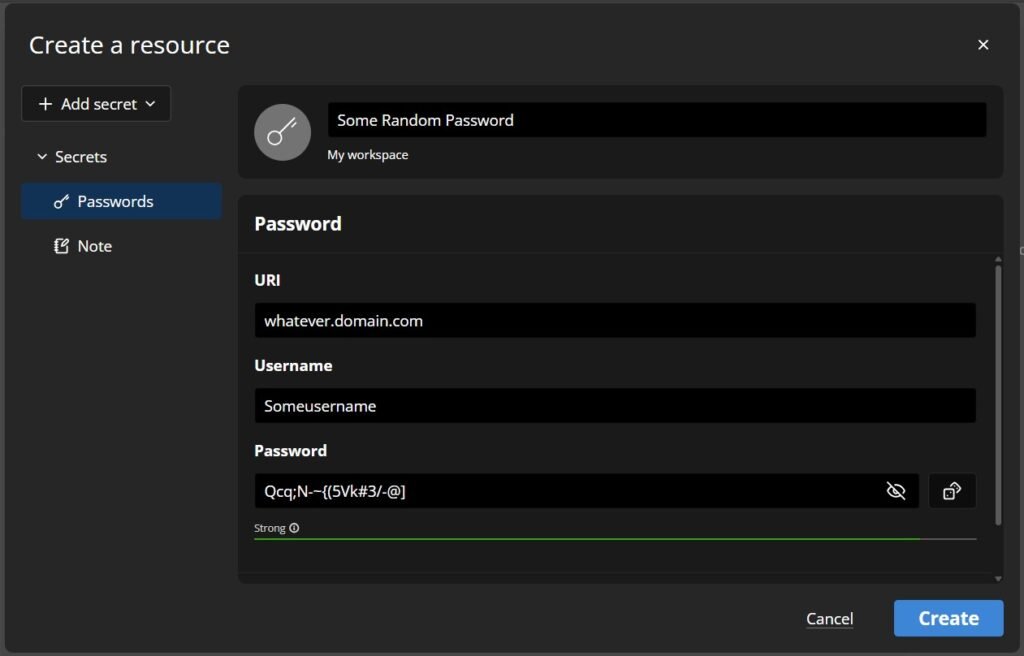
Adding a new password is easy in the GUI:
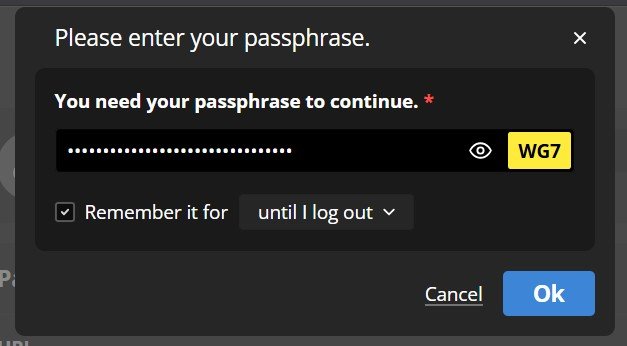
You’ll be prompted again for your passphrase and presented that security token you set earlier.
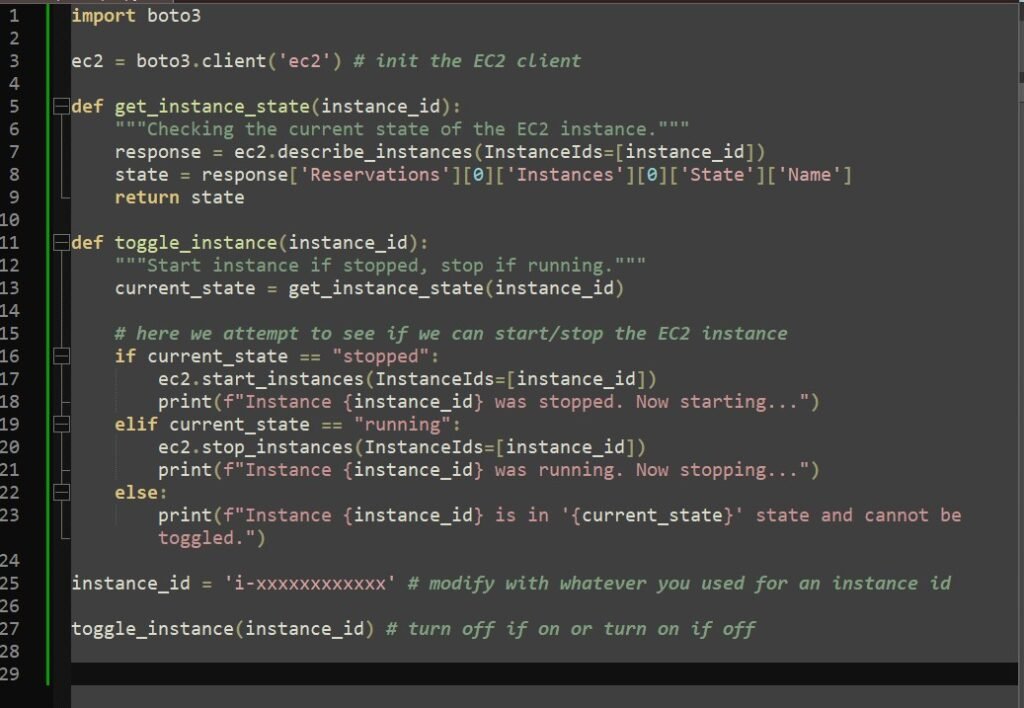
The last thing to consider is your usage time and cost. In practice you might only need your password manager for a total of five minutes per day. So, you can quite readily also easily write a python script as shown below this, to automate turning on or off your instance using Boto3 which is a library with Amazon’s software development kit that can allow you to start or stop your EC2 instance.
This code loads the boto3 library, then will toggle it on or off depending on what is returned when it attempts to check the current status. You’d have to modify this to fit your actual instance id.
Alternatively, let’s hypothesize that perhaps your business operates only between 8am and 8pm, seven days-a-week and employees for sure should only need access to the password manager between these times. You could run a cronjob directly on the linux server machine like:
crontab -e

# start at 8am and stop at 8pm every day, modify to fit your instance id
0 8 * * * aws ec2 start-instances --instance-ids i-xxxxxxxxxxxx
0 20 * * * aws ec2 stop-instances --instance-ids i-xxxxxxxxxxxxEach “cron” entry follows this format: minute hour day month day-of-week command
0 8 * * *    # Runs the command at 8:00 AM every day

0 20 * * * # Runs the command at 8:00 PM every dayThe asterisks (*) indicate that the command should run every day, month, and day of the week, making it a daily schedule.
The two commands in this script use AWS CLI (aws ec2 start-instances and aws ec2 stop-instances) to toggle the instance on and off based on the schedule. You need to replace i-xxxxxxxxxxxx with your actual EC2 instance ID. You can find your instance ID AWS console as shown near the beginning of this blog post. If you need additional flexibility, consider integrating AWS Lambda with EventBridge instead of relying solely on cron jobs. This would allow you to automate actions directly from AWS, improving reliability and scalability without requiring a dedicated Linux server. You can read more about this type of automation here.
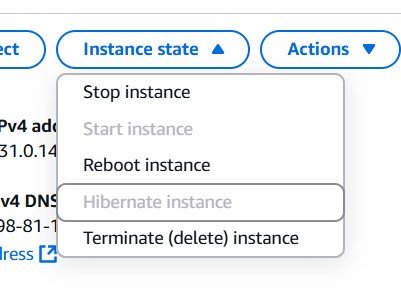
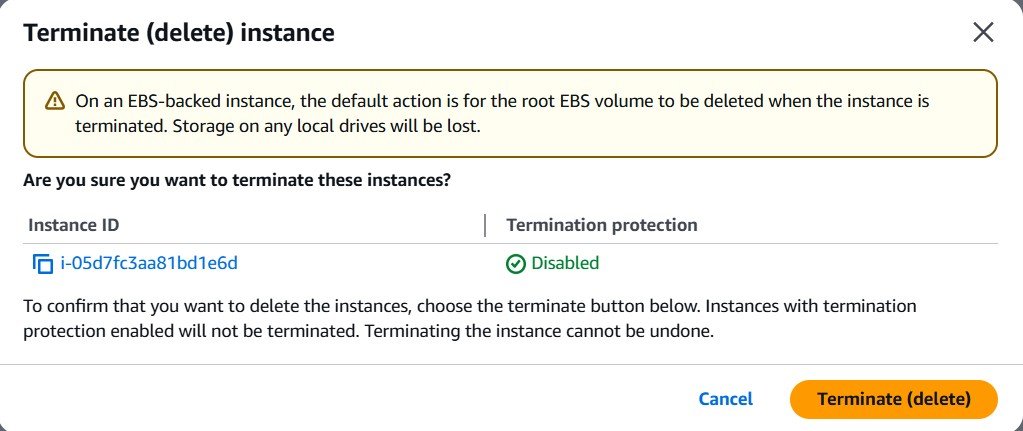
We’re done! It’s time to scrap the EC2 instance. Head back to the console and click “Instance State” -> “Terminate (delete) instance”. Consider making a backup if you want to potentially come back to this project.
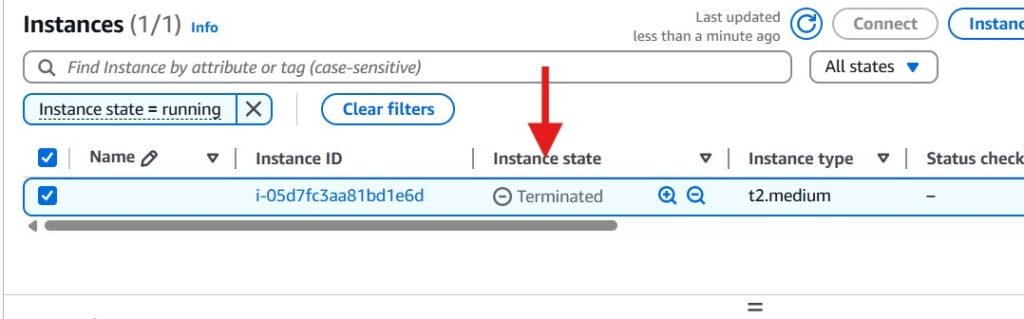
Confirm that your instance was terminated back in the console.
Conclusion
As digital threats become more sophisticated, securing passwords and cloud-based systems is no longer optional. It is a necessity. The advancement of quantum computing will reshape cybersecurity, making today’s weak passwords ineffective. By adopting strong passphrases, automating cloud deployments, and using tools such as AWS EC2 and EventBridge, individuals and businesses can protect their data against emerging risks. Implementing automation for cloud services enhances security while also reducing costs by ensuring resources are active only when needed. Whether through cron jobs, custom scripts, or AWS Lambda integrations, these solutions streamline cloud management and reinforce cybersecurity best practices.
Future authentication methods may evolve beyond traditional passwords. Multi-factor authentication, biometrics, and post-quantum cryptographic standards could become the new security foundation. Staying informed and proactive about these developments will help safeguard sensitive information in an increasingly digital world. By following modern security principles, individuals and businesses can reduce risk and build a more secure digital future. Cybersecurity should always be a priority rather than an afterthought.
Thanks for exploring this topic with me. Stay tuned for more cloud-based cybersecurity explorations!